 The architecture hosting the SME Toolkit, a project sponsored by the IFC (International Finance Corporation), a member of the World Bank Group, utilizes Linux virtual hosts, running on Citrix XenServer. To account for changing needs (specifically disk space), the decision was made to use LVM (Logical Volume Manager) to manage our permanent storage. LVM allows volumes to be dynamically resized online—no rebooting is required. This presumes, of course, that LVM is set up initially when the virtual host is created.
In my case, one of my servers was starting to run low on disk space because of unanticipated increases in the size of an index stored on disk. It would have been acceptable to resize the virtual host’s disk traditionally (with a reboot) if the virtual host had been a development or test server. However, the server in question was a production server. Downtime was not really an option I wanted to consider. Fortunately, LVM was available, and was perfect for just such a situation.
My production server had a single virtual disk, 20GB in size. I wanted to double this, and bring the total available space to 40GB. Using Citrix XenCenter (the graphical manager for XenServer), I added an additional virtual disk (20GB) to the virtual host. This is a relatively trivial operation, and is supported by most virtualization platforms without the need to reboot the virtual host (and presuming the guest OS supports this). Once the virtual host recognized the newly attached virtual disk as a device, I was able to continue.
Partition the Virtual Disk
The next step was to partition the virtual disk so that it was actually usable by the system.
Using fdisk -l, I was able to quickly determine the name of the new virtual disk. The new virtual disk, /dev/xvdb, didn’t have a valid partition table.
1 2 3 4 5 6 7 8 9 10 11 12 13 14 15 |
[root@prdsvc1 ~]# fdisk -l

Disk /dev/xvda: 21.4 GB, 21474836480 bytes
255 heads, 63 sectors/track, 2610 cylinders
Units = cylinders of 16065 * 512 = 8225280 bytes

    Device Boot      Start         End      Blocks   Id  System
/dev/xvda1   *           1          13      104391   83  Linux
/dev/xvda2              14        2610    20860402+  8e  Linux LVM

Disk /dev/xvdb: 21.4 GB, 21474836480 bytes
255 heads, 63 sectors/track, 2610 cylinders
Units = cylinders of 16065 * 512 = 8225280 bytes

Disk /dev/xvdb doesn't contain a valid partition table
|
Then, I used fdisk /dev/xvdb to create a new Linux LVM partition on the new virtual disk.
Step-by-Step
1. Primary Partition
I created a new primary partition in position 1. It started on the first cylinder (default), and ended on the last cylinder (default). This uses the full available disk space.
1 2 3 4 5 6 7 8 9 10 11 |
[root@prdsvc1 ~]# fdisk /dev/xvdb Command (m for help): n <RETURN> Command action e extended p primary partition (1-4) p <RETURN> Partition number (1-4): 1 <RETURN> First cylinder (1-2610, default 1): <RETURN> Using default value 1 Last cylinder or +size or +sizeM or +sizeK (1-2610, default 2610): <RETURN> Using default value 2610 |
2. Change Type
I changed the type of the new partition to “Linux LVM”, identified by hex code 8e.
1 2 3 4 |
Command (m for help): t <RETURN> Selected partition 1 Hex code (type L to list codes): 8e <RETURN> Changed system type of partition 1 to 8e (Linux LVM) |
3. Print & Verify
I printed out the new partition table to verify it was correct.
1 2 3 4 5 6 7 8 |
Command (m for help): p <RETURN>

Disk /dev/xvdb: 21.4 GB, 21474836480 bytes
255 heads, 63 sectors/track, 2610 cylinders
Units = cylinders of 16065 * 512 = 8225280 bytes

    Device Boot      Start         End      Blocks   Id  System
/dev/xvdb1               1        2610    20964793+  8e  Linux LVM
|
4. Write to Disk
And finally, I wrote the new partition table to disk.
1 2 3 4 5 |
Command (m for help): w <RETURN> The partition table has been altered! Calling ioctl() to re-read partition table. Syncing disks. |
Quick Note on LVM Terminology
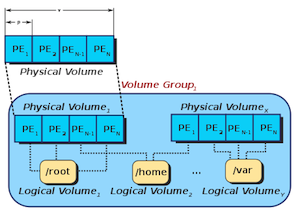
LVM defines physical volumes (PV’s) which together can be grouped into volume groups (VG’s). An example of a physical volume would be a physical hard drive, or a virtual disk drive. These physical volumes are usually divided into multiple units referred to as physical extents (PE’s). A volume group consists of at least one physical volume, and may contain several physical volumes. This volume group then has many available physical extents.
Several logical volumes (LV’s) can be created using the physical extents” available in a volume group. Physical extents are allocated to logical volumes as logical extents (LE’s). Unless mirroring is involved, there is a one-to-one mapping between physical extents and logical extents. Mirroring allows several physical extents to correspond to a single logical extent. Logical volumes are the actual disk volumes usable by the OS. In order to expand an existing logical volume, there must be unused physical extents inside the parent volume group. This can generally be accomplished by adding more physical volumes to the volume group.
This can all be a bit confusing at first, the image at the top of this post may be helpful for visualizing the working components of LVM.
Create the LVM Physical Volume, Add it to the Volume Group, & Extend the Logical Volume
Before adding a new physical volume to a volume group, LVM must be made aware of it. I did this using pvcreate /dev/xvdb1, specifying the newly created partition. I checked available physical volumes before and after this operation using pvs.
1 2 3 4 5 6 7 8 9 10 11 |
[root@prdsvc1 ~]# pvs PV VG Fmt Attr PSize PFree /dev/xvda2 VolGroup00 lvm2 a- 19.88G 0 [root@prdsvc1 ~]# pvcreate /dev/xvdb1 Physical volume "/dev/xvdb1" successfully created [root@prdsvc1 ~]# pvs PV VG Fmt Attr PSize PFree /dev/xvda2 VolGroup00 lvm2 a- 19.88G 0 /dev/xvdb1 lvm2 -- 19.99G 19.99G |
Next, I added the new physical volume to my volume group. This is called ‘extending’ the volume group. I accomplished this by executing vgextend VolGroup00 /dev/xvdb1, specifying the volume group and physical volume to use. I checked the size and free space available to the volume group before and after the operation with vgs.
1 2 3 4 5 6 7 8 9 10 |
[root@prdsvc1 ~]# vgs VG #PV #LV #SN Attr VSize VFree VolGroup00 2 2 0 wz--n- 19.88G 0 [root@prdsvc1 ~]# vgextend VolGroup00 /dev/xvdb1 Volume group "VolGroup00" successfully extended [root@prdsvc1 ~]# vgs VG #PV #LV #SN Attr VSize VFree VolGroup00 2 2 0 wz--n- 39.84G 19.97G |
When a volume group has free space, the extra space can be allocated to a new or existing logical volume. Since I wanted to increase the existing logical volume’s size, I used lvextend -l +100%FREE VolGroup00/LogVol00. This specified that I wanted to extend the named logical volume (VolGroup00/LogVol00), using 100% of the available free extents. I checked the size of the logical volume before and after using lvs.
1 2 3 4 5 6 7 8 9 10 11 12 13 |
[root@prdsvc1 ~]# lvs LV VG Attr LSize Origin Snap% Move Log Copy% Convert LogVol00 VolGroup00 -wi-ao 17.84G LogVol01 VolGroup00 -wi-ao 2.03G [root@prdsvc1 ~]# lvextend -l +100%FREE VolGroup00/LogVol00 Extending logical volume LogVol00 to 37.81 GB Logical volume LogVol00 successfully resized [root@prdsvc1 ~]# lvs LV VG Attr LSize Origin Snap% Move Log Copy% Convert LogVol00 VolGroup00 -wi-ao 37.81G LogVol01 VolGroup00 -wi-ao 2.03G |
Increasing the size of the logical volume gave the OS access to the additional space. However, this did not make it usable. I needed to resize the filesystem on the volume to actually make the newly allocated space usable. I accomplish this with resize2fs /dev/mapper/VolGroup00-LogVol00, specifying the filesystem on my logical volume. This resized the filesystem online. Running df showed the change in available disk space on the filesystem.
1 2 3 4 5 6 7 8 9 10 11 12 13 14 15 16 17 18 19 |
[root@prdsvc1 ~]# df -h
Filesystem            Size  Used Avail Use% Mounted on
/dev/mapper/VolGroup00-LogVol00
                       18G  9.7G  6.8G  59% /
/dev/xvda1             99M   23M   72M  25% /boot
tmpfs                 1.0G     0  1.0G   0% /dev/shm

[root@prdsvc1 ~]# resize2fs /dev/mapper/VolGroup00-LogVol00
resize2fs 1.39 (29-May-2006)
Filesystem at /dev/mapper/VolGroup00-LogVol00 is mounted on /; on-line resizing required
Performing an on-line resize of /dev/mapper/VolGroup00-LogVol00 to 9912320 (4k) blocks.
The filesystem on /dev/mapper/VolGroup00-LogVol00 is now 9912320 blocks long.

[root@prdsvc1 ~]# df -h
Filesystem            Size  Used Avail Use% Mounted on
/dev/mapper/VolGroup00-LogVol00
                       37G  9.7G   26G  28% /
/dev/xvda1             99M   23M   72M  25% /boot
tmpfs                 1.0G     0  1.0G   0% /dev/shm
|
And Voilà ! More free space. This allowed my server to continue operating without interruption. No reboot was required, and more disk space became available—an elegant and effective solution.
Excellent post. Thanks
Kudos for the detailed post that saved me several additional hours of searching for this step-by-step how-to.
NOTES:
1) With XenServer XenCenter 6.0.2, I found that there was no option but to reboot after adding additional storage to the VM. Not a big deal for my scenario, but it sure would be nice to be able to do this in the future without having to reboot. If you know of any tips, please pass them along.
2) My vm had a ‘-‘ in the name (“dev-web”), which resulted in the same name being applied to the volume group (“dev-web”) when created. Reading your post, it became obvious that the “-” is a special character in the resize2fs command used to delineate the logical volume group from the logical volume so that I had to double-up on the dashes to end up with “resize2fs /dev/mapper/dev–git-root”. Hopefully this tip will help someone else who is loose with their use of dashes.
Nicely written post. I just wanted to mention however that you don’t need to partition the disk at all. Once you can see your new disk you can simply add the physical device:
pvcreate /dev/xvdbAlso if you wanted to extend this disk in the future it would be easier, as you would not need to worry about partitions and using fdisk, which might need a reboot to reread the partition table even with the use of partprobe.