
At one time or another, how many of you have thought, “I’m glad I get to do mobile development because that means I don’t have to deal with CSS”? I’m not going to lie. I’ve had that thought more than once. And, while it’s true that by working in the mobile space, we have escaped the misery of CSS, the reality is that we still suffer from many of the same problems that CSS was designed to resolve. We still have to decide: How do we separate aesthetics from behavior and function in our applications?
Why is This a Problem?
Before I get into describing my technique, let me first say that I think Apple is doing the development community a disservice by pushing people to use Interface Builder for styling views. I know it’s possible to only use IB for positioning and constraining view elements, and then apply style programmatically. However, I don’t believe the vast majority of people are doing that.
My biggest problem with Interface Builder is that it does not facilitate reuse. Colors, font sizes, margins, etc., are essentially hard-coded within the GUI over and over again, for every view. What happens if your app gets redesigned and you need to change colors or margins on every view? You have go through every storyboard, sifting through panels of property lists to find every occurrence of the old and change it to the new. Yuck.
Design-First Mobile App Architecture
So, let’s say you bite the bullet and decide to programmatically style your UI. You still have to decide how to organize your “style” code. There are a lot of ways to go about it, and I don’t think there is a silver bullet solution that will work perfectly for every app or every team.
The most important thing is to think through how you want to handle visual design from the very beginning of the development process. Come up with a plan from the beginning, and stick to it.
I call my approach Design-First because I think design should be treated as a first-class citizen in the application architecture—not an afterthought.
Let’s start by taking a look at some code that styles a button and a text field in a view.
// In DashboardView.swift
let emailAddress = UITextField()
emailAddress.text = "Enter email"
emailAddress.textColor = UIColor(red: 74.0, green: 63.0, blue: 99.0, alpha: 1.0)
emailAddress.backgroundColor = UIColor(red: 94.0, green: 23.0, blue: 19.0, alpha: 1.0)
self.addSubview(emailAddress)

let submitButton = UIButton(type: .RoundedRect)
submitButton.setTitle("Submit", forState: .Normal)
submitButton.backgroundColor = UIColor.whiteColor()
submitButton.setTitleColor(UIColor.blueColor(), forState: .Normal)
self.addSubview(submitButton)
This code creates the text field and the button and applies colors and fonts to them. It’s really no better than the Interface Builder approach because the colors and fonts are hard-coded right there in the view. Any other view needing the same colors or font properties would have to redefine them. Doing an application-wide redesign would be painful.
To improve on this, we could create a common style class (or master style) that contains definitions of the colors used in our app. This gives us the ability to reuse definitions throughout the app.
class MasterStyle {
    static let dashboardSubmitButtonTextColor = UIColor(red: 74.0, green: 63.0, blue: 99.0, alpha: 1.0)
    static let dashboardSubmitButtonBackground = UIColor(red: 94.0, green: 23.0, blue: 19.0, alpha: 1.0)
    static let dashboardEmailAddressTextFieldTextColor = UIColor.blueColor()
    static let dashboardEmailAddressTextFieldBackgorundColor = UIColor.whiteColor()
}

// DashboardView.swift can now look like:
let submitButton = UIButton(type: .RoundedRect)
submitButton.setTitle("Submit", forState: .Normal)
submitButton.backgroundColor = MasterStyle.dashboardSubmitButtonBackground
submitButton.setTitleColor(MasterStyle.dashboardSubmitButtonTextColor, forState: .Normal)
self.addSubview(submitButton)
This approach is decent, but the problem is that the master style class quickly gets bloated with lots of definitions. The organization of that file gets difficult to maintain, and adding new styles for specific views can become burdensome.
My recommended approach takes this one step further by breaking the style into view-specific style classes. These style classes provide aliases for properties or functions that are defined in a master style class as a means of organization. All colors should still be defined in a master style class, thus allowing them to be modified globally. The master style can also contain functions that return groups of style properties for common UI elements. For example, it might have a function called commonButtonStyle() that returns a collection of text color, background color, border color, etc.
The code below shows a more complete example of how this might look in an application. I created two classes, ButtonStyle and TextFieldStyle, that hold onto a background color and a text color. My MasterStyle has static functions that return instances of these classes with the colors populated.
class MasterStyle {
    static let primaryBackgroundColor = UIColor.whiteColor()

    // Buttons
    static let primaryButtonBackgroundColor = UIColor.clearColor()
    static let primaryButtonTextColor = UIColor.blueColor()
    static func commonButtonStyle() -> ButtonStyle {
        return ButtonStyle(
            backgroundColor: primaryButtonBackgroundColor,
            textColor: primaryButtonTextColor
        )
    }

    // Text Fields
    static let primaryTextFieldBackgroundColor = UIColor.clearColor()
    static let primaryTextFieldTextColor = UIColor.blueColor()
    static func commonTextFieldStyle() -> TextFieldStyle {
        return TextFieldStyle(
            backgroundColor: primaryTextFieldBackgroundColor,
            textColor: primaryTextFieldTextColor
        )

    }
}

extension UIColor {
    static func designFirstLightGray() -> UIColor {
        return UIColor.grayColor().colorWithAlphaComponent(0.5)
    }
}

class ButtonStyle {
    var backgroundColor: UIColor
    var textColor: UIColor

    init(backgroundColor: UIColor, textColor: UIColor) {
        self.backgroundColor = backgroundColor
        self.textColor = textColor
    }
}

class TextFieldStyle  {
    var backgroundColor: UIColor
    var textColor: UIColor

    init(backgroundColor: UIColor, textColor: UIColor) {
        self.backgroundColor = backgroundColor
        self.textColor = textColor
    }

    func customize(block: (TextFieldStyle) -> ()) -> TextFieldStyle {
        block(self)
        return self
    }
}
The DashboardStyle class can now access the common style groups in the MasterStyle and alias them for view-specific elements. I also included an example of how the DashboardStyle could apply a customization to the common style if that was needed.
The great thing about about this approach is that you never have to search to find the code that is styling a specific UI element on a view. It’s always in a deterministic, easy-to-find place.
class DashboardStyle {
    static let backgroundColor = MasterStyle.primaryBackgroundColor
    static let submitButton = MasterStyle.commonButtonStyle()
    static var emailAddressTextField: TextFieldStyle = MasterStyle.commonTextFieldStyle().customize {
        $0.backgroundColor = UIColor.designFirstLightGray()
    }
}
Finally, the view code only contains references to its own style class–not the master style.
// In DashboardView.swift
let emailAddress = UITextField()
emailAddress.text = "Enter email"
emailAddress.textColor = DashboardStyle.emailAddressTextField.textColor
emailAddress.backgroundColor = DashboardStyle.emailAddressTextField.backgroundColor
self.addSubview(emailAddress)

let submitButton = UIButton(type: .RoundedRect)
submitButton.setTitle("Submit", forState: .Normal)
submitButton.backgroundColor = DashboardStyle.submitButton.backgroundColor
submitButton.setTitleColor(DashboardStyle.submitButton.textColor, forState: .Normal)
self.addSubview(submitButton)
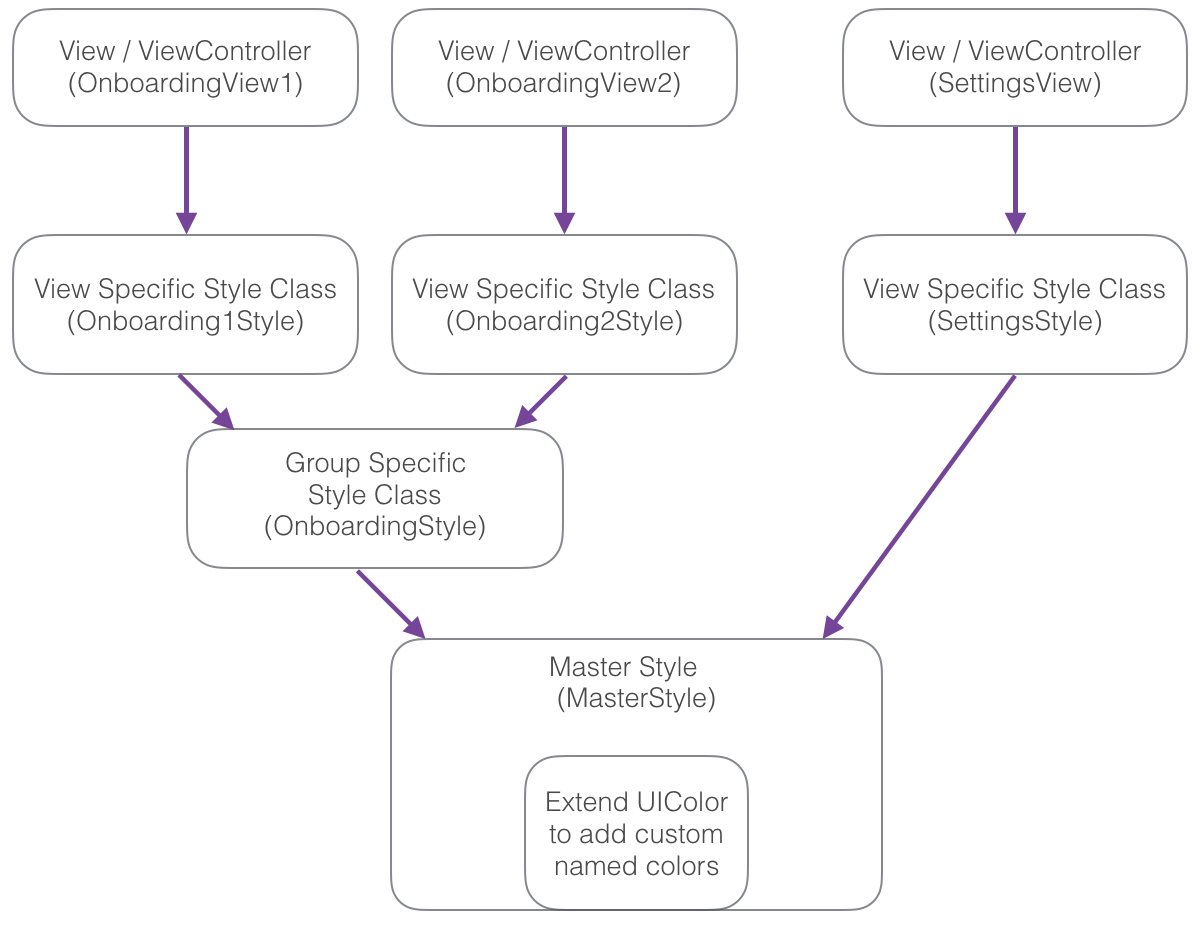
The graphic below shows how this idea could be extended to include a group-specific class that contains style definition for views that have something in common. For example, if your app has an on-boarding process that has a different look than the rest of your app, you might create an OnboardingStyle class.
Takeaway
This approach might not be favorable to all developers. I realize that everyone has their own programming style and ways of doing things, and I don’t expect it to be a one-size-fits-all approach. The main point I hope you leave with is that structuring the “visual design” code in your app is important. It may seem like a tiny portion of your development effort, but it certainly adds up to a lot of code over time, and it can get out of hand very easily.
If you’re starting a new application, talk through your approach with your team and settle on something that fits your needs. If you work with a designer, bring them into the conversation as well. Try to think of ways to cleanly encapsulate the artifacts provided by your designer directly into your app architecture. Believe me, you will be happy in the long run!
What About Android?
I specifically targeted iOS in this post because UI programming in Android is so vastly different. Android seems to have taken a step in the right direction in regards to UI programming, although I think their Theme system is a nightmare to reason about.
See the Source
The complete source code for the snippets used in this post is available on Github.