This post is the second in a two-part series on the process Atomic Object uses to optimize images for the web. To review, our basic image optimization process at Atomic follows these four basic steps:
- Eliminate unnecessary images
- Choose the appropriate image format
- Scale image to the correct dimensions
- Apply compression
My first post covers eliminating unnecessary images and choosing the right format. It can be found here. In this post, I’ll cover Steps 3 and 4 of the guidelines.
Step 3 – Scale Image to the Correct Dimensions
One of the easiest optimizations is to ensure that your image dimensions are no larger than they need to be. For raster image types (JPEG, PNG, GIF), larger image dimensions result in larger file sizes. These, in turn, take longer to deliver over the web. By serving the image at the exact dimensions at which it will display*, we ensure that we aren’t delivering any unnecessary pixels to the browser.
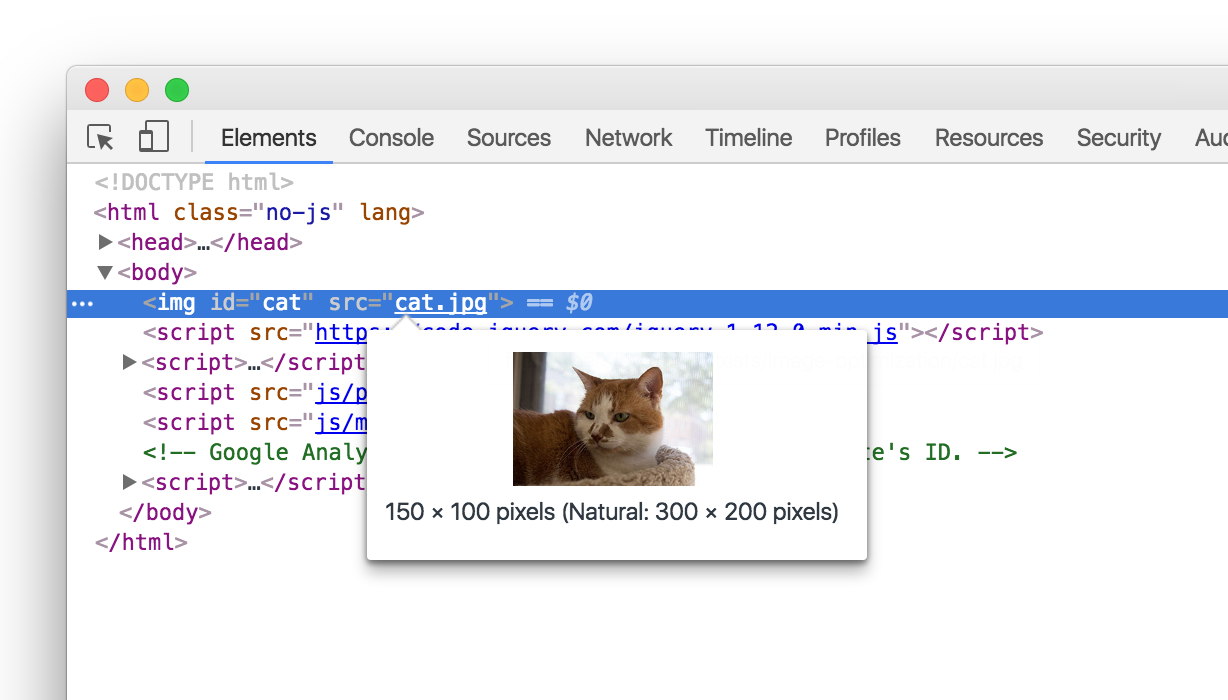
It’s easy to check whether your images are the correct size. If you are a Chrome user, simply open your Dev Tools and inspect the HTML of your page. When you hover over an image, Chrome will show both the display size and the actual size of the image. Make sure that the actual image size matches the displayed image size.

*This principle still applies for retina websites, but instead of trying to match the exact display size, we would make our image equal to double the display size.
Step 4 – Apply Compression
By reaching Step 4, we know we have already determined our need for an image (as opposed to CSS), picked the most appropriate file type, and scaled our images to the exact display dimensions.
The final step in our process is to apply compression techniques to reduce our final file size. We can choose from a number of tools and techniques for each file type.
It’s important to realize that there are two categories of image compression. Lossless compression minimizes file size while ensuring that there is no loss in image quality. Alternatively, lossy compression can often result in more dramatic file size reduction, but it also results in some degradation of image quality. Both types of compression have their advantages, so the choice depends largely on individual circumstances.
There are a number of popular compression tools available. Below are the main tools and techniques we use at Atomic Object. By no means is this an exhaustive list of everything available. Feel free to experiment and find what works best for your organization.
Tools and Techniques
SVG
Tools:
- svgo – svgo is a free command-line tool that strips unnecessary information such as metadata, comments, hidden elements and more from an SVG without affecting quality.
- Adobe Illustrator – Illustrator provides powerful compression options when saving SVGs, allowing you to strip excess XML tags, remove unnecessary metadata, and reduce the decimal precision of an SVG to dramatically reduce file size.
More Techniques:
- Embedding – Unlike other image formats, SVGs provide the advantage of being directly embeddable within HTML and CSS. This keeps the browser from placing additional external file requests to the server, thereby saving download time and speeding page loading.
PNG
Tools:
- Pngcrush is a free and open-source command-line tool. It losslessly compresses PNGs by reducing the size of the data in the IDAT data stream. It is automatically included with Xcode.
More Techniques:
- Posterization – This is a lossy technique that reduces the number of colors contained within the image, thus allowing for better compression. Photoshop allows you to adjust the level of posterization to reduce PNG image size (select Image > Adjustments in the menu).
JPEG
Techniques:
- Quality reduction – As JPEG is a lossy file format, most image editors allow you to adjust the level of compression, which in turn affects the level of quality. In Photoshop, this can be done by adjusting the “Quality” slider in the “Export As…” dialog.
An effective technique is to create the JPEG at retina sizes (twice as large as it will appear on the page) and reduce the image quality considerably. We have found that at retina sizes, quality can be adjusted down to 30% or lower while retaining the image’s sharpness on normal screens. Meanwhile, the small pixel size of retina screens makes the lower quality unnoticeable.
Optimized Images for a Better Webpage
By following the four steps laid out in this series, you can optimize your images for the web for faster webpages and better SEO. Do you use other steps to ensure your photos are optimized? If so, I’d love to see them in the comments.
I am still looking for a tool that would tile a given image to optimal size, using different formats and techniques, e.g. using JPEG and PNG tiles for different parts of the image, with adjustable quality setting (lossy compression and color reduction).
I am also interested in fractal formats, although they seem to have vanished or only apply to niches (like JPEG2000 Wavelet compression).
Also FLIF (http://flif.info/) and WebP are quite interesting.
Ultimately, I believe that image and video compression will merge.