Having devices of varying sizes is great for allowing users to choose what is right for them, but supporting all those combinations of resolution and pixel density can be a hassle. Even if you develop all of your original artwork in some vector format, you typically have to export it in PNG format at various sizes and densities.
This may be manageable if you only have a few images in your application, but it can quickly become unwieldy and tedious as the number of images grows. Additionally, if you have any full-screen (especially iPad-sized) images, having redundant copies of the same image at multiple densities will quickly increase the overall storage space requirement of your application.
Alternatively, you can just use vector images directly in your application. At this point, the only vector format Xcode supports is the PDF. You can add a PDF to the asset manager and it will show up in Interface Builder as expected. However, what is actually happening when you build your application is that those nice vector images are being rasterized at compile time. So at runtime, you’re still dealing with fixed-size PNG images.
This means you are still stuck with the space overhead of multiple redundant images. And if your app does anything with the image size at runtime, you will still notice some pixelation. This is where SVGs come in.
SVGs to the Rescue
If you’re not yet familiar with the SVG, it is an XML-based vector image format, meaning that its file size is relatively small compared even to PNG. As a vector image, it only contains instructions for redrawing the image, rather than the actual image bitmap data. Suffice it to say, you only need to include one copy of an SVG in your app. This can greatly reduce the storage requirement of your app, as well as simplify management of your app’s artwork.
Since Xcode does not support SVGs, you’ll need to find a third-party library to add SVG support to your app. The one I’ve been using in my latest iOS project is SVGKit. It has a caching system to reduce the overhead of parsing the SVG files, and it renders using CoreAnimation layers in order to avoid most performance issues.
Layout Using Interface Builder
If you are designing your layout using Interface Builder, you can add an image view for your SVG, but you won’t be able to see the image until runtime. Since Xcode and Interface Builder do not support SVGs directly, we’ll have to employ a small work-around.
1. In Interface Builder, add a new View object to your interface (this is near the end of the list of available objects).
2. Constrain this new view to your other views as usual. The great thing about using vector images is that you can be flexible about the size. However, I would still recommend adding an aspect ratio constraint that matches the aspect ratio of the source image. This will prevent the image from being distorted by the other constraints.
 3. Change the class of the view to SVGKFastImageView. This won’t affect its appearance at design time, but when the nib is loaded at runtime, the view will be an instance of this class.
4. Add an IBOutlet to your view controller class and connect it to the view added in Step 1.
5. Load the desired image into the view in code. For example:
#import "ViewController.h"
#import <SVGKit/SVGKit.h>

@interface ViewController ()
@property (nonatomic, strong) IBOutlet SVGKImageView *goombaView;
@end

@implementation ViewController

- (void)viewDidLoad {
    [super viewDidLoad];
    // Do any additional setup after loading the view, typically from a nib.

    self.goombaView.image = [SVGKImage imageNamed:@"goomba"];
}

@end
Layout Using Code
If you are setting up your interface by constructing view objects in code, then the process is perhaps a little more in line with what you are already doing. Something like this will give you an SVG image view and load an image into it:
#import "ViewController.h"
#import <SVGKit/SVGKit.h>

@interface ViewController ()
@property (nonatomic, strong) SVGKImageView *goombaView;
@end

@implementation ViewController

- (void)viewDidLoad {
    [super viewDidLoad];
    // Do any additional setup after loading the view, typically from a nib.

    self.goombaView = [[SVGKFastImageView alloc] initWithSVGKImage:[SVGKImage imageNamed:@"goomba"]];
}

@end
Although the above code will work, without any constraints, the image will be sized according to the SVG’s internal dimensions. So you will still want to add some constraints to control the image size.
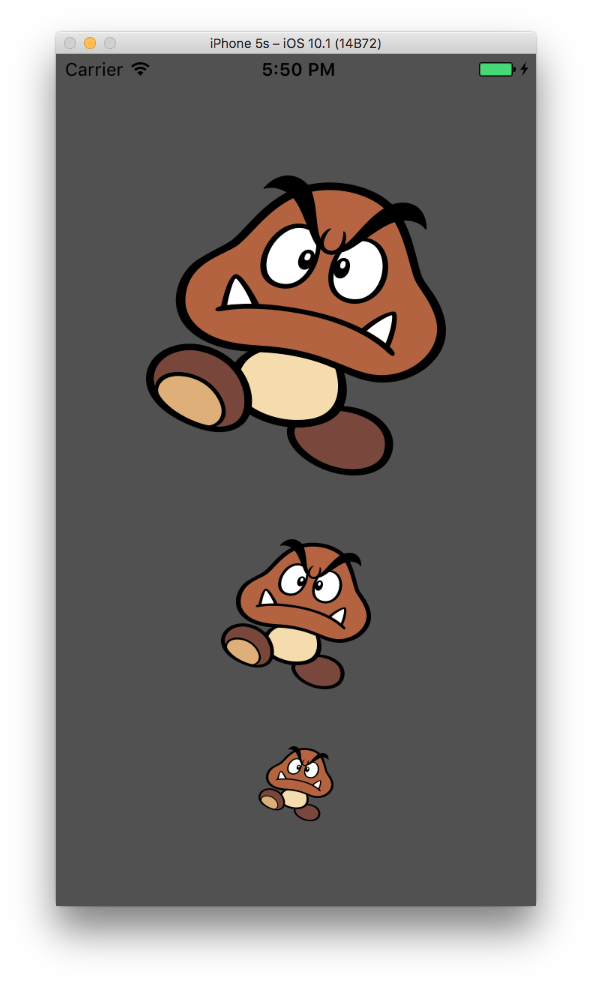
If you were to add a few more identical image views with different sizes, you could see that the image scales with no loss of quality:

Additional Tips
 If you find that your layout is getting messed up when the SVG image is loaded, trying playing with the compression resistance and content hugging priorities of the image view. These can usually be set to 1 (the smallest value) in order to ensure that the image view only gets its size from other constraints and not its intrinsic size.
Finally, since the SVGs in my project are a mix of light and dark, large and small, etc., trying to preview them in Finder is not very easy. So I use the following script to generate an HTML page with a preview of all of the SVG images in the current directory. Feel free to use it and adapt it however you wish!
#!/usr/bin/env ruby

def main()
    output_header
    output_controls
    output_images
    output_footer
end

def output_controls()
    puts "<div class=\"toolbox\">"
        puts "<button id=\"toggle_darkness\">Dark/Light</button>"
        puts "<button id=\"size_decrease\">Smaller</button>"
        puts "<button id=\"size_increase\">Larger</button>"
        puts "<button id=\"toggle_border\">Border</button>"
    puts "</div>"
    puts "<div class=\"toolbox-spacer\"></div>"
end

def output_images()
    Dir.glob('*.svg').each do |filename|
        image_name = filename.sub('.svg', '')

        puts "<div class=\"icon_box\">"
            puts "<img class=\"icon\" src=\"#{filename}\"><br>"
            puts "<span class=\"icon_caption\">#{image_name}</span>"
        puts "</div>"
    end
end

def output_header()
    puts <<END_HEADER
    <html>
    <head>
    <style type="text/css">
    body {
        background: #EEE;
        font-family: sans-serif;
        font-size: 10pt;
        font-style: italic;
        margin: 0;
    }
    .dark {
        background: #111;
        color: white;
    }
    .icon_box {
        text-align: center;
        float: left;
        margin: 1em 1em 2em 1em;
    }
    .icon {
        width: 100px;
        height: 100px;
        margin-bottom: 0.5em;
    }
    .bordered {
        box-shadow: 0 0 1px #888;
    }
    .toolbox {
        background: #555;
        padding: 1em;
        width: 100%;
        position: fixed;
    }
    .toolbox-spacer {
        padding: 1em;
    }
    button {
        font-size: 12pt;
    }
    </style>
    <script src="https://ajax.googleapis.com/ajax/libs/jquery/3.1.0/jquery.min.js"></script>
    <script>
        $(function() {
            var toolbox_height = $('.toolbox').height()
            $('.toolbox-spacer').height(toolbox_height)

            $('#toggle_darkness').click(function() {
                $('body').toggleClass('dark')
                $('.icon').toggleClass('dark')
                $('.icon_caption').toggleClass('dark')
            })
            $('#size_increase').click(function() {
                var icons = $('.icon')
                var size = icons.height()
                icons.height(size * 2).width(size * 2)
            })
            $('#size_decrease').click(function() {
                var icons = $('.icon')
                var size = icons.height()
                icons.height(size / 2).width(size / 2)
            })
            $('#toggle_border').click(function() {
                $('.icon').toggleClass('bordered')
            })
        })
    </script>
    </head>
    <body>
END_HEADER
end

def output_footer()
    puts <<END_FOOTER
    </body>
    </html>
END_FOOTER
end

main