

Automated testing is an essential part of every development project we undertake at Atomic Object. In the past year, I have worked on multiple iOS applications in Swift. Here are four things I’ve discovered that make unit and integration testing more convenient and flexible.
1. Asynchronous Testing with waitForExpectations
Most applications that are reasonably complex contain asynchronous code. A common pattern is sending non-blocking HTTP requests out to a remote API, then taking some action when the requests come back. Two approaches I’ve used in these scenarios are callbacks and NSNotificationCenter messages.
Apple’s waitForExpectations gives us a straightforward way to set up an expectation that something will happen, then wait a specified amount of time. If the specified time passes without that expectation being fulfilled, a test failure will occur. In this first example, I demonstrate how to use waitForExpectations with callback handlers:
let expectation = self.expectation(description: "Successful request")

subject.apiRequest { (response) in
    XCTAssert(response.isSuccess)
    expectation.fulfill()
}

waitForExpectations(timeout: 2, handler: { _ in })
The above code sets up an expectation, then calls the asynchronous function apiRequest(). Finally, we follow up with waitForExpectations. If expectation.fulfill() is not called within the timeout’s timeframe (in this case, two seconds), the test will fail with the defined description in the test runner. Very simple!
Another common pattern I’ve used in app development is to send out a message using NSNotificationCenter in response to an “interesting” event. waitForExpectation also supports this case:
expectation(forNotification:"SomeKey", object: nil, handler: nil)

// Do something that should trigger the notification

waitForExpectations(timeout: 2) { _ in }

// Assert app has changed in the expected manner in response to the notification
In the above snippet, we create the expectation that a notification with the identifier SomeKey will occur, then call code that should trigger the notification. After the notification has occurred, the test code passes through the blocking waitForExpectations method and continues. I have used this pattern to test that my application responds correctly to notifications that are triggered by asynchronous background events (e.g., polling an API).
2. Pre-Loading Application State During UITesting
When writing UITests in Swift, it is often desirable to set up some application state prior to app launch. However, since this is a UITest, we can’t directly manipulate the application state via code. To solve this problem, developers can pass information along to the application in a UITest using launch arguments:
app = XCUIApplication()
app!.launchArguments.append("UITesting")
app!.launch()
In the above code, before launching the app in a UITest scenario set, append a string telling the application that we’re in a testing mode (the string could be anything). Then, in our AppDelegate.swift, we can test for the presence of that flag and set things up to specifically facilitate testing:
func application(_ application: UIApplication, didFinishLaunchingWithOptions launchOptions: [UIApplicationLaunchOptionsKey: Any]?) -> Bool {
    if ProcessInfo.processInfo.arguments.contains("UITesting") {
        setupForTesting()
    } else {
        setUp(application)
    }

    return true
}
If ProcessInfo.processInfo.arguents contains the special string, we can react to the fact that the app is running as a UITest. I’ve used this to do things like bypass required authentication steps for apps that require logins.
3. Assertions on UIImage
Unit testing our UIs in iOS often boils down to calling code, then making assertions on UI component state (e.g., testing if a button is enabled or not). But what if we want to check if a custom UI element is showing the correct image given various inputs? I have come across this scenario when developing a custom “mutli-select” component that showed checkboxes and displayed a “checked” or “unchecked” image. The images are included in the app’s Assets.xcassets file.
In this case, the UI had to display checks based on a data model that wasn’t explicitly tied to the custom control, and I didn’t want to add state to the UI component just to facilitate unit testing. I found a nice workaround using UIImagePNGRepresentation, which returns Data that can be deeply compared against other Data.
let isUnchecked   = UIImagePNGRepresentation(UIImage(named: "checkboxUnchecked")!)
let isChecked     = UIImagePNGRepresentation(UIImage(named: "checkboxChecked")!)

var imageData = UIImagePNGRepresentation(cell.uiImageView!.image!)
XCTAssertEqual(imageData, isChecked)

cell.toggleCheckbox()

imageData = UIImagePNGRepresentation(cell.uiImageView!.image!)
XCTAssertEqual(imageData, isUnchecked)
The above snippet tests that a cell containing a UIImageView called uiImageView is actually displaying the image checkboxChecked initially, then after toggleCheckbox is called, the image view is displaying the image checkboxUnchekced. Using UIImagePNGRepresentation, we can convert a UIImage to a Data object that is directly comparable to other Data objects (as opposed to comparing UIImage instances, which will be references in this case and not match).
4. Record Tests for UITesting
This last tip is not really specific to Swift, but more of a PSA for developers who find Apple’s UITest framework difficult to use. Personally, I have had trouble remembering the various selectors and how to access UI elements without the help of accessibility identifiers–which aren’t always available in dynamic UIs. Thankfully, Apple gave us a nice way to record a test automatically within a UITes. It’s a small red button located in Xcode’s debug navigator:
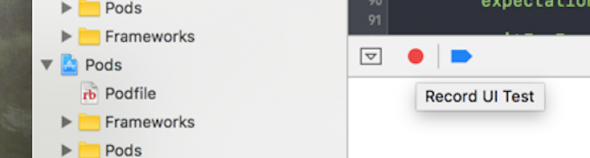
Clicking the red button will launch the app and record–in UITest code–the actions that the developer takes interactively. After you carry out the operations you wish to test, the code that was recorded can be tweaked and refactored into an actual test case. This approach is also nice when trying to discover how to select dynamic UI elements on the screen when Apple’s documentation isn’t helping.
These are just a few of the tools I’ve used to make life a little easier and code more correct. I’d love to hear other approaches you have used for testing iOS applications in Swift!