
Visual Studio Code is an excellent editor, with a ton of room for customization. As a recent convert from Emacs, I appreciate the ability to customize my editor through the form of extensions. Creating an extension is quite simple, if none that fit your needs are available in the marketplace.
The “Hello World” example from Microsoft is quite good, so I would recommend reading it if you want a deeper explanation of each of the steps. However, I would like to take this opportunity to show you specifically how to create a Touch Bar extension for a MacBook.
What You Need
- Visual Studio Code 1.17 or greater
- A MacBook with a Touch Bar
- Node.js and npm installed and in your path
Getting Started
The VS Code team has kindly created an extension generator, which will create the necessary files and folders, including the Hello World extension source code, package.json, launch.json, and tasks.json for additional convenience.
Run the following to install Yeoman and the VS Code extension generator and to create a “Hello World” extension in the current directory:
npm install -g yo generator-code
yo code
This will open the Yeoman interface and allow you to choose a few options for your extension.
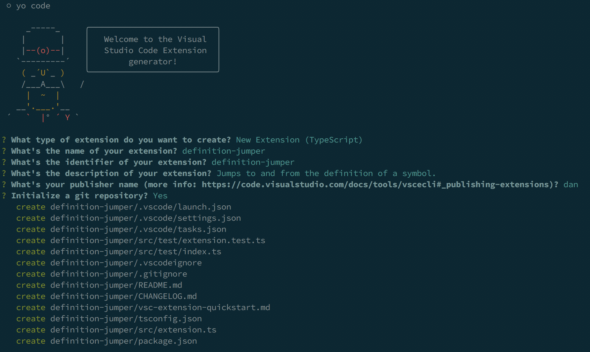
I’ve been using TypeScript for the last several months, so I chose this rather than JavaScript. Go with whatever makes you more comfortable, but if you have no preference, I would strongly recommend using TypeScript.
With the absence of the function keys on my keyboard, and without adding custom keybindings (which would be easier, but way less exciting), I would like a quicker and more consistent way to jump to declaration (F12) and back (CTRL+-). Since I’m not very good at naming things, I’m going to name this “definition-jumper.”
I just went with the defaults for the next several prompts, but enter whatever you would like.
cd to the directory, perform an “initial commit” if desired, and open the directory in VS Code. If you have VS Code CLI in your path, run code . to open the current directory.
Running the Extension
Now that we have the project open, take a minute to explore its structure.
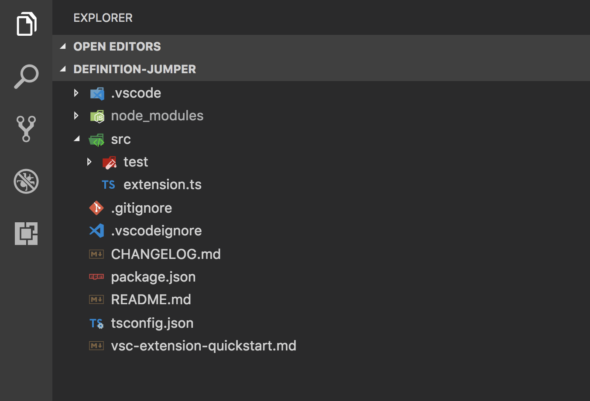
We will be working in a few notable files:
src/extension.tsis where we will implement our extension.package.jsonis where we will declare the extension and the capabilities.
As you can see, the architecture of an extension is quite simple, although I haven’t worked on any large-scale extensions myself.
To run the application, press F5 (or the Play button on your Touch Bar). This will start a debugging session in the current VS Code window, where you can set breakpoints and see console output. It will open another VS Code window (the Extension Development Host) with the extension active.
The “Hello World” extension can be run be opening the command palette (CMD + SHIFT + P) and typing in “Hello World.” Now we’re ready to write our own functionality.
Adding Custom Functionality
As I mentioned earlier, I would like a way to jump to declaration and back quickly. Let’s begin by adding the functionality to jump to the declaration.
In the extension.ts, you will see a line containing: vscode.commands.registerCommands. This looks like a good place to start. Let’s replace the implementation with:
let disposable = vscode.commands.registerCommand('extension.sayHello', () => {
     vscode.commands.executeCommand('editor.action.goToDeclaration')
});
If you’re still debugging the extension, reload the Extension Development Host window. Otherwise, run the extension again. Since we didn’t change the way the functionality is activated, we will still have a “Hello World” command available to use. If you move your caret above a symbol and run the command “Hello World” again, rather than seeing a message pop up, you will jump to the declaration of the symbol.
Since our goal is to create a Touch Bar extension (and this is a pretty weird way to jump to the definition), let’s change how we invoke our action and add a button on the Touch Bar.
Open package.json and add
"menus": {
    "touchBar": [
        {
            "command": "extension.sayHello",
            "group": "editing"
        }
    ]
}
right after commands in the contributes section.
This will add a button with the text “Hello World” to the Touch Bar. Let’s take a moment to get rid of the “Hello World” text and rename the “sayHello” action to “jumpTo” in both package.json and extension.ts.
So far, we haven’t changed much. The activate function of extension.ts looks like this:
export function activate(context: vscode.ExtensionContext) {
    let disposable = vscode.commands.registerCommand('extension.jumpTo', () => {
        vscode.commands.executeCommand('editor.action.goToDeclaration')
    });
    context.subscriptions.push(disposable);
}
and the contributes section of package.json looks like this:
"contributes": {
    "commands": [{
        "command": "extension.jumpTo",
        "title": "Jump To"
    }],
    "menus": {
        "touchBar": [
            {
                "command": "extension.jumpTo",
                "group": "editing"
            }
        ]
    }
},
Try it out now. You should see a button on the Touch Bar with the text “Jump To.”

Now, we can create a “Jump Back” button. Feel free to copy the “Jump To” declaration and implementation in the package.json and extension.ts, respectively. Replace the “JumpBack” command with workbench.action.navigateBack. Don’t forget to add it to the subscriptions as well.
The activate function in the extension.ts should look like this now:
export function activate(context: vscode.ExtensionContext) {
    const jumpTo = vscode.commands.registerCommand('extension.jumpTo', () => {
        vscode.commands.executeCommand('editor.action.goToDeclaration')
   });
    const jumpBack = vscode.commands.registerCommand('extension.jumpBack', () => {
        vscode.commands.executeCommand('workbench.action.navigateBack')
   });
    context.subscriptions.push(jumpTo, jumpBack);
}
Adding Custom Icons
Let’s take this a step further by adding some icons. One option is to replace the title in package.json with unicode characters or emojis, but I would rather use a custom icon.
- Find or create two icons (feel free to use mine that I quickly created in Sketch). I would recommend PNGs for the transparent backgrounds. Following Apple’s guidelines, center the square icon and make it 60% of the full image.
- Create a directory called “assets” in the root of your project.
- Move the PNGs to the
assetsdirectory. - Add the paths to the icons below the titles for each button in the
package.json.
And that’s it!

The important parts of the package.json look like:
{
    "name": "definition-jumper",
    ....,
    "activationEvents": [ "*" ],
    "contributes": {
        "commands": [
            {
                "command": "extension.jumpBack",
                "title": "Jump Back",
                "icon": "./assets/JumpBack.png"
            },
            {
                "command": "extension.jumpTo",
                "title": "Jump To",
                "icon": "./assets/JumpTo.png"
            }
        ],
        "menus": {
            "touchBar": [
                {
                    "command": "extension.jumpBack",
                    "group": "editing"
                },
                {
                    "command": "extension.jumpTo",
                    "group": "editing"
                }
            ]
        }
    },
    ...,
}
and the extension.ts looks like:
'use strict';
import * as vscode from 'vscode';
export function activate(context: vscode.ExtensionContext) {
    const jumpTo = vscode.commands.registerCommand('extension.jumpTo', () => {
        vscode.commands.executeCommand('editor.action.goToDeclaration')
   });
    const jumpBack = vscode.commands.registerCommand('extension.jumpBack', () => {
        vscode.commands.executeCommand('workbench.action.navigateBack')
   });
    context.subscriptions.push(jumpTo, jumpBack);
}

export function deactivate() {
}
Installing the Extension
To install the extension locally, copy the project to ~/.vscode/extensions/definition-jumper:
cd .. && cp -r definition-jumper ~/.vscode/extensions
Now, when you fire up Visual Studio Code, you will have two buttons that will jump to the definition and back.
Thanks! Easy to follow and complete!