In my last post, I gave an overview of Amazon’s tools for building Internet of Things devices and discussed the unique features that Amazon brings to the IoT space. Amazon has a lot to offer, but figuring out exactly which tools or components you need—and how to make them work together—can be challenging. If you want a more turnkey, off-the-shelf solution, you may want to consider Blynk.
Blynk is a very interesting company. They were born out of a Kickstarter campaign, and their mission is to make it as simple as possible to get an IoT project with mobile app integration up and running. To that end, they have completely taken software development out of the app development process by creating a drag-and-drop GUI tool for building app interfaces. Sounds a bit fishy, right? I had to give it a try!
Making an App with Blynk
To build your very own IoT app, you start by downloading the Blynk app. You can find it in the AppStore or Google Play.
Once you open the app and create an account, you can start creating your first project. From what I can tell, a project is meant to contain all the functionality for a given device. An app can contain one or more projects. So you could build a custom home automation app, and within it, you could interact with one project for controlling your irrigation system and another for controlling your garage door.
To create a project, you just pick a name, a device hardware platform (more on this later), and a connection type.
I’ve experimented with WiFi and Ethernet connections, but Blynk also supports USB, GSM, Bluetooth, and BLE. Once you’ve created your app, you will see a blank project canvas.
Setting up Widgets
The canvas is a grid to which you can add widgets to build your user interface. To add a widget, tap anywhere on the grid, and the Widget Box menu will be displayed.
Here, you will find a long list of components that you can add to your app. Blynk provides components for controlling state (sending data or events), displaying data, presenting notifications, sending emails, managing lists of devices, and more.
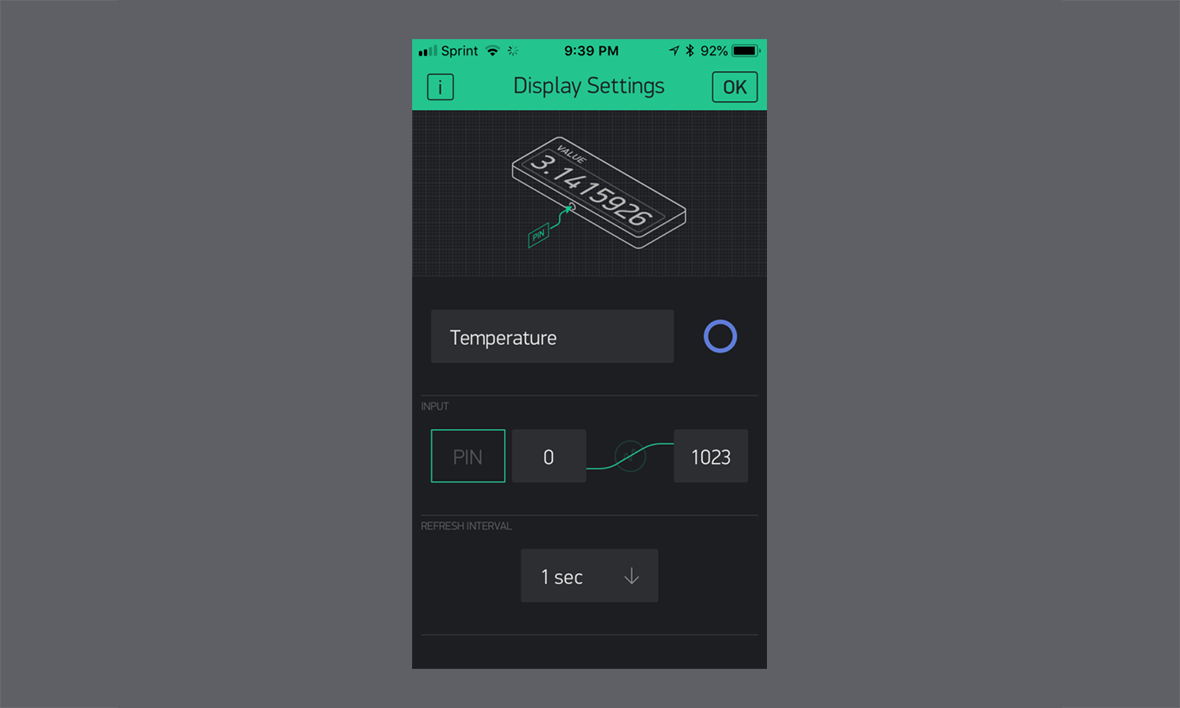
When you select a widget from the list, the widget is dropped onto your canvas. Press and hold the widget to position and size the widget as needed. Once you have it where you want it, tap on the widget to set up its application behavior. For example, in my app, I added a Value Display widget and tapped on it to reveal the following settings screen.
I’m going to be using this element to display a live temperature from my device, so I entered the description “Temperature.” The Input section is where you choose the data source for the value that is to be displayed. The input can be the value of a digital pin, an analog pin, or a virtual pin.
A virtual pin is a major misnomer because it’s not a pin at all. It’s really just a placeholder for an arbitrary piece of state that is made available by the device. In my case, the temperature value that I will be displaying will be read through a digital interface (SPI), so I will use virtual pin V0 to transmit the reading to the app. The data for virtual pins is transferred as a string, so your device can pack anything it wants into the string.
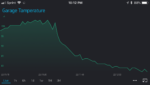
In addition to displaying the current “live” temperature from my device, I also want my app to display a chart which shows the temperature time. Amazingly, this is just as simple as setting up the live temperature. All you need to do is add a SuperChart widget and select the same pin (in my case, V1) as the input data source.
The SuperChart widget is very powerful. I’m using it for a very simple plot of temperature over time, but it can do more sophisticated operations like aggregating data from multiple streams using a variety of functions.

Testing the Project
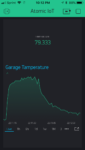
Once all your components are in place and configured as needed, you’re ready to test your project. Press the play button in the upper-right corner of the grid, and the user interface will begin functioning. If your hardware is connected and set up correctly, you will be able to interact with your user interface and see it update as your device pushes out new data. Here’s what my fancy temperature monitor looks like.
The Device
So far, I’ve talked a lot about the mobile app side of things, but of course, that is only half of the picture. The app is pointless without the device. Blynk does not make its own hardware, but according to the website, it “supports” integration with over 400 hardware models–pretty much everything from PICs to Arduino. If it has a network stack, you can probably integrate it with Blynk.
For my demo project, I used a RaspberryPi that had been collecting dust on a shelf in my basement (as I suspect most are!). Unfortunately, the device setup was not as smooth as I had hoped. Blynk device applications are built on wiring sketches just like Arduino. I first tried using the fancy browser-based Arduino code editor, but even after importing the Blynk library, I couldn’t get the demo sketch to pass the verification step.
I was really disappointed because the browser-based editor is pretty slick. You can configure it to sync code changes directly to your RaspberryPi via the network!
After failing with the browser-based tool, I installed the Arduino desktop app thinking that would have more flexibility for configuring libraries. Unfortunately, I found that there wasn’t a good way to deploy my code to my device because the desktop app doesn’t support the RaspberryPi as the browser-based tool does.
Finally, I gave up with Arduino tools and just ssh’d into the Pi and used Git to pull down the demo repository. I used my trusty vi editor to modify the demo code as needed and, voilà, it worked!
I mentioned earlier that I was going to use a virtual pin to transmit the temperature value from the device to the app. To do so, all I had to do is call the following line of code periodically within my firmware. In this case, temp, is a float that holds the most recent temperature value read from the sensor.
Blynk.virtualWrite(V0, temp);Publishing Apps
Not only can you build and test mobile apps within the Blynk app, but you can also publish your app to the AppStore and Google Play. Technically, you submit a request to Blynk, and they will publish it for you. I have not gone through the process, but it seems like it should be relatively straightforward. App publishing is not free; currently, you have to pay $199 a month for a plan that includes it.
Provisioning
An IoT solution is not turnkey if it doesn’t include a device provisioning workflow. There is a lot of complexity involved in provisioning, so it’s definitely something that you want to avoid implementing yourself if possible. I am glad to see that Blynk apps do include the entire workflow for getting customers’ devices configured to connect to their WiFi networks.
Final Thoughts
Overall, I found the Blynk tools pretty nice to use. The documentation needs improvement, but it’s also not the worst I’ve seen. The mobile app is a bit clunky to navigate, but once you figure it out, it actually feels very polished. I didn’t come across any bugs throughout the entire process of building my demo.
I was a little disappointed at the lack of customizability of the user interface from a design perspective. For example, I couldn’t find any way to insert a simple text label in my app. Blynk does support App Branding, but it’s only available for members with plan subscriptions so I have no idea how flexible it is.
For hobby projects, proof-of-concepts, or really simple products, I think Blynk could be a good solution. I would happily use it to build a prototype. Due to the lack of flexibility in design, I don’t see many product companies using it, but I could be wrong.