
Firebase authentication is an easy way to have users sign in to your Unity app. Last time, I showed you how to set up Firebase in Unity. Today, I’ll describe how to maintain an authentication state in your app and make calls to Firebase that allow users to create an account, sign in, and sign out.
Before You Begin
- Make sure your Unity project is properly configured with Firebase.
- If you’d like to follow along, you can find all the code here on Github. It includes some basic scenes and all of the scripts to get you started. Just add the scenes and folders to your existing Unity project.
- A portion of this code comes from the Firebase Unity Quickstart. Check it out for more on how to use Firebase Authentication in your project.
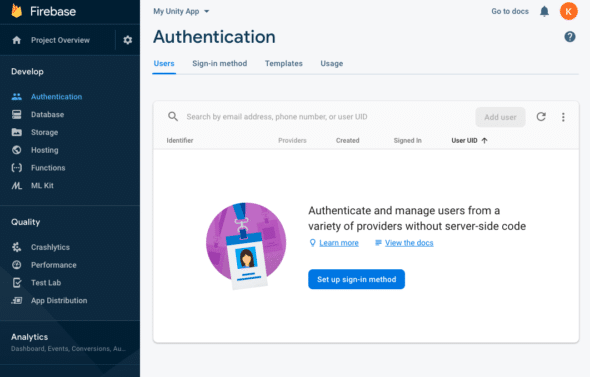
1. Enable Authentication in Firebase Console
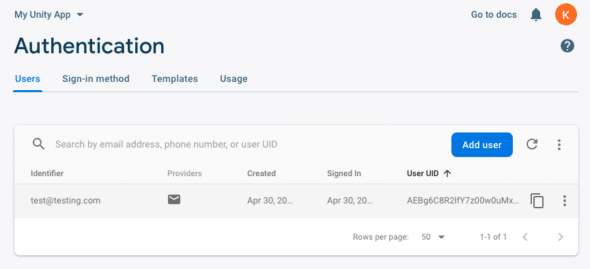
Go to the Firebase console for the project associated with your Unity app. Select Authentication from the menu on the left-hand side. Click “Set up sign-in method.” You will be shown a list of ways to allow a user to sign in to your app through Firebase.
I’m going to show you how to do authentication with an email and password. Select that option and click on the first enable switch. This option provides email address verification, password recovery, and email address change. In this tutorial, we will only go into detail on basic account creation.
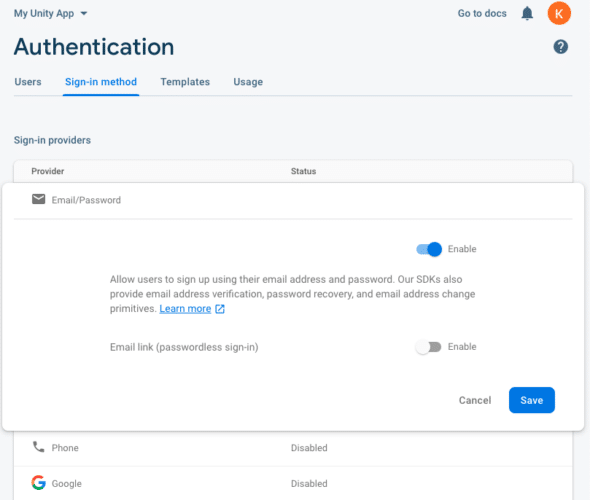
Once you save, you should see the Email/Password option enabled in green letters. You’re all set to start coding!
2. Create an Authentication Manager
You need an authentication manager, which will be in charge of two primary functions:
- Initializing Firebase
- Tracking the App’s Authentication State
Create a new folder in your Assets called Scripts, then add another folder called ScriptableObjects. This is where our AuthManager.cs will live.
The Auth Manager will inherit from Unity Engine’s ScriptableObject class. ScriptableObjects can store large amounts of data independent from script instances. They are especially useful for building flexible communication between different systems in Unity. (To learn more about this handy class, I highly recommend Three ways to architect your game with ScriptableObjects.)

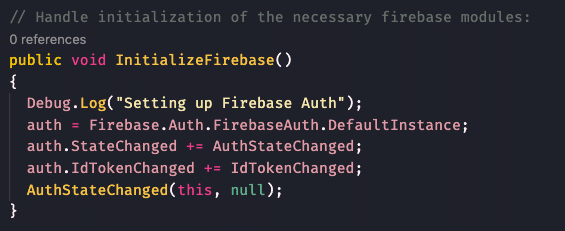
The Auth Manager’s first role is to initialize Firebase. One thing that the Firebase docs don’t tell you is that a user’s authentication state will magically persist until a user explicitly signs out. This happens even inside the Unity editor between builds. The InitializeFirebase() function makes sure to grab a reference to the FirebaseAuth.DefaultInstance to check for that persisting user and kick off a signal indicating that the auth state has changed.
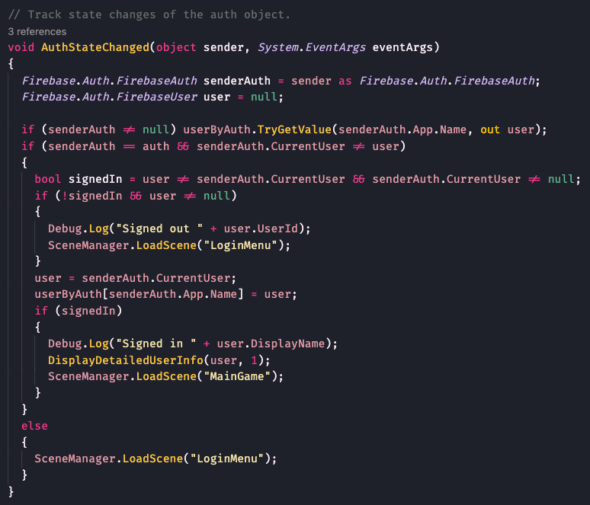
Next, the Auth Manager will track the app’s auth state with the AuthStateChanged() function. Based on the auth state, it will check for a persisting user and manage what scene should be displayed — either automatically signing in a persisted user or showing the sign-in page for an unauthenticated user. This class will always be listening to state changes in your app.
View the entire AuthManager class.
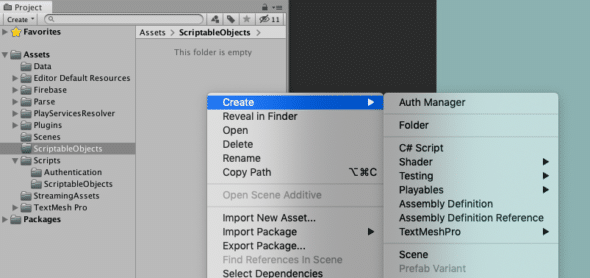
Now we need to create an instance of the Auth Manager ScriptableObject. We can store it in a folder called ScriptableObjects under Assets. Right-click inside the folder and select Create > Auth Manager. This will create an object that we can now pass on to our various scripts.
3. Authentication Setup
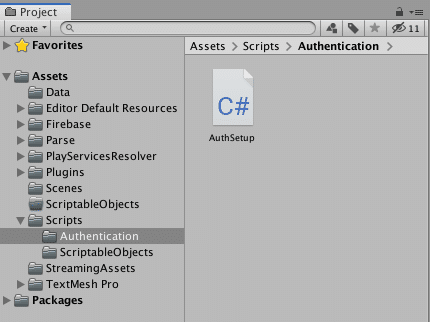
We need a script that will check for any Firebase requirements and then call the Auth Manager’s InitializeFirebase() function. Let’s create a new class called AuthSetup.cs in a folder called Authentication under the existing Scripts folder. The Auth Setup class will inherit from MonoBehavior, so we can include it in the first scene of the app. It will also take an Auth Manager.
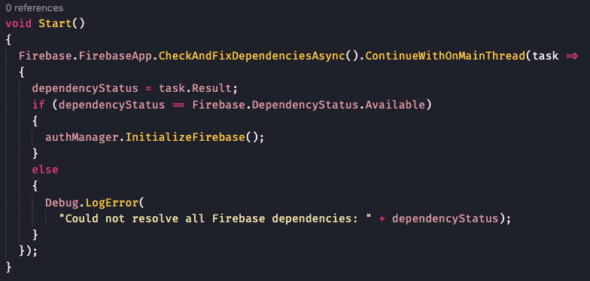
If you are using Android, the Firebase Unity SDK requires Google Play services to be up to date before starting. In the Start() function, Auth Setup needs to first check for these dependencies before calling the Auth Manager’s InitializeFirebase() function.
This all should be done in the very first scene that loads in your Unity app. Remember that the Auth Manager will be maintaining the authentication state and determining what scene should be viewed once it’s initialized.
In this loading scene, click on the Main Camera and click on the Add Component button in the inspector. Search for the Auth Setup script and add it. The Auth Setup will require an Auth Manager ScriptableObject. Use the one created earlier in the ScriptableObjects folder.

Congratulations! You should now be able to run your app and see your loading screen switch over to the sign-in scene!
4. Create a Sign-Up Handler
Now we need to wire up the sign-up form to a script that will call on Firebase Auth. This will allow account creation and sign in when the account is successfully created.
In the Authentication folder under Assets > Scripts, create a new script called SignUpHandler.cs, which will inherit from the MonoBehavior class. (I won’t go into detail on wiring up all the UI bits, so please reference the Github example project if needed.)
On Start(), the Sign-Up Handler will need to get an instance of the Firebase Auth and then listen for a submit button or a back button. In my example, the back button will lead the user back to the sign-in scene. The submit button will check the password fields to ensure they are the same and then go forward with creating a new account.

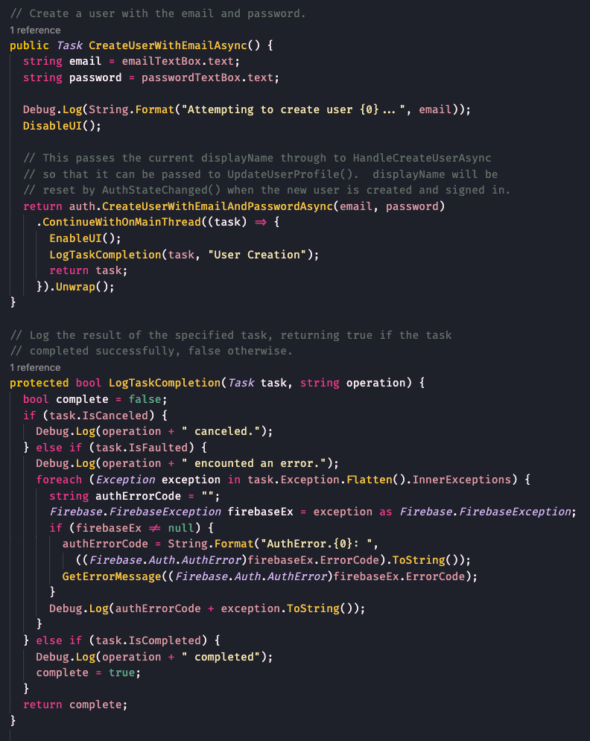
To create a new account, use the Firebase Auth’s CreateUserWithEmailAndPasswordAsync() method. Give the email and password that the user typed, then await the task as Firebase works to make an account.
You can use a helper (such as the LogTaskCompletion() in the example) to log out the result of the task. This can include some error handling if something goes wrong. A list of error codes can be found in the documentation here.
If the task completes successfully, the Auth Manager, which was initialized at the start of the app, will automatically update the auth state and change the scene to one your user should see when signed in.
Click here to view the entire Sign-Up Handler class on Github.
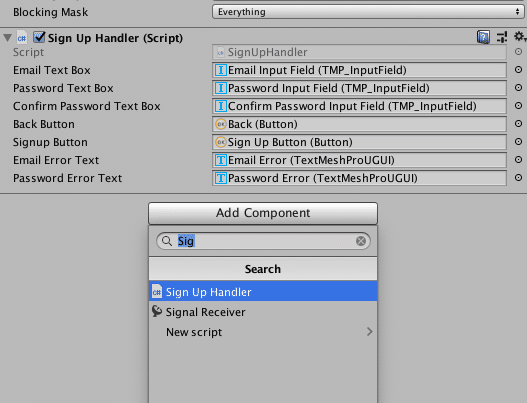
Add this Sign-Up Handler to the main Canvas containing the sign-up form by selecting Add Component and searching for the Sign-Up Handler script. Include all the necessary references to the UI, like the example below.
5. Create a Sign-In Handler
We have the ability to create an account, so now we want to be able to sign in with that account. In the Authentication folder under Assets > Scripts, create a new script called SignInHandler.cs which will inherit from the MonoBehavior class. (I won’t go into detail on wiring up all the UI bits, so please reference the Github example project if needed.)
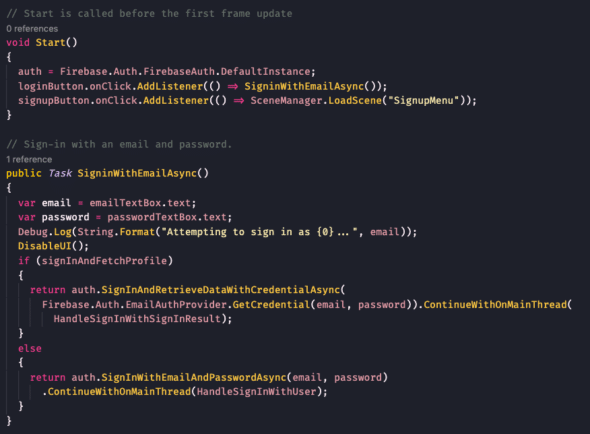
On Start(), the Sign-In Handler will need to get an instance of the Firebase Auth and then listen for a submit button or a sign-up button. In my example, the sign-up button will lead the user to the sign-up scene. The submit button will call the function SigninWithEmailAsync().
The logic here is very similar to the Sign-Up Handler. The SigninWithEmailAsync() function simply calls on Firebase to sign in with the email and password given by the user. Then a helper function logs the task and catches any errors. If the task completes successfully, the Auth Manager, which was initialized at the start of the app, will automatically update the auth state and change the scene.
In the example, you may notice that there are two options for signing in. The first is to sign in and fetch a profile, which includes:
- Creation Timestamp
- Last Sign-In Timestamp
- Username
- Provider ID
This can be useful if you’re interested in analytics or using the username field. Otherwise, the simple option is to sign in without requesting any additional data.
Click here to view the entire Sign-In Handler class on Github.
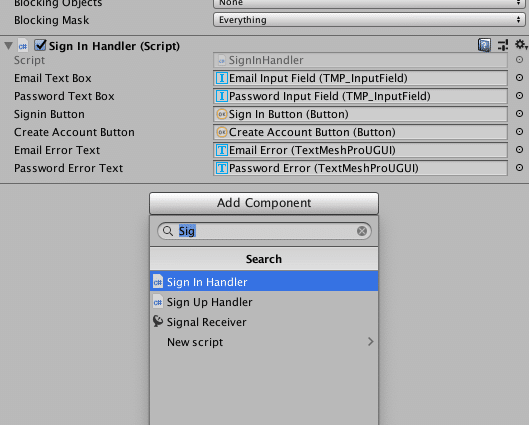
Now you can add this Sign-In Handler to the main Canvas containing the sign-in form by selecting Add Component and searching for the Sign-In Handler script. Include all the necessary references to the UI, like the example below.
6. Signing Out
In the Authentication folder under Assets > Scripts, create a new script called SignOutListener, which will inherit from the MonoBehavior class.
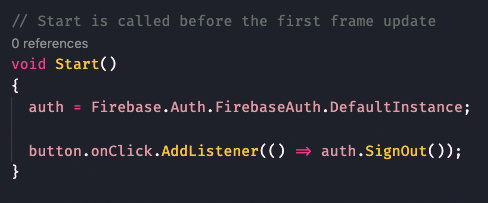
On Start(), the Sign-Out Handler will need to get an instance of the Firebase Auth and then add a sign-out button listener. That listener will simply invoke Firebase Auth’s SignOut() function. It’s as simple as that. Everything else gets handled by the Auth Manager.
Add this Sign-Out Listener to the main Canvas containing the sign-out button by selecting Add Component and searching for the Sign-Out Listener script. Include all the necessary references to the UI, like the example below.

Wrapping Things Up
Your Unity app now has full integration with Firebase Authentication! You can create accounts, sign in with those accounts, and sign out. You can also view and manage those accounts through the Firebase Console.
I hope this tutorial can help you get started with easy authentication for your Unity app. If there was anything that you didn’t see covered here that you would like to know more about, please let me know, and I’ll consider making it a part of this series.
Next time, I’ll show you how to set up Firebase Database so users of your Unity app can save information like their game state, account details, and more.
This is the second part of a series on setting up Firebase with Unity:
- Project Setup & Getting Started
- User Accounts with Firebase Authentication
- Storing User Save Data with Firebase Database (coming soon)
Thanks a lot! I’ve been waiting eagerly for this!
Hello, Thanks for this guide. I really helped me.
I have this running perfectly.
Can I bother you?, I want to add the function of “send email verification”, but im not sure how implement it.
I think I need to merge in the “Task CreateUserWithEmailAsync()”, of SignUpHandler.
But I don’t realize how.
PD: waiting for your next guide
This worked great for me. I was struggling with getting Firebase working.
I would love for you to have a tutorial on adding a Google sign in as well.
Thank you!
When is part 3 coming?
Hello! Part 3 is in the works :)
Hi Kasey,
I hope you are doing well!
Did you posted third part now?
I also want some light on two topics covered by you- “Forgot password” & “Remeber me”, if you will provide some more code snippet for this, it would be appreciable.
Thanks & Regards,
Sumit Singh
This is great! I’ve been trying many different things to get something like this working with AWS & Cognito on Android, and it never works. This was super easy to follow and worked without needing to do anything too crazy. Firebase seems like the better choice, so I’m waiting eagerly for part 3 – thanks so much Kasey!