Article summary
Once in a while, I find myself doing work for a client who requires me to be on their VPN with a specific DNS setup. At the same time, I’ll need to have access to our office’s DNS server so I can reach local services like our continuous integration server, network storage, or build machines. This is a problem because the different DNS servers don’t know about each other. If I’m using the VPN’s DNS server, then it won’t be able to resolve requests for names that are on the Atomic Object network. If I request a name on the VPN while using the Atomic Object DNS server, I’ll have the same problem.
Back in January of 2011, I described what I wanted to a friend of mine, but it wasn’t until today that I was finally frustrated enough to do something about it. As it turns out, it’s not that hard to do (with a little technical knowhow) if you’re running OS X. It does, however, require some technical voodoo if you’re not familiar with BIND or DNS in general.
Ready for your DNS woes to be over? Okay, hold on to your Vim configuration, this might get a little bumpy.
The Plan
We’re going to configure our own DNS server. It’s going to run locally and forward DNS requests based on some rules we specify. OS X comes with `bind` pre-installed, so we shouldn’t have to install any special software to perform these steps.
1. Pop Open a Terminal
If you’re not comfortable in a terminal, this exercise might not be for you. If you are able to use a terminal, but aren’t always sure what you’re doing, then please be careful.
The `Terminal` application will work. I use [iTerm2](http://www.iterm2.com/), but it doesn’t make a difference in this circumstance.
2. Make a Backup
Really. Backup your `named.conf` file. Don’t not back it up. This would be tremendously unwise to not backup. Here’s what you need to run to backup the file:
$ cp /etc/named.conf ~/named.conf.backup
3. Becoming Root
You did make that backup, right? Okay, good, because we’re going to be playing as `root` for a bit. This is not to be taken lightly. Please pay attention to what you’re typing and make sure you understand what is happening on the screen in front of you. The `root` account can cripple your system if used inappropriately.
Let’s become root. When you type the following, you’ll be prompted for your OS X password:
$ sudo -s
Your terminal prompt should change to something like: `bash-3.2#`.
4. rndc Configuration
Generating a rndc Configuration
`rndc` stands for Remote Name Daemon Control. It is used to administer `named`. You can read more about it [here](http://www.omnisecu.com/gnu-linux/redhat-certified-engineer-rhce/rndc-remote-name-daemon-control.php), but you probably don’t need to understand all its inner workings.
We need to make a configuration file and a key file for `rndc`. Let’s start with the configuration file. Using the root shell (the shell in which you ran `sudo -s`), run the following command:
$ rndc-confgen > /etc/rndc.conf
We can inspect the content of the file by running the following command:
$ cat /etc/rndc.conf
Here’s an example of what the command `rndc-confgen` produces:
# Start of rndc.conf
key “rndc-key” {
algorithm hmac-md5;
secret “4b/GmCDb3hhqLokh+89JBQ==”;
};
options {
default-key “rndc-key”;
default-server 127.0.0.1;
default-port 953;
};
# End of rndc.conf
# Use with the following in named.conf, adjusting the allow list as needed:
# key “rndc-key” {
# algorithm hmac-md5;
# secret “4b/GmCDb3hhqLokh+89JBQ==”;
# };
#
# controls {
# inet 127.0.0.1 port 953
# allow { 127.0.0.1; } keys { “rndc-key”; };
# };
# End of named.conf
Note: the 4th line of the `rndc.conf` file contains a secret key. This should be kept private. If it’s shared, others may be able to tamper with your DNS settings.
Generating the rndc Key File
Next, we need to create the `rndc` key file. This is how the `rndc` utility will authenticate itself against the `named` server running on your local OS X machine.
As it turns out, the key is just a subset of the lines in the `rndc.conf` file. Specifically, it is lines 2-5. We can snip these lines out with the following command:
$ head -n5 /etc/rndc.conf | tail -n4
Ensure that your output looks like this (but with a different key):
key “rndc-key” {
algorithm hmac-md5;
secret “4b/GmCDb3hhqLokh+89JBQ==”;
};
If your output looks correct, run the following command to create your key file. This is the same command but with added syntax to redirect the output from the command to the file `/etc/rndc.key`:
$ head -n5 /etc/rndc.conf | tail -n4 > /etc/rndc.key
5. /etc/named.conf Setup
Using your editor of choice, open the `/etc/named.conf` file. If you don’t have an editor of choice, something like the following should open the file with TextEdit and with the correct permission:
$ open -a TextEdit /etc/named.conf
Configuring Your Default Name Servers
We need to configure the default name servers our DNS server will request data from. (If it’s not clear to you what I’m talking about, spend some time with the [Domain Name System](http://en.wikipedia.org/wiki/Domain_Name_System) page on Wikipedia.)
I chose to use the Google public DNS servers (`8.8.8.8` and `8.8.4.4`), but you could just as easily use the public DNS servers provided by OpenDNS (`208.67.222.222` and `208.67.220.220`). You may also want to chose some other servers specific to your typical setup. It’s your call.
We configure these by adding a `forwarders` line in the `options` section. This is the first section of configuration data after the `include` statement on line 4. This when completed, if you used the Google DNS servers like I did, then your `options` section should look something like this:
options {
directory “/var/named”;
/*
* If there is a firewall between you and nameservers you want
* to talk to, you might need to uncomment the query-source
* directive below. Previous versions of BIND always asked
* questions using port 53, but BIND 8.1 uses an unprivileged
* port by default.
*/
// query-source address * port 53;
// Google DNS Servers
forwarders { 8.8.8.8; 8.8.4.4; };
};
Okay, we’re almost done with `/etc/named.conf`. We need to add a zone now. I actually setup two zones since there are two networks I frequent. Let’s call them `atomicobject.localnet` and `mcacmecorp.awesome`. Now, remember that we’ve setup the forwarders in `options`. If the domain we’re searching doesn’t end with the zones we’re setting up below, our request will be forwarded to those servers.
Let’s create our first zone. Add yours after the last `zone` section in the `/etc/named.conf` file (which is probably `0.0.127.in-addr.arpa`). Here’s how I added my network configuration for the Atomic Object VPN:
zone “atomicobject.localnet” IN {
type forward;
forwarders { 10.11.12.13; };
};
This entry will forward all requests for names that end in `atomicobject.localnet` to the DNS server inside Atomic Object’s network at the address `10.11.12.13`. For example, I asked my server to lookup `ponies.atomicobject.localnet`, it would forward that request to the server at `10.11.12.13` and return the response from the server to me.
I’ll add one more entry. This time, I’m going to be forwarding requests for the domain `mcacmecorp.awesome`. I can add this entry after my Atomic Object zone:
zone “mcacmecorp.awesome” IN {
type forward;
forwarders { 172.27.0.10; };
};
This entry would forward requests for domains such as `tps.mcacmecorp.awesome` to the server at `172.27.0.10`.
There’s a tool we can use to check that our `/etc/named.conf` file is correct. We can use it like this:
$ named-checkconf /etc/named.conf
If this command returns with no output, then our configuration file was parsed correctly. If it responded with an error message, fix the problem it reports (possibly a missing `;`), and rerun the command until it doesn’t report any errors.
6. Configuring named to Run at Startup
This is pretty simple. We can use `launchctl` to start `named` for us on startup. Run the following command:
$ launchctl load -w /System/Library/LaunchDaemons/org.isc.named.plist
7. Starting named and Flushing the DNS Cache
Next, we need to start `named` and flush our local DNS cache.
$ sudo /usr/sbin/named
$ sudo dscacheutil -flushcache
8. Testing the Server
We can test the server at this point with the `nslookup` command. I’m going to use one of our local domains: `ubuntubuild1.atomicobject.localnet`. `nslookup` is a pretty simple command to use. The first argument is the name you want to lookup, and the second (optional) argument is the server to use. Here’s an example I used to test out whether or not my new local `named` server was running properly:
$ nslookup ubuntubuild2.atomicobject.localnet 127.0.0.1
Server: 127.0.0.1
Address: 127.0.0.1#53
Non-authoritative answer:
Name: ubuntubuild2.atomicobject.localnet
Address: 10.138.123.212
Here, we can see the output from the DNS server that specifies the correct address. Try this with a few names from all of your DNS zones. If it all works, we can go ahead and configure our network interfaces to use the new local DNS server.
9. Configuring Interfaces to Use the New DNS Server
In your network settings, add a DNS server. We’re going to point our interface at the DNS server we just created. When you’re done, it should look something like this:
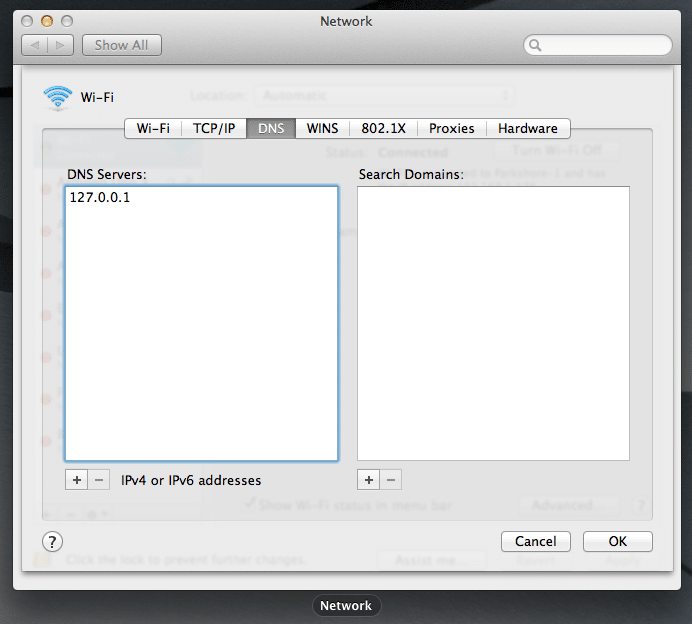
You can reuse the `nslookup` commands you used in the previous step to test again. Except this time, you can leave off the `127.0.0.1`. It will default to the interface’s name server. You should get the same results back.
Final Thoughts
First, I used two rather useful resources for most of the technical bits in this post. You can find them [here](http://www.linuxquestions.org/questions/linux-networking-3/choosing-dns-server-based-on-domain-being-queried-758647/) and [here](http://www.intridea.com/blog/2010/6/2/using-bind-locally-on-os-x-for-easy-access-to-subdomains).
Second, here’s what to do if, for some reason, you need to disable your `named` server.
* Remove all references to the local name server from your network interfaces (see previous step).
* Use `launchctl unload` to take `named` out of the startup service list:
$ launchctl unload -w /System/Library/LaunchDaemons/org.isc.named.plist
That’s it! I hope this helps you overcome some of your battles with DNS.