Thinking through some security concerns recently, I found myself wondering if it was possible to achieve full system Linux encryption in the cloud — running GNU/Linux off of an encrypted root partition (using LUKS). I thought that it should have been possible — it was achieved easily running with a local virtualization platform (VirtualBox, VMWare Fusion, etc.).
Since we have used Linode for a few projects, I figured that I would try to setup Linux encryption on Linode, but a quick Google search for “linux encryption on linode” didn’t turn up anything regarding root partition encryption with LUKS. I decided to try and figure it out myself. It turned out to be a bit of a challenge, but one which I’m glad I undertook as I learned a tremendous amount about Linux disk encryption, and how Linode manages the Linux boot process.
In order to achieve this, I consulted several very different resources, iterated several times on my setup process, and learned a great deal about GRUB configuration. Since I think others might find this information useful, I’ve compiled my setup process. The process assumes a working understanding of GNU/Linux, GNU utilities, and dm-crypt (cryptsetup).
I. Linode Preparation
1. Initial Decisions
I decided on the following system:
- OS: Ubuntu
- Version: 12.04 LTS
- Archictecture: 64-bit
While I choose this setup, certain variations (e.g. 32-bit, Ubtunu 12.10) should also work without too much extra effort. Just tweak parameters where necessary.
2. Notes
Linode boots custom systems (like the one I created) somewhat differently than your typical Linode system. Instead of having a single disk with multiple partitions, I needed to create multiple disks, each with the filesystem directly on the disk (no partitioning). This was necessary in order for the Linode GRUB loader to actually recognize my boot configuration.
For consistency, I always refer to my boot disk, root disk, and swap disks as my boot, root, and swap partitions. So for example, I refer to /dev/xvdb as my root partition even thought it is just my primary disk mounted at /.
3. Disk Image Preparation
I created a new Linode with a three images of type “raw/unformatted”. The first was for the boot partition (/boot), the second for the root partition (/), and the third for the swap partition.

4. Configuration Preparation
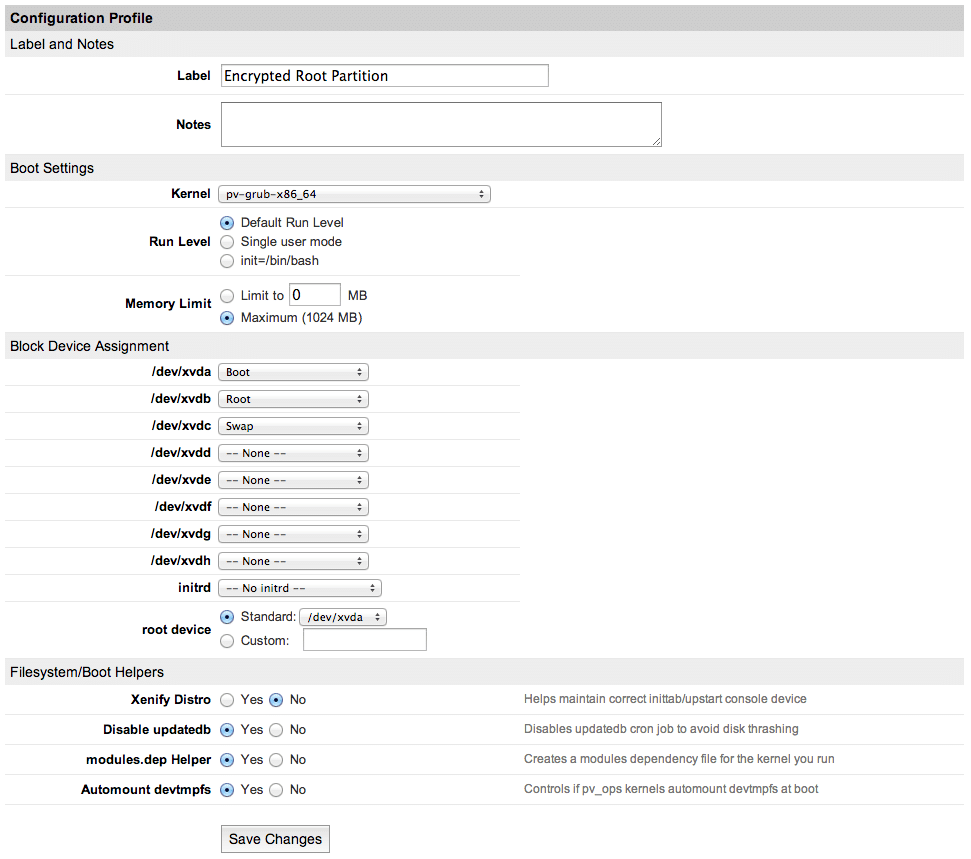
I created a new Linode configuration which assigned the disk images that I just created to block devices. I decided to made my boot parition /dev/xvda, my root partition /dev/xvdb, and my swap partition /dev/xvdc. Since I wanted to use a custom boot process and kernel, I needed to select pv-grub-x86_64 as my “Kernel”. I set the “root device” to /dev/xvda, as I intended to configure it as the boot device. I also disabled the “Xenify Distro” option. These specific details were provided by Linode in their Run a Distribution-Supplied Kernel with PV-GRUB how-to article.
II. System Preparation
1. Booting Into Rescue Mode
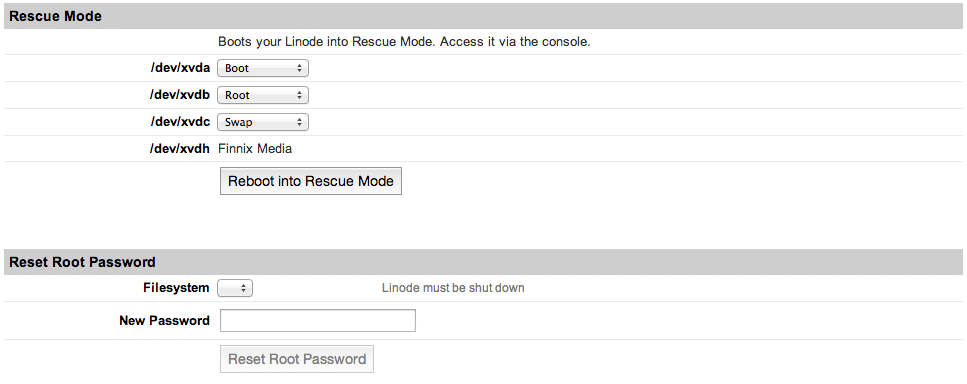
Linode allows you to enter a “Rescue Mode” that boots you into a Finnix Live CD environment with access to a Linode via Lish (the Linode Shell). This sort of access to a working Linux environment is necessary in order to prepare the encrypted root partition. I booted into the Finnix rescue environment, making sure that my disk image was associated with the same block device as in my Linode configuration.
2. Remote Lish Access
I was able to access Lish via SSH using the information on the “Remote Access” tab of the Linode manager. The section under “Console Access” has the SSH command you can run: “Lish via SSH”.
3. LUKS
The LUKS (Linux Unified Key Setup) implementation, dm-crypt, uses the cryptsetup utility to manipulate disks and keys.
First I created a new encrypted partition (luksFormat) using the aes-xts-plain64 cipher, a key size of 512 bits (-s 512), and hash algorithm of sha512 (-h sha512) on my root partition (/dev/xvdb). I entered my passphrase when requested (making sure that the passphrase was sufficiently secure). This sets up the encrypted disk.
Next, I needed to open the new encrypted partition so that I could actually access it (luksOpen). This opened the encrypted partition and used device-mapper to map it as an unencrypted block device with a given name. I opened my root disk (/dev/xvdb) and mapped it to crypt-xvdb. This made the encrypted partition available to use as a normal block device at /dev/mapper/crypt-xvdb.
root@hvc0:~# cryptsetup luksFormat -c aes-xts-plain64 -s 512 -h sha512 /dev/xvdb

WARNING!
========
This will overwrite data on /dev/xvdb irrevocably.

Are you sure? (Type uppercase yes): YES
Enter LUKS passphrase: somethingsecure
Verify passphrase: somethingsecure

root@hvc0:~# cryptsetup luksOpen /dev/xvdb crypt-xvdb
Enter passphrase for /dev/xvdb: somethingsecure

Enter passphrase for /dev/xvdb: somethingsecure
4. Filesystems
I formatted my boot partition as ext2 and my root partition as ext4.
Note that I used the new mapped device (/dev/mapper/crypt-xvdb) to create the filesystem for /dev/xvdb:
root@hvc0:~# mkfs.ext2 /dev/xvda
root@hvc0:~# mkfs.ext4 /dev/mapper/crypt-xvdb
III. System Setup
1. Installing Ubuntu
The Finnix Live CD comes with the debootstrap utility which allows you to download and bootstrap minimal Debian-based systems (including Ubuntu). I mounted my new ext4 formatted root partition to a folder, and started the bootstrap process. I choose a 64-bit architecture (--arch amd64) and Ubuntu 12.04 LTS (precise).
root@hvc0:~# mkdir newsystem
root@hvc0:~# mount /dev/mapper/crypt-xvdb newsystem
root@hvc0:~# debootstrap --arch amd64 precise newsystem/
2. Chroot
After the deboostrap finished, I mounted several devices/filesystems which I would need in a chrooted environment (e.g. /boot, /dev, /proc, /sys), and then chrooted:
root@hvc0:~# mount /dev/xvda newsystem/boot/
root@hvc0:~# mount -o bind /dev newsystem/dev
root@hvc0:~# mount -o bind /dev/pts/ newsystem/dev/pts
root@hvc0:~# mount -t proc /proc/ newsystem/proc/
root@hvc0:~# mount -t sysfs /sys newsystem/sys/
root@hvc0:~# chroot newsystem/ /bin/bash
3. Getting Started
After chrooting in my new system environment, I set the root password, and ran apt-get to retrieve current package information and install a few packages that I needed (cryptsetup) and wanted (vim).
root@finnix:/# passwd
root@finnix:/# apt-get update
root@finnix:/# apt-get install cryptsetup vim
IV. System Configuration
1. Encrypted Swap
I decided that I also wanted to encrypt the swap partition. I did this using cryptsetup (installed in previous step). This created a device mapping similar to the one for the root partition, but used basic (plain) dm-crypt instead of LUKS.
Instead of providing a passphrase on the command line, I specified a keyfile (-d /dev/urandom). This, essentially, used a randomized key to encrypt the partition since swap didn’t need to persist across reboots.
Finally, I actually formatted the new encrypted partition for swap with mkswap.
root@finnix:/# swapoff -a
root@finnix:/# cryptsetup -d /dev/urandom create crypt-swap /dev/xvdc
root@finnix:/# mkswap /dev/mapper/crypt-swap
When creating crypt-swap, I received an error similar to: modprobe: FATAL: Error inserting padlock_sha. According to Ubuntu Launchpad comments, the error message is benign and indicates that the kernel attempted to use a dedicated hardware accelerator which wasn’t present, so a software implementation was used instead.
2. Setting up /etc/crypttab
/etc/crypttab specifies any encrypted filesystems present on the system. I needed to populate this file so that the kernel would recognize encryption modules were necessary during boot, and to properly mount the encrypted filesystem at boot. For more details, see man crypttab.
The format for /etc/crypttab is:
- Target mapped device name (
crypt-xvdb) - The source block device (The UUID for
/dev/xvdbobtained usingblkid) - The keyfile to use (
nonecauses a passphrase prompt at boot) - Options (
luksto enable LUKS extensions)
I included the following information in my /etc/crypttab:
/etc/crypttab:
#
crypt-xvdb      UUID=5bd616e2-7caa-4648-8f8c-5a00b747cbd2       none            luks
crypt-swap      /dev/xvdc                                       /dev/urandom    swap
Note that you can use blkid to retrieve the UUID’s for block devices. In my /etc/crypttab, I used the UUID for the target block device which holds my LUKS encrypted partition (/dev/xvdb). Your source device should have a TYPE of crypto_LUKS when running blkid. Note that I used a keyfile of /dev/urandom for the swap partition as described earlier.
For more details, see man crypttab and man blkid.
3. Setting up /etc/fstab
/etc/fstab specifies filesystems to be mounted by the system (normal behavior for /etc/fstab). The exception is that instead of specifying the normal block devices for the encrypted partitions, I had to specify the mapped devices. For example, I didn’t mount / at /etc/xvdb, but at /dev/mapper/xvdb.
I included the following information in my /etc/fstab:
/etc/fstab:
/dev/xvda                 /boot   ext2    defaults                    0 2
/dev/mapper/crypt-xvdb      /       ext3    noatime,errors=remount-ro   0 1
/dev/mapper/crypt-swap      none    swap    sw                          0 0
proc                        /proc   proc    defaults                    0 0
Following my configuration scheme from earlier, I set /dev/xvda to be mounted at /boot, /dev/xvdb mapped as /dev/mapper/crypt-xvdb to be mounted at /, and /dev/xvdc mapped as /dev/mapped/crypt-swap to be mounted as swap. The rest of the file (e.g. /proc) and other options were fairly typical.
For more information, see man fstab.
4. Setting up /etc/mtab
The /etc/mtab usually lists currently listed filesystems. Because of the way that I entered my system environment (chrooting), this file was not properly populated (in fact, it didn’t exist). I used /proc/mounts to populate this file as certain applications (e.g. update-initramfs) make use of it.
root@finnix:/# cat /proc/mounts > /etc/mtab
/etc/mtab:
rootfs on / type rootfs (rw)
tmpfs on / type tmpfs (rw,relatime,size=804960k)
/dev/xvdh on /cdrom type iso9660 (ro,relatime)
/dev/loop0 on /FINNIX type squashfs (ro,relatime)
unionfs on /UNIONFS type aufs (rw,relatime,si=1bbcee677d8e663e)
none on /proc type proc (rw,relatime)
none on /sys type sysfs (rw,relatime)
tmpfs on /dev type tmpfs (rw,relatime,size=10240k,mode=755)
devpts on /dev/pts type devpts (rw,relatime,mode=600,ptmxmode=000)
devshm on /dev/shm type tmpfs (rw,relatime)
/dev/mapper/crypt-xvdb on / type ext4 (rw,relatime,user_xattr,barrier=1,data=ordered)
/dev/xvda on /boot type ext2 (rw,relatime,errors=continue,user_xattr,acl)
tmpfs on /dev type tmpfs (rw,relatime,size=10240k,mode=755)
devpts on /dev/pts type devpts (rw,relatime,mode=600,ptmxmode=000)
/proc on /proc type proc (rw,relatime)
/sys on /sys type sysfs (rw,relatime)
5. Setting up hvc0 and /etc/init/hvc0.conf
hvc0 is the Xen hypervisor console. It allows access to the Linode via Lish, and is very important. On non-custom Linodes, hvc0 is setup for you. However, on my custom Linode, I had to set it up manually.
Without properly configuring hvc0, booting your Linode with an encrypted root partition will be impossible. hvc0 access allows you to type in the LUKS passphrase that opens the encrypted partition. Once booted, a getty on hvc0 allows you to access your Linode via Lish since you do not have actual terminal (tty) access.
I added the following Upstart script so that my system would maintain a getty on hvc0:
/etc/init/hvc0.conf:
# hvc0 - getty
#
# This service maintains a getty on hvc0 from the point the system is
# started until it is shut down again.

start on stopped rc RUNLEVEL=[2345]
stop on runlevel [!2345]

respawn
exec /sbin/getty -8 38400 hvc0
These specific details were provided by Linode in their Run a Distribution-Supplied Kernel with PV-GRUB how-to article.
V. System Boot
1. Installing GRUB and the Linux Kernel
Next, I actually went about installing GRUB (GRand Unified Bootloader) and the Linux kernel. While I could have installed these packages earlier, getting key configuration files finalized (i.e. the various /etc/*tab files) prevents errors during the installation, and automates the otherwise tedious creation of several configuration files. Note that I installed GRUB legacy (version 1), not GRUB2. This is required for booting a custom system on Linode.
root@finnix:/# apt-get install grub linux-server
2. Configuring GRUB
Configuring GRUB was challenging due to uncertainty regarding the proper command line options for specifying the encrypted root partition. The Arch Linux Wiki had an excellent section on booting to a LUKS partition using GRUB Legacy which was instrumental in figuring everything out.
I generated the initial GRUB configuration (e.g. /boot/grub/menu.lst) by running:
root@finnix:/# update-grub -y
The -y prevents prompting for whether or not to create the menu.lst file.
After the initial files were generated, I edited /boot/grub/menu.lst to provide the necessary options for booting my system.
timeout
I changed the following lines from
## timeout sec
# Set a timeout, in SEC seconds, before automatically booting the default entry
# (normally the first entry defined).
timeout         3
to
## timeout sec
# Set a timeout, in SEC seconds, before automatically booting the default entry
# (normally the first entry defined).
timeout         10
in order to give me more time for catching the boot menu.
groot
I changed the following lines from
## default grub root device
# groot=(hd0,0)
to
## default grub root device
# groot=(hd0)
in order to set the “root” device for GRUB to /dev/xvda (instead of /dev/xvda1).
kopt
I changed the following line from
## ## Start Default Options ##
## default kernel options
## default kernel options for automagic boot options
# kopt=root=UUID=14fec84b-7054-4c49-aff4-40946c0bb61b ro
to
## ## Start Default Options ##
## default kernel options
## default kernel options for automagic boot options
# kopt=root=/dev/mapper/crypt-xvdb cryptdevice=/dev/xvdb:crypt-xvdb console=hvc0 ro
in order to specify that the “root” device (the device holding the root partition) will be on /dev/mapper/crypt-xvdb, and that this is a cryptdevice which is mapped from /dev/xvdb. console=hvc0 indicates the hvc0 is the console device to use (as referenced earlier). ro indicates that GRUB will treat the partition as read-only.
3. Finalizing GRUB Configuration
After making the above changes to /boot/grub/menu.lst, I needed to re-run the update-grub command:
root@finnix:/# update-grub
Next, I needed to do a little bit of file manipulation within /boot. The Linode GRUB loader expects to find the menu.lst file at /boot/grub/menu.lst on the root device hd0. This would be all fine and good if my /boot directory wasn’t actually a mount-point to the root of /dev/xvda. When the Linode GRUB loader looks at /dev/xvda, it will only find a /grub directory, not /boot/grub.
To address this, I created a directory in /boot/ named boot, moved /boot/grub to /boot/boot/grub and symlinked /boot/grub to /boot/boot/grub:
root@finnix:/# cd /boot
root@finnix:/# mkdir boot/
root@finnix:/# mv grub boot/
root@finnix:/# ln -nfs boot/grub grub
4. Updating Initrd
Before attempting to boot, I rebuilt the initrd image (initramfs) for my system. This is stored in /boot, and serves as the initial root filesystem for the kernel (early user space).
The initrd image contains necessary helpers for device detection and module loading for the kernel. Updating the initrd image ensures that it contains the necessary kernel encryption modules so that the kernel can discover and open encrypted disks.
root@finnix:~# update-initramfs -c -v -k all
VI. Finale
1. Un-Chrooting
And now, approaching the moment of truth (the reboot), I backed out of my chroot and unmounted all of the filesystems that I had mounted in preparation:
root@finnix:~# exit
root@hvc0:~# umount newsystem/proc/
root@hvc0:~# umount newsystem/dev/pts
root@hvc0:~# umount newsystem/dev
root@hvc0:~# umount newsystem/sys/
root@hvc0:~# umount newsystem/boot
root@hvc0:~# umount newsystem
2. The Moment of Truth
Finally, I rebooted… and hoped that my system would boot the first time.
root@hvc0:~# shutdown -r now
But, of course, my system didn’t boot the first time. At least not like it should have. My initial attempts at getting the system running were hampered by several issues, including silly mistakes I had made. It took several attempts to resolve all of the issues, and finally get a fully running system.
3. Debugging GRUB
One particular process was tremendously helpful in getting the system to run: manually booting from the GRUB console. This allowed me to verify that my GRUB options were correct and see any verbose output from the process to help debug any issues (the default GRUB menu items use the quiet option which supresses output).
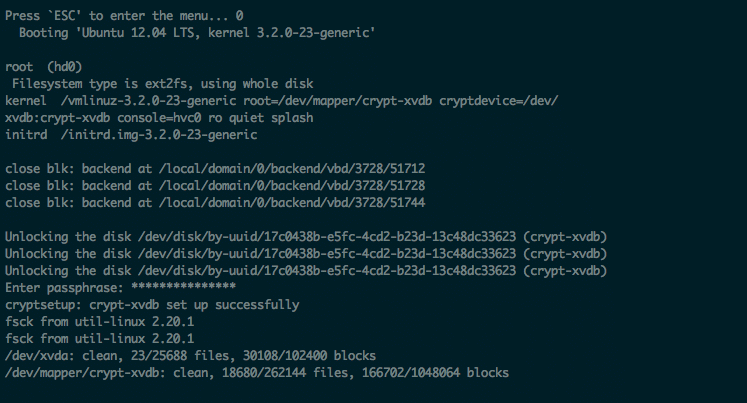
For example, when the system would start to boot, I would get the message: Press 'ESC' to enter the menu… at which point I would hit ESC, and then immediately hit c to drop to the GRUB console.
From there, I could try commands like the following to attempt a boot and see any errors:
grubdom> root (hd0)
grubdom> kernel  /vmlinuz-3.2.0-23-generic root=/dev/mapper/crypt-xvdb cryptdevice=/dev/xvdb:crypt-xvdb console=hvc0 ro
grubdom> initrd  /initrd.img-3.2.0-23-generic
grubdom> boot
This helped me catch errors I made in specifying device names, as the GRUB process would usually indicate something helpful.
Thanks for publishing this. The only thing I didn’t like about linode was the inability to have the virtual disk encrypted. Instructions worked great!
Glad that you found it helpful. :)
/dev/xvda					/boot	ext2	defaults					0 2

/dev/mapper/crypt-xvdb		/		ext3	noatime,errors=remount-ro	0 1

/dev/mapper/cryptswap		none	swap	sw							0 0

proc						/proc	proc	defaults					0 0
should be
/dev/xvda					/boot	ext2	defaults					0 2

/dev/mapper/crypt-xvdb		/		ext3	noatime,errors=remount-ro	0 1

/dev/mapper/crypt-swap		none	swap	sw							0 0

proc						/proc	proc	defaults					0 0
otherwise your swap partition will never mount. debian will boot, and run, but you will have no swap because you called it “crypt-swap” everywhere, except in fstab it is called “cryptswap”!
check your free command, or try running swapon -a and you will see!
Thanks for the correction! I’ve updated the code in the post accordingly.
Hi Justin, I’m also grateful that you wrote this article. I recently tried to update one of these Linode setups to use KVM. I was unsuccessful after many attempts. Have you tried it?
This is nice except that your encryption keys are vulnerable at all times the system is running. The same method used in cold-boot attacks can be use against your virtual machine by the host analyzing your virtual machine’s memory.