Article summary
One of my core beliefs as a software designer is that regular user testing is extraordinarily valuable to almost any project. Getting feedback and validating the usefulness and usability of features as they are being developed helps ensure that your time, budget, and effort are being spent wisely as you work to create a product.
For many, the phrase “user testing” conjures up images of a test session conducted with scientific precision on a large scale in an elaborate, expensive usability test lab. However, in many cases, testing at this scale is unnecessary. What you really need is some concrete feedback from a few real users. The good news is that you can easily get this feedback with a small budget and a bit of effort. Over the past few years as I’ve incorporated usability testing more fully into my own practice and our process here at Atomic, I’ve had the opportunity to iterate on my technique. In this post, I’ll tell you about how I use cheap, readily available software to conduct and record a usability test.
Computer/Software Setup
In a nutshell, I use two computers: one for me (the test facilitator), and one for the test participant. I also use two pieces of software: GoToMeeting and QuickTime Player. Here’s a quick diagram of how it all looks:
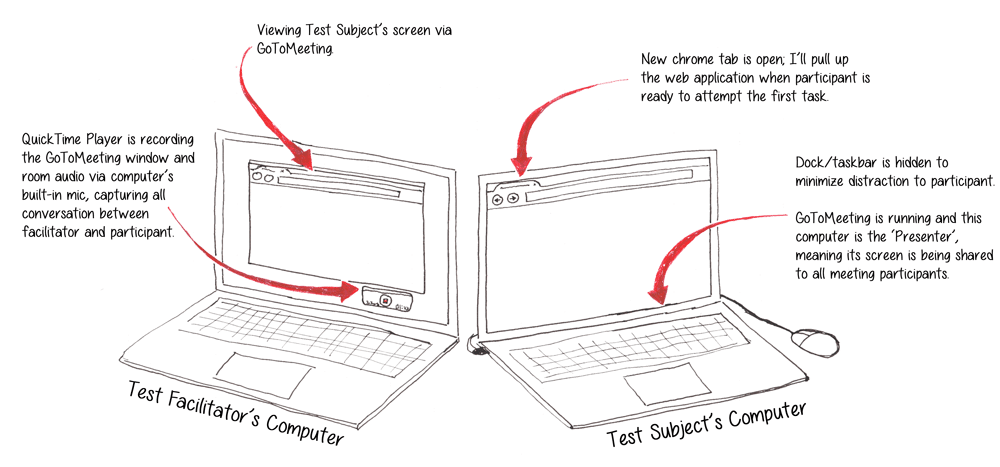
First, on my computer, I “host” a GoToMeeting. Then, using my participant’s computer (depending on the requirements of the test, this could be a device I provide, or their own computer that they brought along), I “Join” the meeting and give “Presenter” control over to them, so that their screen is being shared.
GoToMeeting is helpful in few different ways:
- My product team (both our clients and our developers) can watch the test and listen in via conference call. They can do this from the next room, or from way across the country!
- I can watch the participant’s actions mirrored on my own laptop’s screen instead of trying to watch over their shoulder. This puts everyone at ease.
- GoToMeeting is unobtrusive — once I start the GoToMeeting and minimize it on the participant’s computer, they forget it’s there.
Recording the Test
I’ve tried a few different software suites for recording usability sessions, but QuickTime Player beats them all. The little “player” that comes bundled for free with Mac OS also has a handy little screen recording utility.
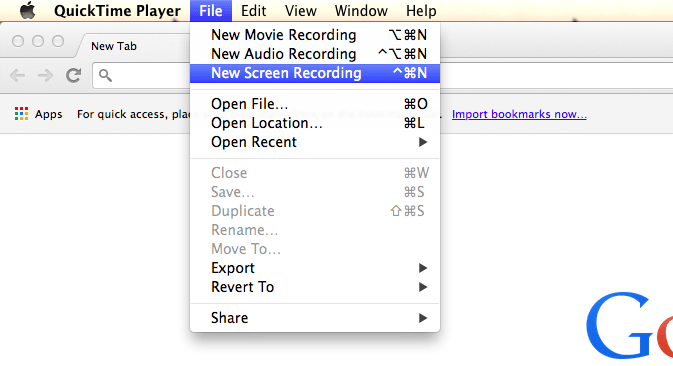
Using my computer, I record a separate QuickTime movie for each test participant. Generally, I start the recording right before they walk in the room. QuickTime lets you record only a portion of the screen, so I crop the recording to the GoToMeeting window, so that my computer is recording the stream from the participant’s screen. QuickTime can also capture the audio. This feature is a bit hidden in the UI, so here’s a screenshot:

Nifty, eh? By recording each session, I don’t have to worry about taking notes or anything. As the facilitator, I’m free to focus all of my energy on the test participant, and the entire test is captured so that later I can analyze the results. (As a side note, I usually speed the recordings up to 1.5x so that I can review them faster. QuickTime does this too.)
Quick & Easy
For me, this setup is great because it comes together easily and captures the most important data. Being able to quickly put together a test removes barriers to the regular user feedback that is so vital to a piece of software’s success.