
Article summary
On my current project, we are using AWS Amplify to manage cloud infrastructure. One of the reasons we’re using Amplify is to send targeted emails to our users through AWS’s analytics tool, Pinpoint. Setting up an email channel through Amplify turned out to require extra work since, at the time of writing this blog post, the Amplify SDK doesn’t support the creation of email endpoints. In this post, I’m going to walk through how to create email endpoints on a project utilizing Amplify.
Project Setup
For the sake of this tutorial, I’ll be using a simple project that utilizes Amplify’s authorization features to signup, sign-in, and logout. Clone the project here and run the following commands:
npm install -g @aws-amplify/cliThis installs the Amplify CLI, which allows us to provision cloud resources on AWS.
amplify initUse this command to initialize our app to connect to Amplify’s cloud resources. You will be guided to configure your app. Make sure to specify that you are using a JavaScript project with no framework. Select the default options for the rest of the questions. This command also creates an Amplify directory that will store information about our cloud infrastructure.
amplify add authEnter this command to add authorization through Cognito. All of the default configuration options are sufficient for our application.
amplify add analyticsThis command will set up your app with analytics through Pinpoint. Again, it is sufficient to use the defaults for this command.
amplify pushFinally, run the command above to create our resources on the cloud. Then go to the Pinpoint console on AWS, and open up your project. Click the settings dropdown and select email. Once there, click edit and enable the email channel for your project. You will need to verify an email to send your emails.
Now that we have our cloud resources set up, let’s run the app.
npm install && npm startOpen the app at localhost:8080 and create a user. Enter a valid email as a username, and a valid password. Then click create user. It will prompt you to enter the verification code sent to the email you provided.
Upon signing up, an email endpoint is created with the following code:
const pinpointUpdateEndpoint = email => {
  Auth.currentUserCredentials().then(credentials => {
    if (credentials.identityId === undefined) {
      console.warn("no identityId");
      return;
    }
    const pinpoint = new Pinpoint({
      region: awsconfig.aws_mobile_analytics_app_region,
      credentials
    });
    const { identityId } = credentials;
    const channelType = "EMAIL";
    pinpoint
      .updateEndpoint({
        ApplicationId: awsconfig.aws_mobile_analytics_app_id,
        EndpointId: `email-endpoint-${identityId}`,
        EndpointRequest: {
          Address: email,
          ChannelType: channelType,
          OptOut: "NONE",
          User: {
            UserId: identityId,
            UserAttributes: {}
          }
        }
      })
      .promise()
      .then(data => console.log(data))
      .catch(err => console.error(err));
  });
};
Now, you should have an email endpoint which allows us to create a targeted campaign on Pinpoint.
Creating an Email Campaign
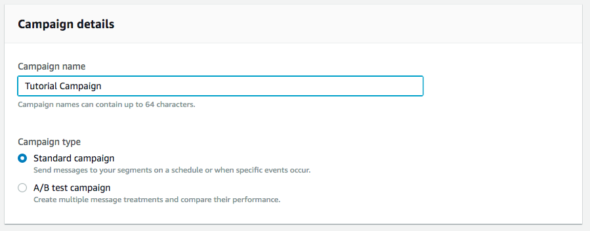
Back on the Pinpoint console, go the Campaigns page and create a campaign.
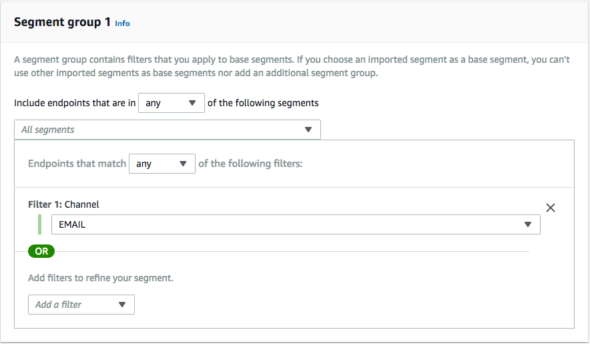
Hit “next” and create a new segment that filters by email channel.
You will be asked to compose a message to send to your users. Fill in the subject and messages fields, then click next.
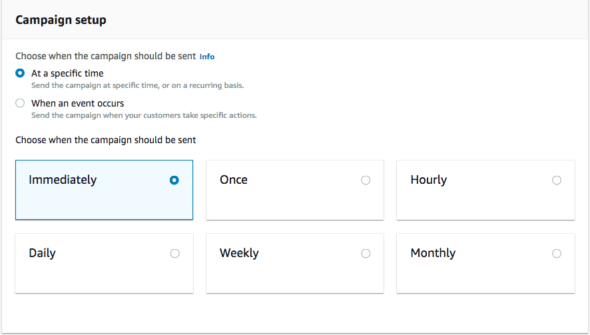
On the next page. you will be asked to select when you want to launch the campaign. For this tutorial, we will launch the campaign immediately.
After clicking next, launch the campaign. Soon after, you should receive an email from your verified email address!
Note: Pinpoint environments are initiated in sandbox mode. This means that emails can only be sent and received by verified emails. For this tutorial, make sure to sign into your application with an email that is verified on Pinpoint so you can receive an email from this test Pinpoint campaign.
Conclusion
The process for setting up Pinpoint endpoints with Amplify isn’t ideal since you have to use the Pinpoint SDK. However, it is possible. I hope you are able to use this tutorial to setup targeted email campaigns in your Amplify project!