This series covers building a simple REST API using the Prisma ORM and Postgresql. Part one covered how to get a Prisma schema from your Postgresql database and used information from a national plant database as an example. In part two, I explained how to use this Prisma client in our express server. Next, we’ll talk about how Swagger UI and OpenAPI spec allow us to easily document our API so that consumers can consume and interact with it.
Automating API Documentation with Swagger UI
Okay, so now you’ve got a full-fledged API that works. We want to make it available for the public to enjoy, because, let’s be honest, there is no API like yours and people could really use it. So what do we do to make it easy for others to consume?
Well, we could create our own UI that shows people how to consume our API. However, this is reinventing the wheel when automatic documentation tools like Swagger UI exist. So, we will use Swagger UI which allows consumers to see and interact with our API resources without us having to write much UI code.
Defining Our OpenAPI Spec
Swagger UI will take an OpenAPI specification. This is a standardized way of defining your API to generate documentation for your consumers that’s easy to read. Let’s get started setting that up.
First lets install Swagger UI Express. This package will allow us to serve Swagger UI from Express based on a YAML, JSON file, or jsDocs.
npm i swagger-ui-express Now let’s import the Swagger UI:
import swaggerUi from ‘swagger-ui-express’;Now before we serve Swagger UI, we need to create our Swagger specification. We will do this by defining an options object that has information about our spec and where our API routes can be found:
 const options = {
    failOnErrors: true,
    definition: {
        openapi: '3.0.0',
        info: {
            title: 'Native Plants API',
            version: '1.0.0',
        },
    },
    apis: ['./routes/*.ts'],
};
Some of the things we include are the Swagger version, an API description, and the paths to our API endpoints.
Next, let’s import swagger-jsdoc, a tool that can help easily define our API routes.
npm i swagger-jsdoc Next, we can define a swaggerJsdoc object and pass it the options we defined above. This object sets up our openApiSpecification so that can serve the Swagger UI later on in the future.
const openapiSpecification = swaggerJsdoc(options);Now we can use the Swagger UI middleware:
app.use(‘/api’, swaggerUi.serve, swaggerUi.setup(openapiSpecification));Run your app and navigate to https://localhost:3000/api. We should see this:

Documenting our endpoints
Notice how it says that there are No operations defined in the spec? This is where swaggerJsdoc comes into play. This tool will allow us to use multiline comments (using JSDoc) defined above our routes and automatically create Swagger UI documentation for our API.
Let’s add this comment to our simple / route. This will result in Swagger UI showing us the responses that we can potentially get as well as a description for how to use the route.
/**
 * @swagger
 * /:
 *   get:
 *     description: Welcome to swagger-jsdoc!
 *     responses:
 *       200:
 *         description: Returns a mysterious string.
 */
This is fine for a simple route. However, we want to be able to use our plant’s route and pass it a name so that we can get a list of plants by common name. Let’s try that out.
Let’s add the same comment to our plants/{name} route.
/**
 * @swagger
 * /plants/{name}:
 *   get:
 *     description: Returns a list of plants by common name.
 *     responses:
 *       200:
 *         description: Returns a list of plants by common name.
 *     parameters:
 *      - in: path
 *        name: name
 */
Note, that we let Swagger know that our route is now /plants/{name}. We also added parameters. In:path tells Swagger that there is a route parameter in our request called name.
Now in our app, we can see there’s a field with the route parameter a user can test out.
Before we test out our parameter, let’s make sure that Docker is running with our database setup we configured in part one of the series. Now we can click on the Try it out button on the right-hand side of the route. This will allow us to enter a route parameter for the name. Let’s enter Maple and execute.
You should get a response body with data that contains species with the common name you entered. In this case, we get one result.
The data we get back doesn’t look the greatest because we are returning a string of data right now.
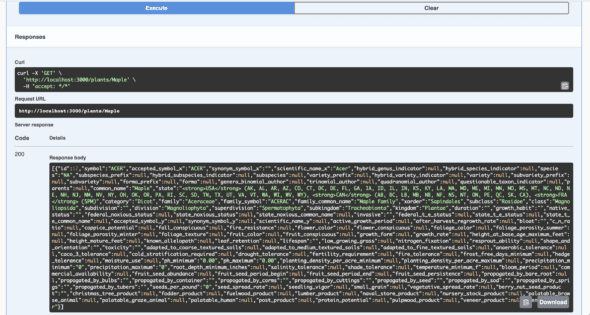
We need to modify the response object so that we get a JSON object instead.
Let’s go back to PostgresService.js and remove our stringifyData function and return the simple response in each get call. We will need to change the return type of each function into a Promise.
async getPlantsByCommonName(name: string): Promise {
  return await prisma.plants
    .findMany({
      where: {
        common_name: name,
      },
    })
    .then((res) => res);
}
Now if we execute our request again, our response data looks like formatted JSON data.
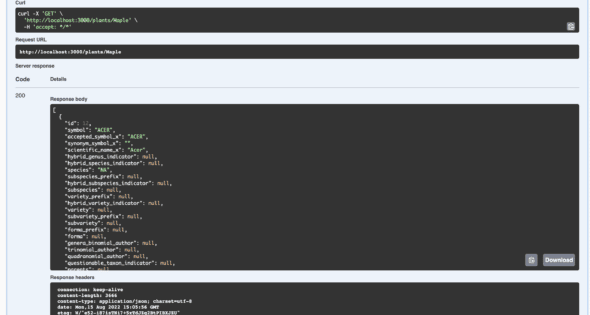
This will make it more readable to your user.
Next Steps
Swagger Ui and OpenAPI spec allow us to easily document our API so that consumers can consume and interact with it. We can write every new route in this way. Currently, our API only exists locally. We still need to host our API and the Swagger UI. In the next part, we will learn how to host our API so that anyone can access it.