Article summary
After successfully automating the reporting and watering of my garden last summer via my GardenPi, I wanted to rev on the idea this summer. Since this is as much a learning project as it is an automation project, I decided to improve on both fronts. Introducing: Garden KnowEms™.
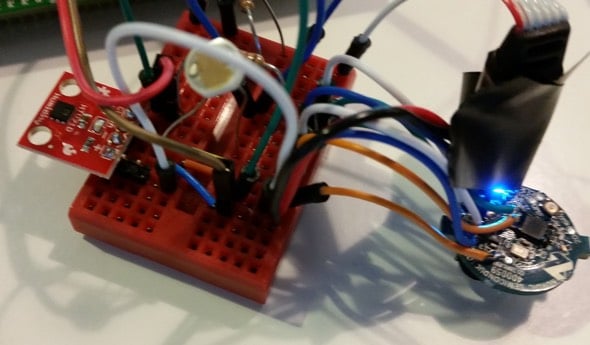
A Garden KnowEm is a small internet of things (IoT) device that captures data from your garden and broadcasts it via Bluetooth Low Energy (BLE). It collects four data points: soil moisture, humidity, temperature, and light level. All that data is packaged up into a BLE advertising packet. That information can eventually be beamed to a base station (Raspberry Pi) to control watering and send data to the cloud via in-home WiFi.
If it Ain’t Broke Don’t Fix It?
The GardenPi was a nice first revision, but it had a couple of big design problems.
Placement
Because the sensors were connected directly to my Raspberry Pi, the entire rig had to be in the garden. This required me to run power to my garden (kind of a silly endeavor). I also had concerns about the Pi running out in the weather (full sun, storms, etc).
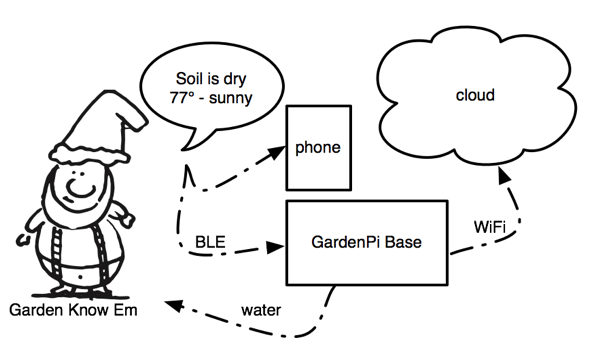
With my new Garden KnowEm, only a small coin sized micro lives in the Garden. It runs off a 3V coin cell battery (no running power to the garden). By using BLE and advertising for a few seconds every 5-10 minutes, the battery should last an entire grow season.
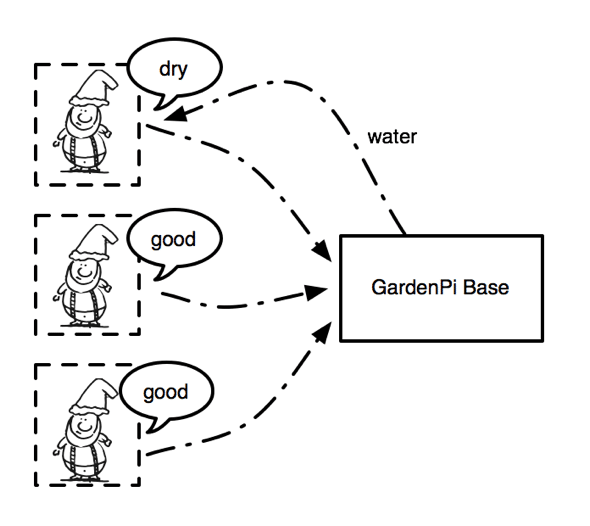
Zones
Eventually, I’d like to support multiple zones as well as my lawn. GardenPi didn’t support multiple zones and would require a Raspberry Pi per zone. I’d also need to augment my WiFi network to reach each zone. The answer is to separate the sensors from the base station. That’s exactly what Garden KnowEms do via Bluetooth.
Fun Things I’ve Learned on this Project
- Programming my first micro
- BLE stack / protocol
- Power optimization techniques
- The joy of reading lots of data sheets sarcasm
Hardware
- Nordic NRF51822-BEACON
- SoC that includes BLE and ADCs. Great dev kit for many projects (Mouser for $30)
- HTU21D
- Temperature and Humidity sensor that communicates over I²C (Sparkfun for $15).
- Photocell
- Mini photocell resistor (Sparkfun ~$1).
- Soil Moisture Sensor
- Homemade analog moisture sensor (two galvanized nails). The Garden KnowEms design runs current through both ways to cut down on the electrolysis side effects of running DC in only one direction across the probes.
Software
While this was my first foray into embedded software, I’m pretty pleased with how the code shaped up. You can get the code for Garden KnowEm on Github.
int main(void)
{
  for (;;)
  {
    switch(current_state) {
      case STARTING:
        startup();
        transition_to(READ_HUMIDITY);
        break;

      case READ_HUMIDITY:
        read_humidity();
        transition_to(READ_TEMP);
        break;

      case READ_TEMP:
        read_temp();
        transition_to(READ_LIGHT);
        break;

      case READ_LIGHT:
        read_light();
        transition_to(READ_SOIL);
        break;

      case READ_SOIL:
        read_soil();
        transition_to(RESET_SOIL_SENSOR);
        break;

      case RESET_SOIL_SENSOR:
        reset_soil_sensor();
        transition_to(START_ADVERTISING);
        break;

      case START_ADVERTISING:
        start_advertising();
        transition_to(ADVERTISING);
        break;

      case STOP_ADVERTISING:
        stop_advertising();
        transition_to(GO_TO_SLEEP);
        break;

      case GO_TO_SLEEP:
        go_to_sleep();
        transition_to(SLEEPING);
        break;

      case SLEEPING:
      case ADVERTISING:

      default:
        power_manage();
    }
  }
}
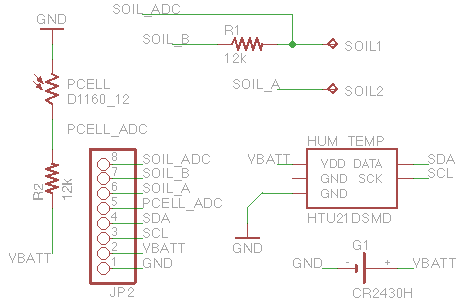
Schematic
Next Steps
Now that the KnowEms are doing their job, I’ll focus on retrofitting the GardenPi base station to collect the data, check the weather forecast, calculate whether to water, and control the water via relay to a 12V solenoid valve. Most of that functionality is already present and just needs tweaking and a USB Bluetooth dongle for the Raspberry Pi.
I’d also like to try out a couple of free tools that I’ve recently discovered: dweet.io for “tweeting” your data and freeboard.io for easily building dashboards from data streams. If you have similar IoT tools that you like, please post them in the comments.
It would be really easy to throw a solar panel and a charging circuit on this with a rechargeable AAA lithium battery that will last years. This will allow to make the device fully sealed. A quick google search shows multiple schematics.
This circuit even has a regulator circuit that stops charging when the battery is full.
Thanks Michael. If I decide to keep going on this project next spring, I’ll definitely keep this link handy. The nice thing about just using the coin cell battery is that I can keep the whole device pretty tiny.
Hi, I really enjoy your posts and I myself am a Ruby fan!
But, I am really a newbie in electricity and home automation. Do you have a picture of the end result? I would love to see what we are talking about!
Hey Shawn,
I’m really interested in building one of these of my own. However, I’m a newbie. Do you mind telling me how you enjoyed using the bluetooth beacon for this project? Did you rig up the sensors each to one that then reported data to your arduino or pi or wifi?
Hey Gracie,
I did enjoy using these beacons. The Nordic beacons were easy to work with and worked well with a gcc toolchain. The beacon had multiple GPIO that I could solder to. So, I only needed once for all the sensors. I never did finish up the pi code to collect the BLE broadcasts, but I should. For more detailed info/questions, feel free to post issues on the github repo. Good luck!
Shawn,
Thanks for the reply! :)
What is the github repo. ?
https://github.com/shawn42/garden_know_ems