I would bring my cats everywhere with me if I could, including to work. Since that’s not really an option, I decided to make them part of my Codex setup instead.
I used codex-pets.net to turn my two tabby cats into a custom Codex Pet.
To upload a Codex Pet, you need two files:
pet.json
spritesheet.webp
The pet.json file contains the metadata describing the pet. The spritesheet.webp file contains all of the animation frames.
Creating the first image
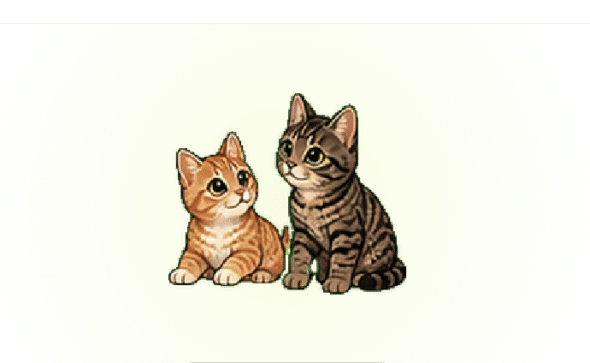
I started by creating one base image of my cats. This is the image that defines what the pet should look like.
For my pet, I wanted both cats together, simplified enough to work at a small size.
The prompt I used:
Create a small Codex pet mascot featuring these two cats together,
using the reference photos of my cats. Simplified cute full-body style,
compact readable silhouette, both cats visible as a pair,
with consistent size and positions relative to each other.
Preserve each cat's fur colors, face markings, body shape, and main distinguishing features.
 Center the pair on a transparent or flat chroma-key background.
No shadows, no text, no scenery, no extra props.
You can use AI for this step, or you can create the image manually in a tool like Pixlr, Photopea, Figma, Photoshop, Procreate, or whatever tool you prefer.
Creating the animation frames
A Codex Pet is not just one image. It needs a spritesheet with multiple animation states.
The final spritesheet needs to be:
1536 x 1872 px8 columns x 9 rows192 x 208 pxper frame- transparent background
The rows need to be in this order:
row 0: idle           6 frames
row 1: running-right  8 frames
row 2: running-left   8 frames
row 3: waving         4 frames
row 4: jumping        5 frames
row 5: failed         8 frames
row 6: waiting        6 frames
row 7: running        6 frames
row 8: review         6 frames
I used my first image as the reference for each animation state.
Here is the prompt template I used for generating frames:
Use the attached image as the exact character reference.

Create a Codex pet animation row for [STATE].

Show exactly [FRAME COUNT] full-body frames in one horizontal strip.
Keep the same two cats, same fur colors, same markings, same proportions, same style, and same positions relative to each other.

Each frame should be evenly spaced, centered, and fully visible.

Animation direction:
[DESCRIBE THE MOTION]

Use a transparent or flat chroma-key background. No shadows, no text, no scenery, no borders, no extra props.
I recommend generating one row at a time instead of trying to generate the entire spritesheet in one prompt. It is easier to fix one row than to fix a whole broken spritesheet.
Folder structure
Once I had the frame PNGs, I organized them like this:
frames/
  idle/
    00.png
    01.png
    02.png
    03.png
    04.png
    05.png
  running-right/
    00.png ... 07.png
  running-left/
    00.png ... 07.png
  waving/
    00.png ... 03.png
  jumping/
    00.png ... 04.png
  failed/
    00.png ... 07.png
  waiting/
    00.png ... 05.png
  running/
    00.png ... 05.png
  review/
    00.png ... 05.png
Each frame should be a transparent PNG.
Creating the pet.json file
Along with the spritesheet, Codex Pets need a pet.json file. This is the small metadata file that tells codex-pets.net what the pet is called and where to find the spritesheet.
For my pet, the file looked like this:
{
  "id": "two-tabby-cats",
  "displayName": "Two Tabby Cats",
  "description": "A Codex pet featuring two tabby cats.",
  "spritesheetPath": "spritesheet.webp"
}
The important part is this line:
"spritesheetPath": "spritesheet.webp"That needs to match the filename of the spritesheet exactly.
In my script, this file gets created automatically in the dist/ folder, but you could also create it manually if you are assembling the spritesheet another way.
Assembling the spritesheet with a script
You can assemble the spritesheet manually in Pixlr, Photopea, Figma, or a sprite tool like Aseprite.
I used a Python script with Pillow instead.
Install Pillow:
pip install pillowThen save this script as:
assemble_codex_pet.pyfrom pathlib import Path
import json
import re
from PIL import Image
CELL_WIDTH = 192
CELL_HEIGHT = 208
COLUMNS = 8
ROWS = [
("idle", 6),
("running-right", 8),
("running-left", 8),
("waving", 4),
("jumping", 5),
("failed", 8),
("waiting", 6),
("running", 6),
("review", 6),
]
FRAMES_DIR = Path("frames")
OUTPUT_DIR = Path("dist")
PET_JSON = {
"id": "two-tabby-cats",
"displayName": "Two Tabby Cats",
"description": "A Codex pet featuring two tabby cats.",
"spritesheetPath": "spritesheet.webp",
}
def natural_sort_key(path):
parts = re.split(r"(\d+)", path.stem.lower())
return [int(part) if part.isdigit() else part for part in parts]
def load_frame(path):
image = Image.open(path).convert("RGBA")
bbox = image.getbbox()
if bbox:
image = image.crop(bbox)
image.thumbnail((CELL_WIDTH - 10, CELL_HEIGHT - 10), Image.Resampling.LANCZOS)
cell = Image.new("RGBA", (CELL_WIDTH, CELL_HEIGHT), (0, 0, 0, 0))
left = (CELL_WIDTH - image.width) // 2
top = (CELL_HEIGHT - image.height) // 2
cell.alpha_composite(image, (left, top))
return cell
def main():
OUTPUT_DIR.mkdir(parents=True, exist_ok=True)
spritesheet = Image.new(
"RGBA",
(CELL_WIDTH * COLUMNS, CELL_HEIGHT * len(ROWS)),
(0, 0, 0, 0),
)
for row_index, (state, frame_count) in enumerate(ROWS):
state_dir = FRAMES_DIR / state
frame_paths = sorted(state_dir.glob("*.png"), key=natural_sort_key)
if len(frame_paths) != frame_count:
raise SystemExit(
f"{state} needs exactly {frame_count} PNGs, found {len(frame_paths)}"
)
for column_index, frame_path in enumerate(frame_paths):
frame = load_frame(frame_path)
spritesheet.alpha_composite(
frame,
(column_index * CELL_WIDTH, row_index * CELL_HEIGHT),
)
spritesheet.save(OUTPUT_DIR / "spritesheet.webp", "WEBP", lossless=True, quality=100)
(OUTPUT_DIR / "pet.json").write_text(
json.dumps(PET_JSON, indent=2) + "\n",
encoding="utf-8",
)
print("Created:")
print(f" {OUTPUT_DIR / 'pet.json'}")
print(f" {OUTPUT_DIR / 'spritesheet.webp'}")
if __name__ == "__main__":
main()Run it from the same folder that contains your frames/ folder:
python3 assemble_codex_pet.pyIt creates:
dist/
  pet.json
  spritesheet.webp
Those are the two files you upload to codex-pets.net.
Uploading and tweaking the pet
Once I had the two files ready, I uploaded them to codex-pets.net:
pet.json
spritesheet.webp
For my cats, I chose:
Kind: Animal
Tags: cute, animated, mascot, soft
After uploading, the site shows a preview of the pet so you can make sure everything is working. This is where I checked that both cats still looked like themselves, the background was transparent, and the animations were showing up in the right places.
One nice thing about codex-pets.net is that it also gives you some extra tools for editing and adjusting the animations after you upload the files. So if something is a little off, you have a chance to tweak it instead of starting completely from scratch.
The finished pet
And that’s how I ended up with my two tabby cats as a Codex Pet.
You can see them here: Two Tabby Cats on codex-pets.net.
My cats are now part of my Codex setup, which means I have technically found a way to bring them to work with me!