Article summary
This is part of a series on GNU Privacy Guard:
- Getting Started with GNU Privacy Guard
- Generating More Secure GPG Keys: Rationale
- Generating More Secure GPG Keys: A Step-by-Step Guide
- Using an OpenPGP Smartcard with GnuPG (this post)
Recap
Picking up where we left off, we’re on a relatively secure (air-gapped) system with a keyring looking something like this:
$ gpg -k
/home/amnesia/.gnupg/pubring.gpg
--------------------------------
pub   4096R/144A027B 2013-11-04 [expires: 2016-11-03]
uid                  John Doe <[email protected]>
sub   3072R/E02EDE61 2013-11-04 [expires: 2014-05-03]
sub   3072R/A59563DA 2013-11-04 [expires: 2014-05-03]
sub   3072R/B2E31884 2013-11-04 [expires: 2014-05-03]

$ gpg -K
/home/amnesia/.gnupg/secring.gpg
--------------------------------
sec#  4096R/144A027B 2013-11-04 [expires: 2016-11-03]
uid                  John Doe <[email protected]>
ssb   3072R/E02EDE61 2013-11-04
ssb   3072R/A59563DA 2013-11-04
ssb   3072R/B2E31884 2013-11-04
We’ve already moved the mainkey to removable media and stored it in a safe place. Now we’d like to move the subkeys onto a Smartcard for day-to-day use.
Assumptions
For the sake of simplicity, we’ll assume that we already have pcscd (and libccid) installed, either by manually moving these packages onto your air-gapped machine, or by using some other LiveCD that already includes them.
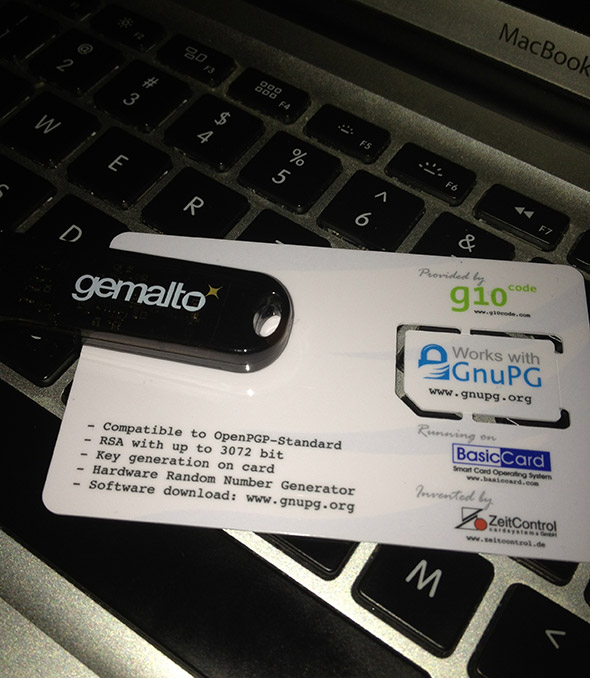
We will also assume the following (or compatible) hardware has been acquired:
- OpenPGP Smartcard V2 (with breakout)
- Gemalto USB Shell Token V2
1. Hardware Setup
This setup makes use of a Smartcard paired with a small form-factor Smartcard reader to effectively create an OpenPGP USB “token.” (Note: This reader does NOT have an external PIN pad for secure PIN entry, so if that’s a concern for you, you should consider another type of reader.)
I like this solution because it’s compact and convenient. I also like that the Smartcard and the reader are separate components. I could remove the Smartcard and use it with another device, or use another Smartcard with this reader.
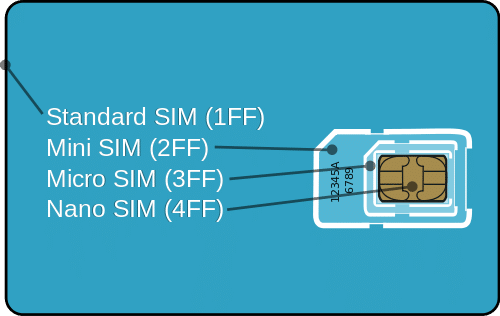
The cards with the breakout option break down to (mini-)SIM card size from the typical wallet size of a standard Smartcard. This SIM card size is supposed to fit snuggly inside the reader. I found that I still needed to file down the edges of the card a bit before it fit well. I used a table knife.
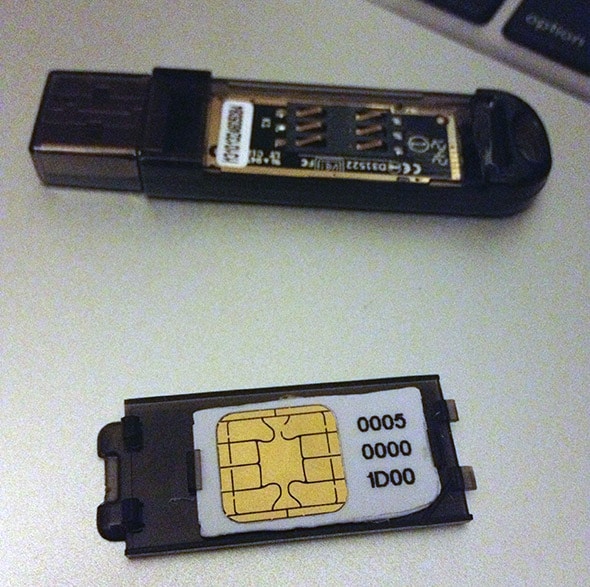
After inserting the card into the reader (it really just rests inside on top of the contacts), I put the plastic cover back on. It clicked into place, but didn’t really feel secure enough for something I intended to carry with me everywhere. I wrapped a bit of duct tape around the whole token and that set my mind at ease.
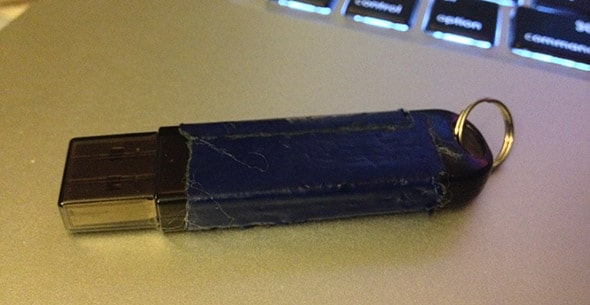
With the Smartcard + reader “token” assembled, I was ready to add my keys.
2. Changing PINs
The Smartcard is protected by two PINs. The user PIN (default: 123456) and the admin PIN (default 12345678). After three incorrect entries of the user PIN, the card becomes “blocked” and can only be “unblocked” by entering the admin PIN. After three incorrect entries of the admin PIN, the card is destroyed. This prevents abuse should the card fall into the wrong hands. It also means that it’s important not to forget your PIN(s).
From the gpg --card-edit menu, you can set the user PIN:
> passwd
1 - change PIN
2 - unblock PIN
3 - change the Admin PIN
4 - set the Reset Code
Q - quit
Your selection? 1
Please enter the PIN
New PIN
New PIN
PIN Changed.
And the admin PIN:
1 - change PIN
2 - unblock PIN
3 - change the Admin PIN
4 - set the Reset Code
Q - quit
Your selection? 3
Please enter the PIN
New PIN
New PIN
PIN Changed.
While editing the card, you can also set other metadata like the card owner’s name and login.
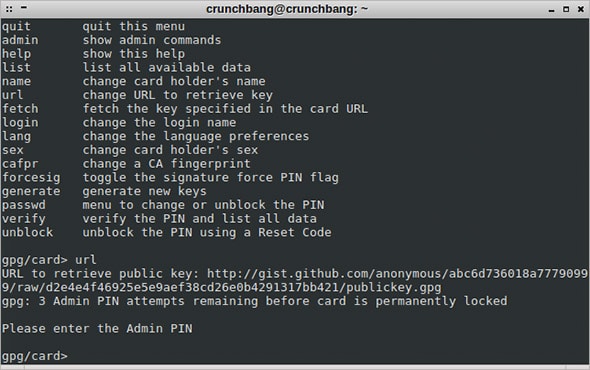
One field we’ll want to make sure to set is the url to fetch our public key from. Populating this field will make it much easier to start using the card on our normal computer because we’ll be able to use the fetch command in this menu to add our public key and some private key stubs to our keyring.
3. Adding the Keys
Keys can be generated on the Smartcard from the gpg --card-edit menu, but we won’t be using that method because it doesn’t allow us to have offline backups, which would be helpful to have if case our Smartcard were to meet an untimely demise. (As an aside, generating keys on a Smartcard also forces you to trust the built-in Random Number Generator, etc., etc.)
Instead of generating keys on the Smartcard, we will move the subkeys we generated in our air-gapped environment onto the Smartcard. We do this from the gpg --edit-key menu.
gpg --edit-key [email protected]
We’ll toggle our view from the public to the private parts of the keys, select each key we want to tranfer, and then move them onto the card with the keytocard command:
gpg> toggle
...
gpg> key 1 # Select first (sub)key to transfer
...
gpg> keytocard # Move selected key to smartcard
...
gpg> key 1 # Deselect first key
...
gpg> key 2 # Select second key to transfer
...
gpg> keytocard # Move selected key to smartcard
...
gpg> key 2 # Deselect second key
...
gpg> key 3 # Select third key to transfer
...
gpg> keytocard # Move selected key to smartcard
...
This copies each subkey into place on the card. Once we’ve done this, we can replace the subkeys in our local keyring with empty stubs by using the save command.
Afterwards we should see that the subkeys in our local keyring are stubs and that the corresponding keys are now on the Smartcard.
gpg -K
...
gpg --card-status
...
4. Using the Smartcard on a Mac
Setup
Now we’re ready to take our Smartcard to another computer and start using it. Let’s assume we have Mac where we’d like to use our SmartCard. GPGTools is a popular choice that provides some nice GUI options, but I prefer to use gpg primarily from the commandline and manage the packages with Homebrew.
We’ll install gpg2 (which includes scdaemon and will also pull in gpg-agent and pinentry):
brew install gpg2
I do use one tool from GPGTools though: a GUI version of pinentry called pinentry-mac. I do this because keeping track of tty’s while using tmux can be a pain, and also because it works with Thunderbird + Enigmail.
Old binaries of the standalone mac-pinentry can still be found on GitHub. Alternatively, you could build it yourself from the latest source. To use it, add pinentry-program /Applications/pinentry-mac.app/Contents/MacOS/pinentry-mac to your ~/.gnupg/gpg-agent.conf.
I also create a Launch Agent to start gpg-agent for me because I like to use it as my SSH agent. This allows me to use the third key on my Smartcard, the “authentication” key, as an SSH key for logging into remote systems or using Git over SSH. That plist resides in ~/Library/LaunchAgents/net.mikeenglish.gpgagent.plist and looks something like this:
    Label
    net.mikeenglish.gpgagent
    ProgramArguments

        /usr/local/bin/gpg-agent
        --daemon
        --scdaemon-program
        /usr/local/Cellar/gnupg2/2.0.22/libexec/scdaemon
        --write-env-file
        --use-standard-socket
        --default-cache-ttl
        43200
        --enable-ssh-support
        --default-cache-ttl-ssh
        43200

    RunAtLoad

    StandardErrorPath
    /dev/null
    StandardOutPath
    /dev/null
    ServiceDescription
    Run gpg-agent at login.
I use long cache timeouts; you may want to use something shorter. The important options here are:
--scdaemon-programtells gpg-agent where to findscdaemon, the Smartcard daemon it uses to communicate with the Smartcard.--write-env-filetellsgpg-agentto write an environment file we can source that contains information like the paths to the agent sockets. The default location for that file is$HOME/.gpg-agent-info. (We’ll want tosource $HOME/.gpg-agent-infoin our bash or zsh profile.)--enable-ssh-supportallowsgpg-agentto act as an SSH agent.
These options could also be moved into ~/.gnupg/gpg-agent.conf rather than this Launch Agent plist.
To load and start the Launch Agent without rebooting: launchctl load ~/Library/LaunchAgents/net.mikeenglish.gpgagent.plist and then source ~/.gpg-agent-info in your shell.
Usage
Plug the card in. Run gpg2 --card-status. If everything is configured correctly, you should see something like:
$ gpg2 --card-status
Application ID ...: D276000124010200000500001D000000
Version ..........: 2.0
Manufacturer .....: ZeitControl
Serial number ....: 00001D00
Name of cardholder: John Doe
Language prefs ...: en
Sex ..............: unspecified
URL of public key : https://gist.github.com/anonymous/abc6d736018a77790999/raw/d2e4e4f46925e5e9aef38cd26e0b4291317bb421/publickey.gpg
Login data .......: john
Signature PIN ....: forced
Key attributes ...: 3072R 3072R 3072R
Max. PIN lengths .: 32 32 32
PIN retry counter : 3 0 3
Signature counter : 0
Signature key ....: C289 BFA1 F5DA 6384 6310  3966 5E9A 2530 ED59 7D80
      created ....: 2014-01-24 04:07:52
Encryption key....: 8BE5 77DD EABF ED11 F4A4  783D DE61 0E24 7707 A102
      created ....: 2014-01-24 04:09:13
Authentication key: 1AD9 EE61 FE56 3F41 31D2  5E4D 501F 59F5 7B06 3F80
      created ....: 2014-01-24 04:10:25
General key info..: [none]
If you haven’t loaded the Launch Agent for gpg-agent yet and it’s not already running in the background, you may see something more like this, with gpg-agent and scdaemon being spun up on demand:
$ gpg2 --card-status
gpg-agent[8670]: enabled debug flags: command mpi crypto memory cache memstat hashing assuan
scdaemon[8679]: pcsc_control failed: invalid parameter (0x80100004)
scdaemon[8679]: pcsc_vendor_specific_init: GET_FEATURE_REQUEST failed: 65538
Application ID ...: D276000124010200000500001D000000
Version ..........: 2.0
Manufacturer .....: ZeitControl
Serial number ....: 00001D00
Name of cardholder: John Doe
Language prefs ...: en
Sex ..............: unspecified
URL of public key : https://gist.github.com/anonymous/abc6d736018a77790999/raw/d2e4e4f46925e5e9aef38cd26e0b4291317bb421/publickey.gpg
Login data .......: john
Signature PIN ....: forced
Key attributes ...: 3072R 3072R 3072R
Max. PIN lengths .: 32 32 32
PIN retry counter : 3 0 3
Signature counter : 0
Signature key ....: C289 BFA1 F5DA 6384 6310  3966 5E9A 2530 ED59 7D80
      created ....: 2014-01-24 04:07:52
Encryption key....: 8BE5 77DD EABF ED11 F4A4  783D DE61 0E24 7707 A102
      created ....: 2014-01-24 04:09:13
Authentication key: 1AD9 EE61 FE56 3F41 31D2  5E4D 501F 59F5 7B06 3F80
      created ....: 2014-01-24 04:10:25
scdaemon[8679]: updating slot 0 status: 0x0000->0x0007 (0->1)
General key info..: [none]
In order to use the card, we’ll need to set up stubs in our keyring. As I mentioned before, we can do this with the fetch command from gpg2 --card-edit:
$ gpg2 --card-edit
Application ID ...: D276000124010200000500001D000000
Version ..........: 2.0
Manufacturer .....: ZeitControl
Serial number ....: 00001D00
Name of cardholder: John Doe
Language prefs ...: en
Sex ..............: unspecified
URL of public key : https://gist.github.com/anonymous/abc6d736018a77790999/raw/d2e4e4f46925e5e9aef38cd26e0b4291317bb421/publickey.gpg
Login data .......: john
Signature PIN ....: forced
Key attributes ...: 3072R 3072R 3072R
Max. PIN lengths .: 32 32 32
PIN retry counter : 3 0 3
Signature counter : 0
Signature key ....: C289 BFA1 F5DA 6384 6310  3966 5E9A 2530 ED59 7D80
      created ....: 2014-01-24 04:07:52
Encryption key....: 8BE5 77DD EABF ED11 F4A4  783D DE61 0E24 7707 A102
      created ....: 2014-01-24 04:09:13
Authentication key: 1AD9 EE61 FE56 3F41 31D2  5E4D 501F 59F5 7B06 3F80
      created ....: 2014-01-24 04:10:25
General key info..: [none]
gpg/card> fetch
gpg: requesting key ED597D80 from http server gist.github.com
gpg: key 186086A4: public key "John Doe <[email protected]>" imported
gpg: Total number processed: 1
gpg:               imported: 1  (RSA: 1)
gpg/card> quit
This adds the public key to our public keyring. Running gpg2 --card-status once more after this will add the secret key stubs to our secret keyring.
Now let’s test it:
$ cat > message.txt
This is a secret message for John Doe.
^D
$ gpg2 -esa -r [email protected] message.txt
gpg: 7707A102: There is no assurance this key belongs to the named user
pub  3072R/7707A102 2014-01-24 John Doe <[email protected]>
 Primary key fingerprint: CAE1 A98D C49E 66EB 9DFD  AD01 A0A9 03D4 1860 86A4
      Subkey fingerprint: 8BE5 77DD EABF ED11 F4A4  783D DE61 0E24 7707 A102
It is NOT certain that the key belongs to the person named
in the user ID.  If you *really* know what you are doing,
you may answer the next question with yes.
Use this key anyway? (y/N) y
You should then see the mac-pinentry prompt asking for your user PIN in order to do the signature. (Remember, it’s important not to flub this because it can lock you out of your card and make it unusable.)
And then we can decrypt and verify the signature:
$ gpg2 -d  message.txt.asc
gpg: encrypted with 3072-bit RSA key, ID 7707A102, created 2014-01-24
      "John Doe <[email protected]>"
This is a secret message for John Doe.
gpg: Signature made Fri Jan 24 04:40:54 2014 EST using RSA key ID ED597D80
gpg: Good signature from "John Doe <[email protected]>"
gpg: WARNING: This key is not certified with a trusted signature!
gpg:          There is no indication that the signature belongs to the owner.
Primary key fingerprint: CAE1 A98D C49E 66EB 9DFD  AD01 A0A9 03D4 1860 86A4
     Subkey fingerprint: C289 BFA1 F5DA 6384 6310  3966 5E9A 2530 ED59 7D80
We now know that we are able to use two of the three keys on our Smartcard, but what about the third?
Using an OpenPGP Smartcard for SSH Authentication
For this, it’s important that gpg-agent is running with the --enable-ssh-support option and for our shell environment to have the correct SSH_AUTH_SOCK. It should look like this:
$ echo $SSH_AUTH_SOCK
/Users/doe/.gnupg/S.gpg-agent.ssh
We should be able to see our authentication key listed as an identity:
$ ssh-add -l
3072 f5:3a:4d:b9:9c:ca:d5:67:5f:9f:63:f2:ca:bc:40:cb cardno:000500001D00 (RSA)
...
(The agent may also contain other identities like ~/doe/.ssh/id_rsa.)
We can export our public key(s) from the agent in the correct format for an authorized_keys file like so:
$ ssh-add -L
ssh-rsa AAAAB3NzaC1yc2EAAAADAQABAAABgQDrXyNLWQx8y2ofD4lwc2/FlAt0Mv/XtKE3j531S32MqGn8ZmxIv8BaIADMhSUkhlhoZckhJ7eGOKLeoyUbWQsGSfebhfn/rQe7vNVbkM/nftoDJyToWfq2YjoZjiCIUFVxqM8xkyyOm160VTLf84EuA4O9xpgvqX6IMScX8Sd6t8ztzaA+7Zxw/xvx2c/RHO+CUGXUNGSvKwpM04BWCxDnnucXaj9hsNQU2MZ613pfd39eKdIGgLaE+jvNTx1vPXkdSQ2vUoRZBC/jRNnyYsPZ8gmHjSz5KgaRvq0VmPWoja6/65ww5xy5riN0xwbCxmsmdBo9kMoKMDLHRdA8ShZg9KGI77MdR+64t0rf3gSuE08jOZ6q3ojK0JKedm6Fd26bUPLX+b5hwmNnCq8lODFz8c+gNwwODFtV2rtQRCLs1fireQBqU24+VZ2WZvuUmh/Y8PdE+fbUINTlAQ2KWSVheh8IAeb7m6XQY7phwPFOF1+S5pmArBjM14sxxTnrIVE= cardno:000500001D00
...
Copy that onto a sever, and you should be able to log in using the key on your Smartcard.
Something like:
ssh user@host 'mkdir -p ~/.ssh;echo '`ssh-add -L`' >> ~/.ssh/authorized_keys'
One minor frustration I have here is that the pinentry prompt is displayed for SSH (and consequently Git) too, even when the private keys on disk have already been decrypted and imported to ~/.gnupg/private-keys-v1.d/. That is, the prompt appears when no passphrase is actually required. It’s possible that newer versions of mac-pinentry may handle this better, but I haven’t tried building them yet.
To verify that these things really are using the Smartcard, just try them again after unpluggining the card from your USB port.
Using the Smartcard on Linux
Using the Smartcard on a Linux computer is quite similar, though the package names and method of launching gpg-agent will be different. On Debian Wheezy systems at least, scdaemon is packaged with gpgsm rather than gpg2, for example.
Using the Smartcard on Windows
It should also be possible to use this same device in a Windows environment. I haven’t tested this myself yet, but will update this post if and when I do.
Overall a good post. Just some comments:
1. When you use a smartcard you have a PIN, not a passphrase. This isn’t just semantics. Many of the options for caching passhrases (default-cache-ttl etc) do nothing because PIN unlocking happens on the card and not in scdaemon.
This is why you need to keep entering the pin for SSH by default. This is also why after you decrypt a single document you’ll no longer be asked for a pin to decrypt until you remove the card. The default settings unlock the card for decrypting and keeps it unlocked until you remove the card, regardless or your passphrase cache settings.
But per the default settings you will be prompted for a PIN every time you want to sign a document. There’s some option to change this behavior on the card and keep the key unlocked. This will probably stop the prompts every time you ssh. However, if someone owns your box, they can start signing documents with your supposedly secured unhackable card, so you probably don’t want to do that.
2. You may run into a problem on linux where gnome keyring fights with scdaemon for access to the smart-card, causing the card to seem to be unavailable, and provide different error messages depending on whether you use gpg or gpg2. The only workaround I found was to remove the gnome-keyring-daemon file. I wrote a blog post about this that might help.
Hi Grant!
Thanks for the clarification; you are correct. The PIN/passphrase distinction is important. I tend to remove my Smartcard after each use so I need to enter my PIN each time regardless of other caching settings.
However, in this case, my frustration is not with entering a PIN to access the authentication key on the Smartcard for SSH (that would be expected), but that pinentry is also used to prompt for passphrases and specifically prompts for a passphrase for an RSA OpenSSH key that I have on disk with a passphrase that has already been cached when it is first added to the agent (gpg-agent acting as an ssh-agent). I don’t actually have to re-enter the passphrase, but I do have to click “OK” or hit Enter each time it comes up. It’s a pretty minor frustration, really, but it seems like either a bug or a misconfiguration that could easily confuse new users (it confused me at first) so I thought it was worth mentioning.
I have also experienced conflicts with gnome keyring when using Linux. Besides fighting with scdaemon for access to the smartcard, I’ve found that it is often also configured to act as the default ssh-agent, preventing gpg-agent with –enable-ssh-agent from working properly. Thanks for the link to your post! It’s always helpful to have a few more data points of peoples’ experiences with these tools.
-Mike
I follow now.
Another thing to note is that gpg-agent will import a copy of your ssh key into ~/.gnupg/private-keys-v1.d/ and use that. So after the initial import, it will grab the key from there and not ~/.ssh/id_rsa.
Which means you probably do want to add the appropriate caching settings to .gpg-agent.conf for your non-smartcard key. e.g. `default-cache-ttl 3600` to cache the key for an hour.
Right, though wouldn’t it be `default-cache-ttl-ssh` in this case?
I have both specified not in gpg-agent.conf, but in the arguments passed to gpg-agent as part of the LaunchAgent configuration. I believe these cache times are being respected, but the initial prompt still seems unnecessary.
Re-reading the post, I see now where I glossed over some important details—namely that SSH keys are imported to ~/.gnupg/private-keys-v1.d/. I’ll update accordingly.
I read with great interest your story about OpenPgP cards.
I don’t know why it is so difficult to find such clear exlenations of this topic.
Another probmem I have, besides a decent manual, is in finding the cards itselfs.
Can you give me any hints where I can buy one?
gabriël
@Gabriel — the Yubikey Neo can act as an OpenPGP card (among other things). It’s about $50.
Yes, as BostonEnginerd mentioned, the Yubikey NEO can be used as an OpenPGP smart card. I recently bought one of these devices and it looks like it will be a very versatile tool. The OpenPGP implementation for the Yubikey NEO is as an open source JavaCard applet.
As I mentioned in an earlier post, another option is to use the (closed source) BasicCard OpenPGP v2 implementation with a reader like Gemalto’s USB Shell Token (now sold under a different name, I think). Both card and reader can be purchased from Kernel Concepts, though there are other vendors who provide similar products as well. If going the route of a separate card and reader, you also have the option of getting a reader with an external PIN pad which may fit some threat models better than inputting the PIN through the computer the reader is attached to.
A third option would be a board running the open source Gnuk software. I haven’t used it yet, but it appears to be under fairly active development. Specifically, the Gnuk implements the OpenPGP v2 smart card protocol for STM32F103. An FST-01, for example, can be purchased for around $35-40.
Ultimately, you’ll need to decide who you trust, and what device meets your needs best, but hopefully this gives you a start to see what’s out there.
As an update, yubikey 4 has “touch option”, and you can set it separately for every key (sig, aut, dec). if enabled, you have to physically touch yubikey for operation to be executed on smartcard. Also this touch option can be set to fix (not only to on,off), so it cannot be reset to off by malware. Only during new private key import it can be resetted of off. pretty interesting..
As a side note, you should use /usr/local/opt/gnupg2/libexec/scdaemon as the scdaemon location in your launchctl agent, otherwise your agent won’t work if you update GPG.