In my previous blog post, I introduced you to Unwind Segues in iOS. In that example, much of the work was done in the Interface Builder of Xcode. Now I’ll show you how to perform an unwind segue in code and how to pass data along the unwind segue.

We are going to build upon the example we built in my first post. In that example, I put a “Next” button on each view controller that goes from #1 to #3 in order. To do this, I used “Show” or “Push” Segues as you normally would to go from one view controller to the next. Then I created an Unwind Segue that goes from #3 all the way to #1.
Originally we had Ctrl-dragged from the “Home” button on UIViewController #3 to the “Exit” outlet to create our Unwind Segue and take us back to view controller #1. This time we’re going to have two buttons on view controller #3 that will take us back to view controller #1 but pass along some data in the process. I’ll show you two ways to accomplish this task.
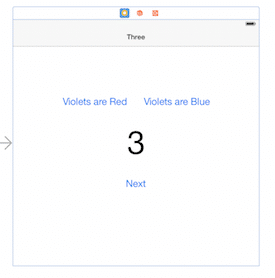 Many times you have a pattern where the user will navigate to a view controller, do a task on that view controller, and then pop back where they came from. You may need to know what the user did on that view controller. You could store some global state or use core data to transport that information back to the original view controller; sometimes that’s appropriate. But in this case we want to pass that information along with the segues. The problem we are going to solve is the user is going to select whether Violets are Red or Blue on view controller #3 and we need to know that information on view controller #1.
Option A – Save State in View Controller #3
1. Add button actions.
Instead of Ctrl-dragging from each “Violets are Red or Blue” button to the “Exit” outlet, we are going to create regular action outlets on each button and perform the Unwind Segue in code. I am going to create two button actions called “violetsAreBlueAction” and “violetsAreRed” action on my view controller #3. The code in ThreeViewController.c will look like this:
@implementation ThreeViewController

- (IBAction)violetsAreRedAction:(id)sender {

    self.violetsAreColor = @"Red";

}

- (IBAction)violetsAreBlueAction:(id)sender {

    self.violetsAreColor = @"Blue";

}

@end
2. Add the Unwind Segue using Interface Builder.
As you can see, I added a property of type NSString to ThreeController. Add this to the header file, so that it’s accessible to other classes. But we’re not done yet—all we’ve done is save state when each button is pressed. Now we need to perform the unwind segue. Ctrl-drag from the yellow view controller outlet to the “Exit” outlet. What this does is add the Unwind Segue to the scope of the entire view controller #3 instead of only one button like we did in my previous blog post with the “Home” button.
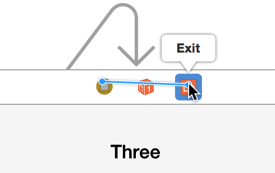
Then select the “prepareForUnwind” function on the modal popup after you release from Ctrl-dragging. This will add our Unwind Segue so we can call it from code.
3. Give the Unwind Segue an identifier.
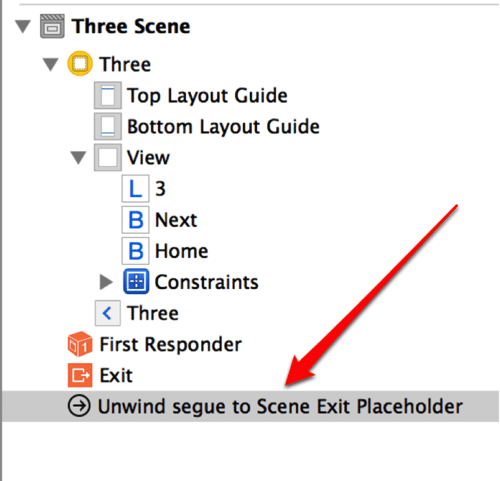
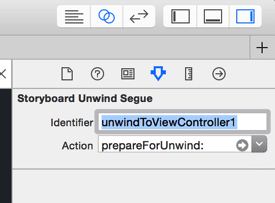
In order to call this Unwind Segue from code, we need to give it an identifier. Click on the unwind segue in the document outline and give it an identifier of “unwindToViewController1”.
4. Perform the Unwind Segue in code.
To trigger an Unwind Segue, we use the same technique to trigger a normal push segue. We simply call performSegueWithIdentifier on the view controller and give it our identifier.
@implementation ThreeViewController

- (IBAction)violetsAreRedAction:(id)sender {

    self.violetsAreColor = @"Red";

    [self performSegueWithIdentifier:@"unwindToViewController1" sender:self];

}

- (IBAction)violetsAreBlueAction:(id)sender {

    self.violetsAreColor = @"Blue";

    [self performSegueWithIdentifier:@"unwindToViewController1" sender:self];

}

@end
5. Get the data from the SourceViewController.
If you build and run, you will see that, when you press either button in view controller #3, it will take you back to view controller #1. Now let’s turn our attention to the code for view controller #1 and see if we can read what color of Violets the user chose.
@implementation OneViewController

-(IBAction)prepareForUnwind:(UIStoryboardSegue *)segue {

    if ([segue.identifier isEqualToString:@"unwindToViewController1"]) {

        ThreeViewController *threeVC = (ThreeViewController *)segue.sourceViewController;

        NSLog(@"Violets are %@", threeVC.violetsAreColor);

    }

}

@end
The prepareForUnwind function was already in OneViewController from my previous blog post, but it had no code inside it. It was only there as a marker to tell the system which view controller to pop back to. Now we can add some code to the function to get the data we need. As you can see, you can access and cast the sourceViewController of the segue to be the ThreeViewController and we can access which violet color was chosen.
Option B – Use Identifiers to Know which Button Was Pressed
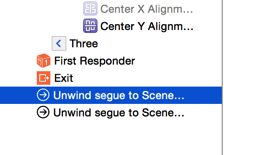
The other option is a simple one, as long as all you need to know is which button was pressed. This time we are going to Ctrl-drag from each “Violets are…” button to the “Exit” outlet and create two Unwind Segues.
Give each one a separate identifier of “Red” and “Blue”:
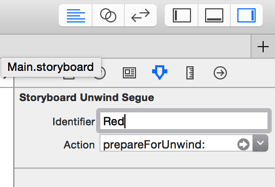
Now from the OneViewController we can determine which button was pressed simply by inspecting the identifier of the segue.
@implementation OneViewController

-(IBAction)prepareForUnwind:(UIStoryboardSegue *)segue {

    if ([segue.identifier isEqualToString:@"Red"] || [segue.identifier isEqualToString:@"Blue"]) {

        NSLog(@"Violets are %@", segue.identifier);

    }

}

@end
This is the second part of my series on Unwind Segues:

Thank you a lot. Exactly what i wanted to know
Part 2 is succinct and easy to read. Except at first it seemed you pulled The prepareForUnwind out of thin air and I was left to ponder in which class it was defined in.
This is really great!!! thanks for shared the code!! Really helped!!
exactly why i dont use storyboards.
Thank you, Mike! This helped me to use back navigation bar button unwind segue without adding a custom bar button. In fact, I was even able to make it work with 2 parent view controllers and made the function execution on the necessary controller by giving the same name to the functions in the corresponding parent controllers.
Good one!
This is what I needed! Thank you!
Thanks everyone for the nice comments. 👍
Nice tutorial!. I am trying to navigate to a view from a tab bar controller(which was presented modally). I get “Unbalanced calls to begin/end appearance transitions for “. in my console. Here is my view hierarchy Nav(VC1->VC2->VC3), Now VC3 presented a TabViewController modally. Tab(TVC1, TVC2). I used unwind segue to from TVC1 to VC2. I got the above warning. Any help appreciated.
I get “Unbalanced calls to begin/end appearance transitions for “. in my console. Here is my view hierarchy Nav(VC1->VC2->VC3), Now VC3 presented a TabViewController modally. Tab(TVC1, TVC2). I used unwind segue to from TVC1 to VC2. I got the above warning. Any help appreciated.
Why don’t you provide github example project?
Can you please show how this code looks in Swift 3?
Champion! Great job educating me on how unwind works!