In this post, I will show you how to switch between two child view controllers that are constrained with auto layout.
I struggled with the name of this post since I called my last post in this series The Easy Way to Switch Container Views in iOS. I didn’t want to say this method is “the hard way” or “the right way” because the “easy” method might be the right method if the downsides I mentioned in my last post are not an issue for you. The next title I considered was “Switching Container Views with Auto Layout,” but that’s not technically correct since it is not possible to have a single container view with two child view controllers. If you want this result, it has to be done manually without container views and embedded segues. Now that I have settled on a title, on to the solution.
I am going to modify the example that I used in my previous post. Previously, I toggled the visibility of two container views identified as A and B, using a segmented control to switch between them. In this example, I will still use the segmented control, but the way the view controller is constructed is totally different. If you want to follow along, I put the entire project on GitHub
Building the Example
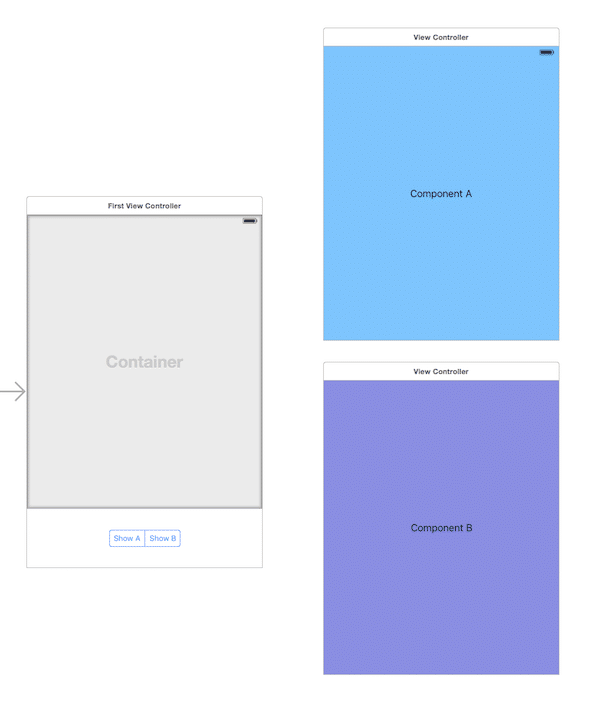
1. First, add a plain UIView or container view to your view controller. Now delete the embedded segue that connects the container view to the child view controller. A container view without a child is simply a UIView, so it doesn’t matter which one you use. I like using the container view because on the storyboard, it has a watermark that indicates this view is a container of other view controllers.
2. If you use a UIView, drag a view controller next to the parent that will become the child. If you use a container view, you should already have a child view controller on the storyboard. I applied a blue color to the child view controller and called it “Component A” so you could tell the difference between the two.
3. Next, position and constrain the container view however you want it to appear in your parent view controller.
4. Drag a second child view controller underneath Component A. I applied a purple color to the child view controller and called it “Component B”.
At this point, your layout should look like this:
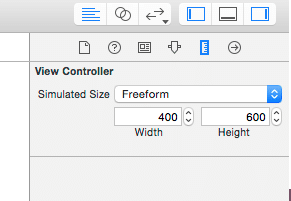
One of the advantages of using container views and embedded segues is that any layout change you make to your container view will be applied to the child view controller in interface builder. That is not the case with the two child view controllers since they are not connected with an embedded segue. They appear as a full-size view controller. However, we can apply a freeform size to our child view controllers to approximate their finished size. Adding a freeform size in interface builder does not affect the size of the view controller when you run the app.
5. Add a freeform size to both child view controllers to match the size of your container view.
6. Because we will be instantiating the child view controllers on demand, we need to give them storyboard identifiers before we create them in code. Add a storyboard identifier to each child view controller.

Adding the First Child
Our visual layout is now done. If we build and run our application right now, neither child view will be shown because we don’t have the container view’s embedded segue that automatically adds the first child view controller to the container view. We can fix this by adding the child view controller to the container view manually with our viewDidLoad method.
class ViewController: UIViewController {
    @IBOutlet weak var containerView: UIView!
    weak var currentViewController: UIViewController?

    override func viewDidLoad() {
        self.currentViewController = self.storyboard?.instantiateViewControllerWithIdentifier("ComponentA")
        self.currentViewController!.view.translatesAutoresizingMaskIntoConstraints = false
        self.addChildViewController(self.currentViewController!)
        self.addSubview(self.currentViewController!.view, toView: self.containerView)
        super.viewDidLoad()
    }
@interface ViewController ()
@property (weak, nonatomic) IBOutlet UIView *containerView;
@property (weak, nonatomic) UIViewController *currentViewController;

@end

@implementation ViewController

- (void)viewDidLoad {
    self.currentViewController = [self.storyboard instantiateViewControllerWithIdentifier:@"ComponentA"];
    self.currentViewController.view.translatesAutoresizingMaskIntoConstraints = NO;
    [self addChildViewController:self.currentViewController];
    [self addSubview:self.currentViewController.view toView:self.containerView];
    [super viewDidLoad];
}
The first line of code instantiates the child view controller named “Component A”. Next, we set the auto resizing mask appropriately on the view of the newly constructed child view controller for use with auto layout. Then we add the child view controller to the parent view controller.
The final line of code in the viewDidLoad method uses a helper method I wrote to add a sub view to another view and constrain it with auto layout. The constraints bind the subview directly to the edges of the parent view. We will make use of this method later when we want to switch between child view controllers.
func addSubview(subView:UIView, toView parentView:UIView) {
    parentView.addSubview(subView)

    var viewBindingsDict = [String: AnyObject]()
    viewBindingsDict["subView"] = subView
    parentView.addConstraints(NSLayoutConstraint.constraintsWithVisualFormat("H:|[subView]|",
        options: [], metrics: nil, views: viewBindingsDict))
    parentView.addConstraints(NSLayoutConstraint.constraintsWithVisualFormat("V:|[subView]|",
        options: [], metrics: nil, views: viewBindingsDict))
}
- (void)addSubview:(UIView *)subView toView:(UIView*)parentView {
    [parentView addSubview:subView];

    NSDictionary * views = @{@"subView" : subView,};
    NSArray *constraints = [NSLayoutConstraint constraintsWithVisualFormat:@"H:|[subView]|"
                                                                   options:0
                                                                   metrics:0
                                                                     views:views];
    [parentView addConstraints:constraints];
    constraints = [NSLayoutConstraint constraintsWithVisualFormat:@"V:|[subView]|"
                                                          options:0
                                                          metrics:0
                                                            views:views];
    [parentView addConstraints:constraints];
}
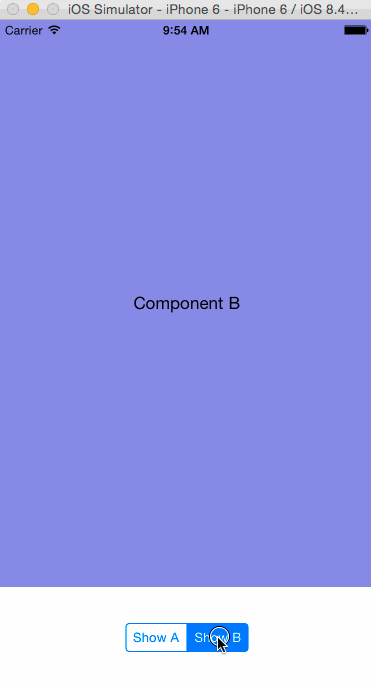
If you build and run with what you have now, you will see that Component A is shown initially. Now, let’s start thinking about how to switch over to Component B.
Using the Segmented Control
Just like my previous blog post, I am using a segmented control to switch from A to B. I created an outlet on the segmented control for the “value changed” action called showComponent. When the selectedSegmentIndex is zero, I need to show A. Otherwise, I need to show B.
I chose to instantiate my two child view controllers dynamically every time I switch from A to B. If you only have a couple of child view controllers, this step is unnecessary. Instead, you would construct them once and keep a reference to them. However, if you have many child view controllers or ones that consume a lot of memory, then constructing them as needed is the way to go.
The code is pretty straightforward. I construct the view controllers in the same way I did in the viewDidLoad method and I call a helper method called cycleFromViewController:toViewController: to do the transition. We will look at how this helper method works later in this blog post.
@IBAction func showComponent(sender: UISegmentedControl) {
    if sender.selectedSegmentIndex == 0 {
        let newViewController = self.storyboard?.instantiateViewControllerWithIdentifier("ComponentA")
        newViewController!.view.translatesAutoresizingMaskIntoConstraints = false
        self.cycleFromViewController(self.currentViewController!, toViewController: newViewController!)
        self.currentViewController = newViewController
    } else {
        let newViewController = self.storyboard?.instantiateViewControllerWithIdentifier("ComponentB")
        newViewController!.view.translatesAutoresizingMaskIntoConstraints = false
        self.cycleFromViewController(self.currentViewController!, toViewController: newViewController!)
        self.currentViewController = newViewController
    }
}
- (IBAction)showComponent:(UISegmentedControl *)sender {
    if (sender.selectedSegmentIndex == 0) {
        UIViewController *newViewController = [self.storyboard instantiateViewControllerWithIdentifier:@"ComponentA"];
        newViewController.view.translatesAutoresizingMaskIntoConstraints = NO;
        [self cycleFromViewController:self.currentViewController toViewController:newViewController];
        self.currentViewController = newViewController;
    } else {
        UIViewController *newViewController = [self.storyboard instantiateViewControllerWithIdentifier:@"ComponentB"];
        newViewController.view.translatesAutoresizingMaskIntoConstraints = NO;
        [self cycleFromViewController:self.currentViewController toViewController:newViewController];
        self.currentViewController = newViewController;
    }
}
Transitioning between View Controllers without Auto Layout
Before I get too far into demonstrating a manual transition between two child view controllers, let’s look at some sample code from Apple on how to transition between two view controllers by adjusting the frame of the views instead of using auto layout.
- (void)cycleFromViewController: (UIViewController*) oldVC
               toViewController: (UIViewController*) newVC {
   // Prepare the two view controllers for the change.
   [oldVC willMoveToParentViewController:nil];
   [self addChildViewController:newVC];

   // Get the start frame of the new view controller and the end frame
   // for the old view controller. Both rectangles are offscreen.
   newVC.view.frame = [self newViewStartFrame];
   CGRect endFrame = [self oldViewEndFrame];

   // Queue up the transition animation.
   [self transitionFromViewController: oldVC toViewController: newVC
        duration: 0.25 options:0
        animations:^{
            // Animate the views to their final positions.
            newVC.view.frame = oldVC.view.frame;
            oldVC.view.frame = endFrame;
        }
        completion:^(BOOL finished) {
           // Remove the old view controller and send the final
           // notification to the new view controller.
           [oldVC removeFromParentViewController];
           [newVC didMoveToParentViewController:self];
        }];
}
When you try to convert this method to use auto layout instead of setting the frames, you run into a problem. You can’t add auto layout constraints between two views unless they are in the same view hierarchy. The transitionFromViewController:toViewController method does not give us a callback between attaching the view to the hierarchy and calling the animation block. We can get around this by doing what the transitionFromViewController:toViewController method does manually.
Switching between View Controllers with Auto Layout
We can avoid using the transitionFromViewController:toViewController method by using the custom container view controller api to do the transition of the view controllers ourselves. I also used the UIView animation api to animate the transition. This is my version of the cycleFromViewController:toViewController method.
func cycleFromViewController(oldViewController: UIViewController, toViewController newViewController: UIViewController) {
    oldViewController.willMoveToParentViewController(nil)
    self.addChildViewController(newViewController)
    self.addSubview(newViewController.view, toView:self.containerView!)
    newViewController.view.alpha = 0
    newViewController.view.layoutIfNeeded()
    UIView.animateWithDuration(0.5, animations: {
            newViewController.view.alpha = 1
            oldViewController.view.alpha = 0
        },
        completion: { finished in
            oldViewController.view.removeFromSuperview()
            oldViewController.removeFromParentViewController()
            newViewController.didMoveToParentViewController(self)
    })
}
- (void)cycleFromViewController:(UIViewController*) oldViewController
               toViewController:(UIViewController*) newViewController {
    [oldViewController willMoveToParentViewController:nil];
    [self addChildViewController:newViewController];
    [self addSubview:newViewController.view toView:self.containerView];
    [newViewController.view layoutIfNeeded];

    // set starting state of the transition
    newViewController.view.alpha = 0;

    [UIView animateWithDuration:0.5
                     animations:^{
                         newViewController.view.alpha = 1;
                         oldViewController.view.alpha = 0;
                     }
                     completion:^(BOOL finished) {
                         [oldViewController.view removeFromSuperview];
                         [oldViewController removeFromParentViewController];
                         [newViewController didMoveToParentViewController:self];
                     }];
}
I matched the same fade transition I did in my previous blog post, but you could do better. Since we are using auto layout, you can do any transition you need by modifying the constraints. Here is the same function again with placeholders showing where to set up your constraints to animate the transition. Inside the animation block, you only need to call layoutIfNeeded.
func cycleFromViewController(oldViewController: UIViewController, toViewController newViewController: UIViewController) {
    oldViewController.willMoveToParentViewController(nil)
    self.addChildViewController(newViewController)
    self.addSubview(newViewController.view, toView:self.containerView!)
    // TODO: Set the starting state of your constraints here
    newViewController.view.layoutIfNeeded()

    // TODO: Set the ending state of your constraints here

    UIView.animateWithDuration(0.5, animations: {
            // only need to call layoutIfNeeded here
            newViewController.view.layoutIfNeeded()
        },
        completion: { finished in
            oldViewController.view.removeFromSuperview()
            oldViewController.removeFromParentViewController()
            newViewController.didMoveToParentViewController(self)
    })
}
- (void)cycleFromViewController:(UIViewController*) oldViewController
               toViewController:(UIViewController*) newViewController {
    [oldViewController willMoveToParentViewController:nil];
    [self addChildViewController:newViewController];
    [self addSubview:newViewController.view toView:self.containerView];
    // TODO: Set the starting state of your constraints here
    [newViewController.view layoutIfNeeded];

    // TODO: Set the ending state of your constraints here

    [UIView animateWithDuration:0.5
                     animations:^{
                         // only need to call layoutIfNeeded here
                         [newViewController.view layoutIfNeeded];
                     }
                     completion:^(BOOL finished) {
                         [oldViewController.view removeFromSuperview];
                         [oldViewController removeFromParentViewController];
                         [newViewController didMoveToParentViewController:self];
                     }];
}
Just the results we wanted! If you would like to try this code out yourself to see it in action, I have the entire project on GitHub.
Catch up on my other posts in this series:
- Adding an iOS Container View in Xcode
- How to Pass Data to an iOS Container View
- The Easy Way to Switch Container Views in iOS
- Switching Child View Controllers in iOS with Auto Layout
For more on using Xcode, read my series on unwind segues:
You stated, “The final line of code in the viewDidLoad method uses a helper method I wrote to add a sub view to another view and constrain it with auto layout.”
You didn’t specify where to add this code. I’m sort of lost on this and errorring out like crazy.
@Daniel
You can just add that method to your controller.
The author suggests using a custom base class, but you certainly don’t have to.
Lee
Thanks for the awesome tutorial. I need to know one thing. If ComponentA has a textField and user inputs something in textField. Then clicks on switch button to switch to componentB. And in the end user switches back to componentA, textFields’s data vanishes. Is there anyway, I can prevent it?
This tutorial is great. It’s just what I was trying to find for a number of reasons. I’m going to attempt to duplicate this because I need the functionality in a project that I’m doing. @Chanchal Raj, the reason that your textField is erasing data is because code re-instantiates the VCs every time the switch happens. See comment below. You’ll need to detect whether or not you have already instantiated the VC during the switch. If so, just do the switch. At least, I think this is the reason. I’ll know better after I attempt this on my own. In short, the re-instantiation of the view controller is causing viewDidLoad to be called, and your VC is staring from scratch every time.
“I chose to instantiate my two child view controllers dynamically every time I switch from A to B. If you only have a couple of child view controllers, this step is unnecessary. Instead, you would construct them once and keep a reference to them.”
In the showComponent function I am instantiating a new ViewController each time. Instead you could instantiate your component A and B view controllers ahead of time in the parent’s viewDidLoad and switch between the two in the showComponent function.
If you save your child view controllers and use references instead of always instantiating them than we have a bug with this code.
If you start a transition and then change the segmented control tab before the animation -and thus the transition- is completed, you lose the new view controller.
The point is that with a completion block you can’t assume the order of the instructions.
So basically you will have:
beginTransition 1
beginTransition 2
completionBlockOfTransition1
completionBlockOfTransition2
and since we use references we will removing the newViewController.
How do you think we can solve this?
Thanks for Great tutorial. I had searched switching child view controller with ONE conatiner
view. Your approach is very simple and also lightweight. it save my time lot!
Hi Mike! nice tutorial,
Just to be completely sure, this implementation doesn’t have the two view controllers loaded at the time right?
Thank you
Hi Jonathan,
That is correct. In this implementation, I dynamically create each view controller on the fly before each transition.
This is a good approach. How do i pass data from the parent view controller to the child view controller?
Hi Arun,
That is a good question. You can find the answer if you read the comments on my first blog post in this series.
–Mike.
I did read your first blog. You have explained clearly the need for container view. You have mentioned about segue in passing the data. But with this current approach I don’t think we use segue .Do we?
Arun, this is a very good question. I was wondering how you solved this, as you point out, we don’t use embedded segues in this example. The obvious solution seems to go back to the “easy” way illustrated in the previous post.
Guys ,if you need, I have a answer for this question
Great Tutorial. My issue is when i click on segmented control the corresponding child view is getting displayed and in 6 sec app is getting crashed. Can you please help me to resolve this. Thanks in advance.
Hello,
Firstly thanks for the great tutorial, How to set constraints for child VC for landscape mode, so that it works properly. presently when I tilt my device, the view goes on top of segment bar
Hi Ranjit,
My guess is that your child VC is not constrained properly using Auto Layout. Make sure your child VC is constrained on all sides. If your view is showing on top of the segment bar, then you are missing a constraint between the bottom of the child VC and the top of the view that contains the segment bar.
Just wanted to say a big thank you for a great and informative tutorial.
Thanks Andrew, glad you liked the post!
Thanks a lot for this nice tutorial! It works very well!
I have a question concerning the memory usage when switching between 2 view controllers, especially when working with mapviews.
For example, my view controller A only has a label, my view controller B has a mapkit mapview. Following your tutorial, the switching works very well but I notice that every single time when controller B is loaded, it adds ~70MB to memory usage… So the total memory climbs rather high if I switch back and forth a lot…
Is there a way to avoid this memory consumption? Any recommendations? Thanks again!
Hi Haiyan,
I would make sure you are constructing your child view controllers from scratch each time you make the switch. In my showComponent function, I create the child view controller each time. The other thing to look for is avoid strong references to any of your child view controllers. Hope that helps.
Thanks Mike for the great tutorial.
I expand it a bit your tutorial and I have some problem.
I added a new VC (NVC) I could access it pressing a button in Component A or in Component B.
I connect these two button with ctrl + drag from the button to the NVC.
On the NVC I have a button that is ctrl + drag to your First View Controller with the container.
Everything works fine until I click on Component A or B button and I’m back clicking on the NVC button.
From now on the Component A and B are not switching anymore. The container will still showing the last Component A or B before I moved to the NVC.
Thanks for your feedback.
Hi Mauro, I don’t completely understand the layout of what you are trying to do. Hopefully you have figured it out.
Hi Mike, Yes I did it.
Basically the problem was that when I was accessing the new ViewController pressing the button on the Component A or B instead of coming back with ctrl + drag to the FirstViewController I used dismissViewControllerAnimated().
In this way I’ll be back to the origins viewController.
Was a good exercise for me to make some practice on ViewController handling.
Thanks
Thanks for this tutorial !!
addSubview doesn’t seem to have a `toView` parameter. No Apple docs indicate this and I get an error in Swift 2.2.
Sorry, my bad. I hand’t noticed you created the method yourself. Naming it the same as an existing method threw me off. Please disregard.
Thanks for the helpful post! Very clear explanations and clean code samples.
👍
Thanks! Helped me in my project
👍
Thanks! I’m using this solution but I need to do an animation and I don’t understand how I can.
I want componentA to move on the left going out screen, while componentB move left, from off screen, replacing componentA. To do this I would need separate constraints for the two components, so that componentB replace the position of componentA. I can’t set constraints on the two separate viewcontrollers, I can do it only on the view container, so I don’t know how to start.
Hi AR,
Good question. The main view of the child view controllers does not have any auto layout constraints that control it’s position. The only way to move it is to adjust the main view frame position much like the example code from Apple. If you want to use auto layout, I would add a subview to the main view and constrain it with constraints you can modify when you do the transition. I would add equal width and equal height constraints, and then modify a center constraint to move it from right to left.
I have the problem with my container, because it size does’t fill the entire screen just like you. you know why? It is possible add a scroolview in container?
Thank you. Your tutorial is very good
Yes, you can add a UIScrollview in the child view controller.
i am getting follwing exception in “viewDidLoad”.
( Terminating app due to uncaught exception ‘NSRangeException’, reason: ‘*** -[__NSArray0 objectAtIndex:]: index 0 beyond bounds for empty NSArray’ ).
i am getting this on this line self.currentViewController.view.translatesAutoresizingMaskIntoConstraints = NO;
any idea why?
Hi qasim, I’ve updated the post to include the source code on GitHub
Would it not be easier to use a UINavigationController in the container view (without nav bar), and use a custom fade segue?
class FadeInPushSegue: UIStoryboardSegue {
override func perform() {
let transition: CATransition = CATransition()
transition.duration = 0.25
transition.type = kCATransitionFade
sourceViewController.view.window?.layer.addAnimation(transition, forKey: “kCATransition”)
sourceViewController.navigationController?.pushViewController(destinationViewController, animated: false)
}
}
class FadeOutPopSegue: UIStoryboardSegue {
override func perform() {
let transition: CATransition = CATransition()
transition.duration = 0.25
transition.type = kCATransitionFade
sourceViewController.view.window?.layer.addAnimation(transition, forKey: “kCATransition”)
sourceViewController.navigationController?.popViewControllerAnimated(false)
}
}
Why cant we simply use UITabBarController as the container view’s embedded segue and hide the tab bar?. It may be out of the box and easily visualised in the storyboard. Ofcourse you have to programatically switch the tabs
Life saver on a late night. Thanks!
Thanks a lot for the great solution! I have used it successfully switching two view controllers each having multiple UIViews and UIImageViews. I am using AutoLayout and the application is iPad-only. Everything looked great while app was deployed just on iPad Air 2. However, when deployed on iPad Pro with screen size 12.9″ the child view controller’s size wasn’t matching already the size of the container view and the layout was stretched horizontally with most left and most right elements off the screen completely. I tried lots of tricks but couldn’t figure out how to make it look right.So, I am wondering is there any way to set AutoLayout constrains so that the size of all UIViews in the child view controllers is just scaled up or down depending on the size of the container view if you do it “not easy” way without segues? Thanks you.
Hi Mike,
I partly followed your tutorials on using child controllers. It did help! Thanks for the information.
But, I have two tableviewcontrollers’ as child controllers for two container views which are accessible using uisegmentedcontrol. Would you please have a look at my question, http://stackoverflow.com/questions/40101381/navigation-bar-button-items-not-working-in-child-controller-from-parent-view ?
Thanks in advance…
If componentA has UITableView, say with 40 elements. After scrolling down I select the last one.
Then switch to componentB it does retain the state of the componentA.
First Thank you that help me alot
But I Have two problem
1st . I got space on top of tableview I don’t know how to fix it .
2nd. I have 3 cells when i switch view controller and going back again to tableview the cells become 6 and if I switch again it become 9 etc ..
How to fix these problems ?
Hi
I add a scrollview into the Component A view controller.
I run the app, the Component A viewcontrolller appears first and the scrollview scrolls perfectly in view controller A. However, when I witch to Component B and then I come back to Component A, the color of the screen disappears and no scroll availbable.
Please help!
Thanks
Why didn’t you put a tab controller in your container with hidden tab bar?
Hi Mike,
Thank-you for the great post as this has really helped me along in learning how to do this.
I am running into one issue though. I have it set up via your instructions, with the difference being that my segmented control is at the top, and then on the two controllers that I am using for my segues I have them configured with a UIScrollView based on https://medium.com/disblu/scroll-view-auto-layout-in-xcode-8-7f43e82fe33.
When the initial view controller loads the content of my scroll view shows up fine with the very top content visible underneath the navigation item (segmented control). If I then switch to another segment the top content is hidden underneath the navigation and happens when switching back to the initial ‘segment’ or changing the device orientation.
How do I get the top of the scroll views content to start underneath the navigation item so the top portion is view-able when switching?
Thanks,
Devin
Hi,
Basically what I ended up doing was on my navigation controller I checked the option ‘Under Top Bars’ under Extended Edges section of my navigation controller inspector.
Also under ‘Navigation Bar’ inspector I set the background color to white.
This means no seeing content scroll up underneath but at least in switching between segments the top content is readable.
Perhaps not an ideal solution but the only one I could find, perhaps this is the difference between having the selected at the top vs on the bottom.
Thanks,
Devin