I wrote recently about using Emacs as a JavaScript development environment. One of my chief complaints was the inability to easily run JavaScript tests from within Emacs. I practice TDD frequently, and having to context-switch out of the editor I’m using to run tests is a big annoyance for me.
I knew it was possible to do what I wanted from within Emacs, as evidenced by other test runner modes like RSpec-mode. Armed with that knowledge, I decided to go through the process of learning enough Emacs Lisp to make a Mocha test runner. In the process, I learned a lot about developing Emacs packages and ended up with a really useful tool, so I thought I would share some of the things I learned.
There is a lot of content here, and we are going to cover three main topics: using Emacs as a Lisp IDE, writing a simple package, and publishing that package for others to use.
Emacs as an Emacs Lisp IDE
Unsuprisingly, Emacs itself is an excellent development environment for Emacs Lisp code. It can be easily cofigured to include IDE features for Lisp development, such as autocompletion, popup documentation, integrated debugging, and a REPL.
A few recommendations
Most of these features are built in, although I highly recommend installing the third-party packages company-mode (autocompletion) and Flycheck (real-time syntax checking) if you’re going to do Emacs Lisp development.
I also recommend turning on the built-in eldoc-mode, which will pop up documentation and signatures for various functions and symbols as you write code.
Lastly, I recommend familiarizing yourself with the built-in debugging and evaluation functions for Emacs Lisp. For evaluating code to test it, you can use the built-in Lisp-interaction-mode, which the *scratch* buffer usually has enabled by default. With the mode, you can paste Emacs Lisp code and then press C-x C-e to evaluate the code and see the results.
Emacs also comes with Edebug, a built-in stepping debugger for Emacs Lisp code. There are several ways to use it, but I most commonly use the interactive function edebug-defun. When run inside the body of a function, it sets a breakpoint at the start of that function that will be hit the next time you run it.
Making a Custom Compilation Mode
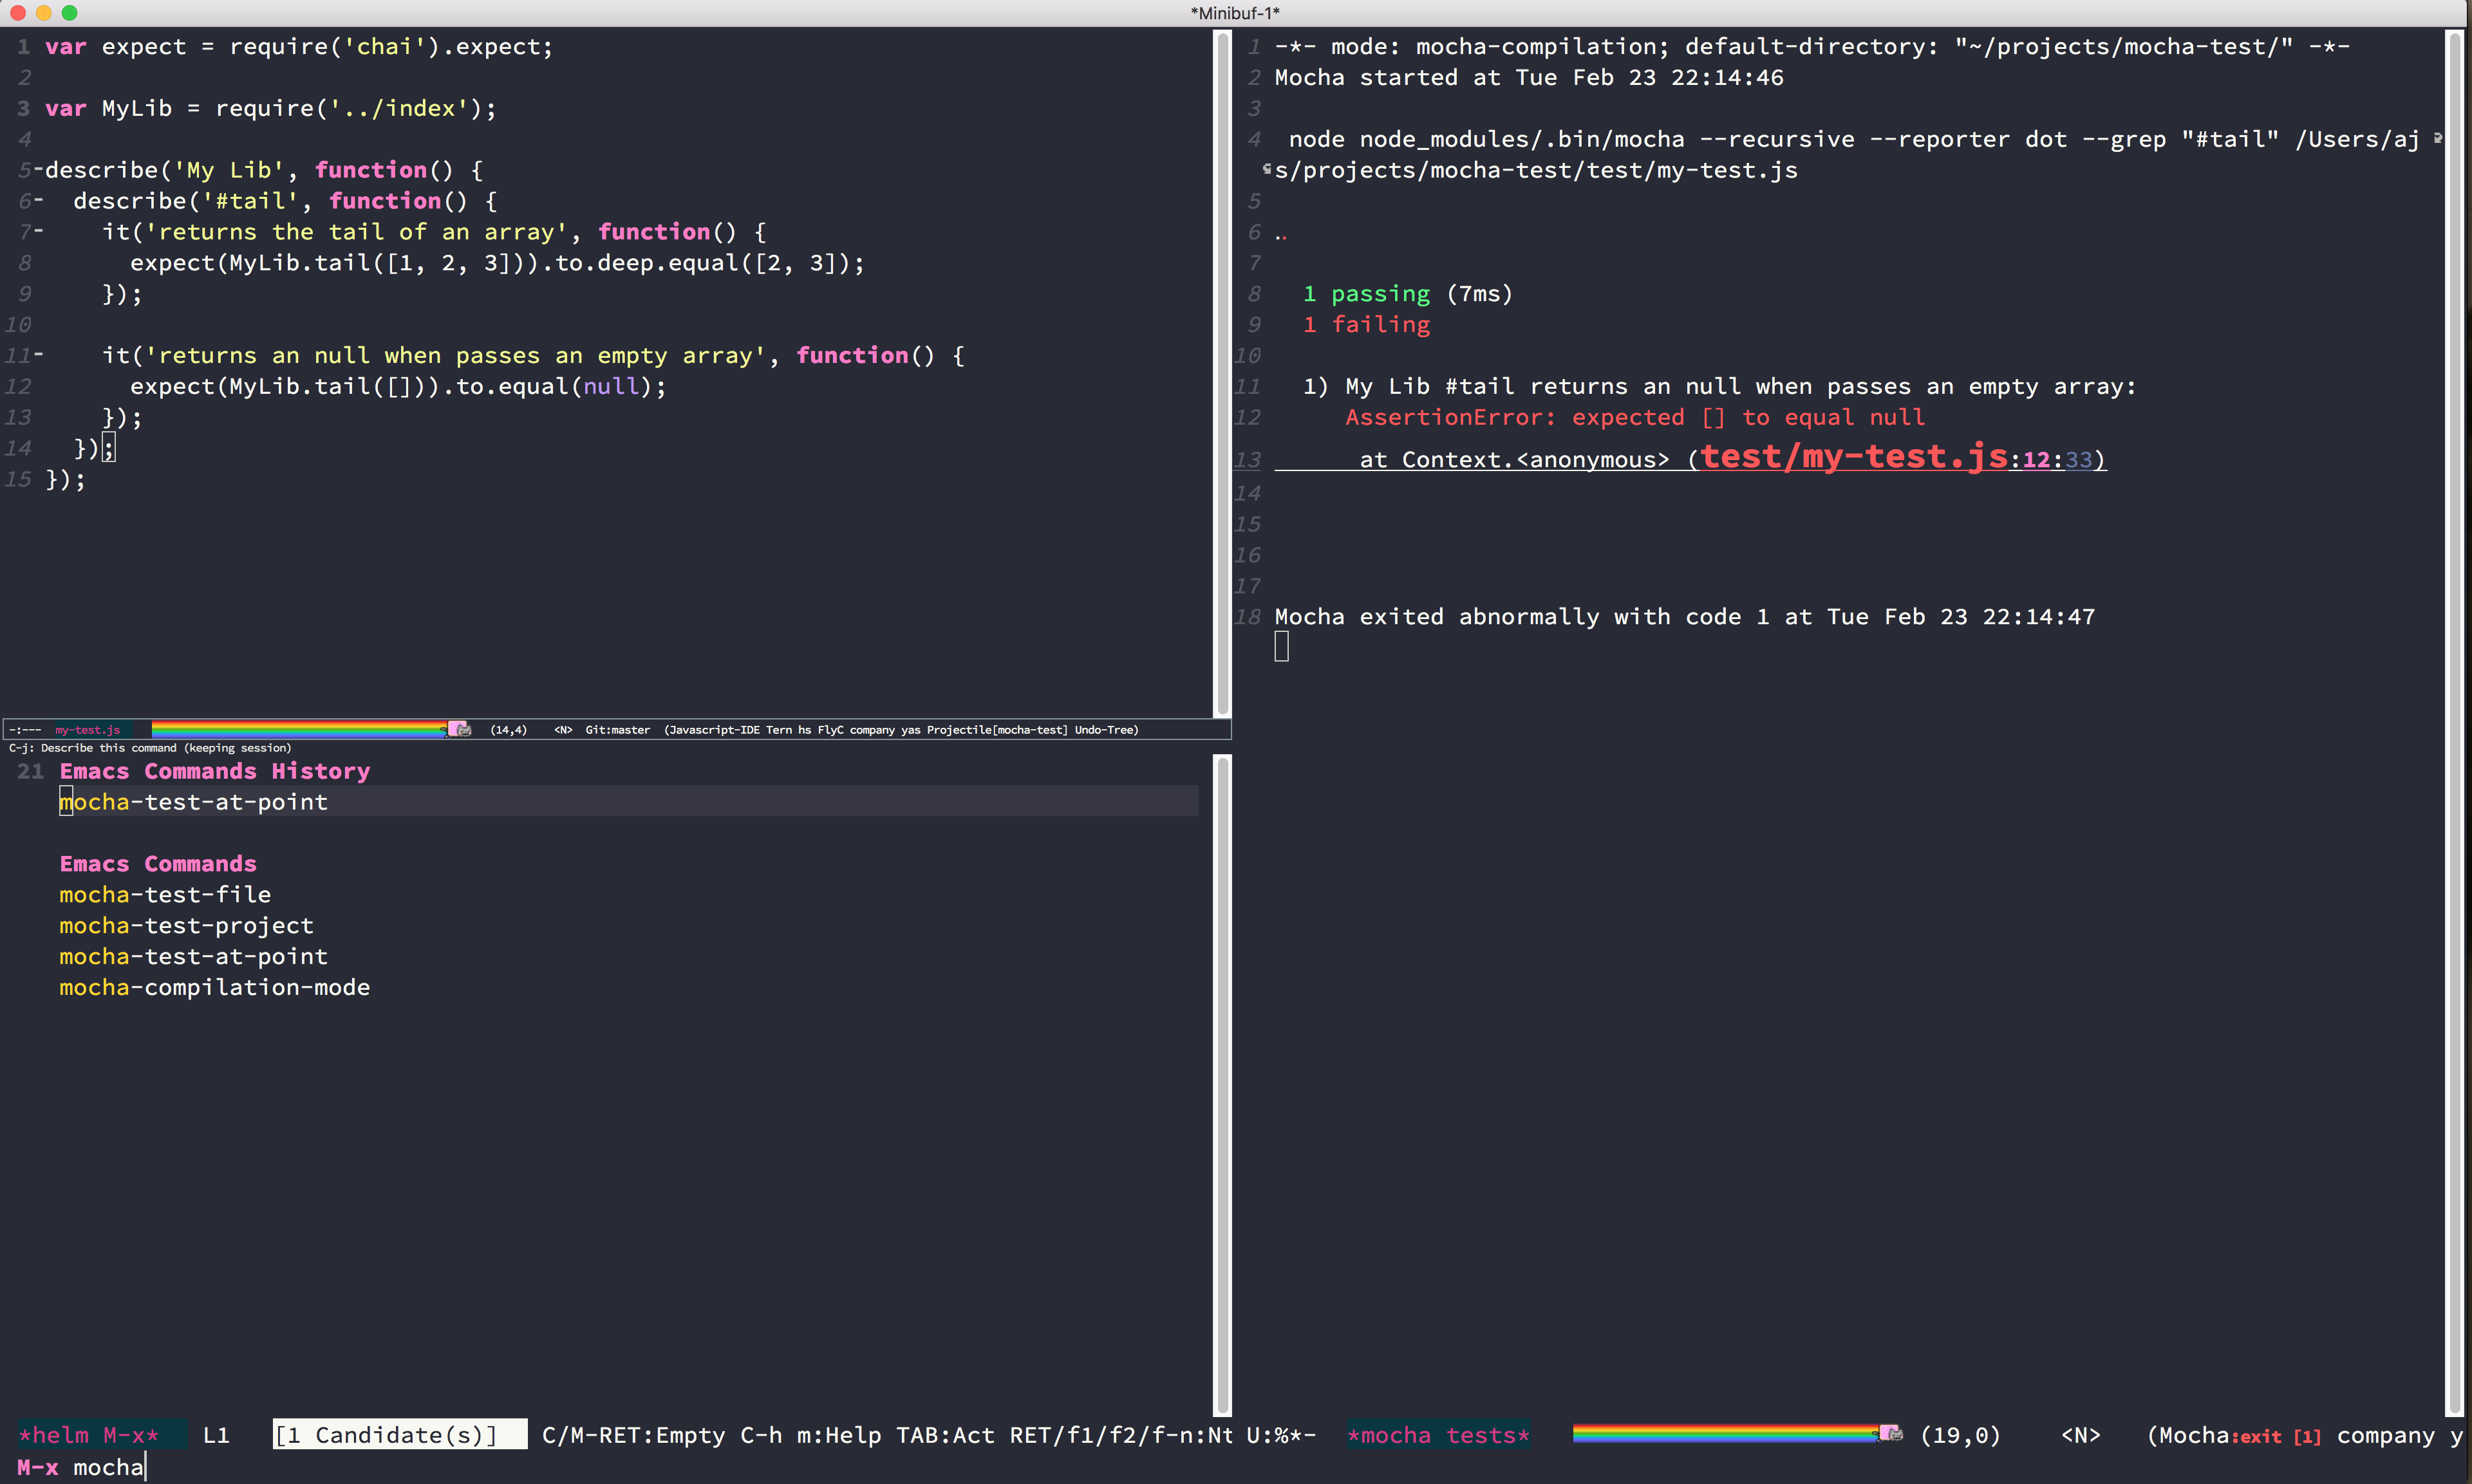
Mocha is a CLI tool, and Emacs has a number of built-in utilities for running external CLI programs.
Compilation buffer
The most relevant one for something like a test runner is a compilation buffer. In Emacs, this runs an external CLI process and displays the output in a buffer. This is useful for programs where you care about the output, like a compiler or test runner. It also includes some built-in niceties like the ability to highlight errors and jump to them.
In fact, you don’t even need to write any code to run an external command in a compilation buffer. You can just use the M-x compile command like so:

This is a solid approach for a static compilation command like the default make -k. However, it doesn’t scale well to something like a test runner, which needs to do the following:
- Run a local script, requiring a consistent working directory or an absolute path (
M-x compilewill use the directory of the current file as the working directory). - Pass dynamic configuration options like the file to test the runner.
Custom compilation mode
The solution in Emacs is to programmatically create a custom compilation mode that can take these options and run using an interactive function. This is easy to do. In fact, the compilation mode for Mocha.el is only a couple of lines:
(require 'compile)

...

(defvar node-error-regexp-alist
  `((,node-error-regexp 1 2 3)))

(defun mocha-compilation-filter ()
  "Filter function for compilation output."
  (ansi-color-apply-on-region compilation-filter-start (point-max)))

(define-compilation-mode mocha-compilation-mode "Mocha"
  "Mocha compilation mode."
  (progn
    (set (make-local-variable 'compilation-error-regexp-alist) node-error-regexp-alist)
    (add-hook 'compilation-filter-hook 'mocha-compilation-filter nil t)
  ))
While some of the syntax is a little cryptic (thanks, Lisp!), what it does is very simple. We use the built-in define-compilation-mode macro to define a compilation mode named mocha-compilation-mode, and we do two things with it:
- Pass it a regular expression that maps Node.js error output to filenames, line numbers, and column numbers.
- Add a processing hook which interprets ANSI escape codes and formats them properly.
The first enables us to quickly jump to the point of failure in a test. The second makes everything look nicer.
Running Test Commands
Now that we have a custom compilation mode that will nicely display our command output, we need to generate a test command and run it with the custom mode. Doing this will involve several simple steps.
Find project root
Many types of command line utilities need to be run from the project root. Fortunately, project roots are generally easily identified by the presence of a particular file or directory (like a source control directory). Since this is such a common need, Emacs has a built-in function, locate-dominating-file, to recursively search up a directory tree for a particular file name. The Emacs documentation on this function explains how to use it better than I could:
(locate-dominating-file FILE NAME)
Look up the directory hierarchy from FILE for a directory containing NAME. Stop at the first parent directory containing a file NAME, and return the directory. Return nil if not found. Instead of a string, NAME can also be a predicate taking one argument (a directory) and returning a non-nil value if that directory is the one for which we’re looking.
Customize configuration
Unlike an actual compilation, which would involve rerunning a single static command, something like a test runner needs to be dynamically configurable. Fortunately, Emacs has Customize, an awesome built-in and extensible configuration interface for packages (and the core editor). Customize exposes several macros which can be used to define custom configuration parameters for a package and display them in an editable GUI.
For example, here are the configurations we expose for our Mocha runner:
(defgroup mocha nil
  "Tools for running mocha tests."
  :group 'tools)

(defcustom mocha-which-node "node"
  "The path to the node executable to run."
  :type 'string
  :group 'mocha)

(defcustom mocha-command "mocha"
  "The path to the mocha command to run."
  :type 'string
  :group 'mocha)

(defcustom mocha-environment-variables nil
  "Environment variables to run mocha with."
  :type 'string
  :group 'mocha)

(defcustom mocha-options "--recursive --reporter dot"
  "Command line options to pass to mocha."
  :type 'string
  :group 'mocha)

(defcustom mocha-debug-port "5858"
  "The port number to debug mocha tests at."
  :type 'string
  :group 'mocha)
And those show up in the customize GUI like so:

Since many of these options make sense to configure on a per-project rather than global basis, Emacs also supports a special file called .dir-locals.el, which can override these settings on a per-directory basis. A typical .dir-locals.el file might look like this:
((nil . (
            (mocha-which-node . "/Users/ajs/.nvm/versions/node/v4.2.2/bin/node")
            (mocha-command . "node_modules/.bin/mocha")
            (mocha-environment-variables . "NODE_ENV=test")
            (mocha-options . "--recursive --reporter dot -t 5000")
            (mocha-project-test-directory . "test")
            )))
The syntax is a little cryptic, but if your Emacs working directory is in the same directory as this file or below it, it will respect these options in favor of any global configuration.
Once we have these configuration options defined, it is easy to write a function that will concatenate all the strings together to create our test runner command!
(defun mocha-generate-command (debug &optional mocha-file test)
  "The test command to run.
If DEBUG is true, then make this a debug command.
If MOCHA-FILE is specified run just that file otherwise run
MOCHA-PROJECT-TEST-DIRECTORY.
IF TEST is specified run mocha with a grep for just that test."
  (let ((path (or mocha-file mocha-project-test-directory))
        (target (if test (concat "--grep \"" test "\" ") ""))
        (node-command (concat mocha-which-node (if debug (concat " --debug=" mocha-debug-port) "")))
        (options (concat mocha-options (if debug " -t 21600000"))))
    (concat mocha-environment-variables " "
            node-command " "
            mocha-command " "
            options " "
            target
            path)))
Generating and Running Compile Command
Now that we can configure our test command and find the root of our project, we are ready to run it with the custom compilation mode we made earlier. I’m going to show you the most important code for doing that below, and then break it down and explain the different parts.
(defun mocha-run (&optional mocha-file test)
  "Run mocha in a compilation buffer.
If MOCHA-FILE is specified run just that file otherwise run
MOCHA-PROJECT-TEST-DIRECTORY.
IF TEST is specified run mocha with a grep for just that test."
  (save-some-buffers (not compilation-ask-about-save)
                     (when (boundp 'compilation-save-buffers-predicate)
                       compilation-save-buffers-predicate))

(when (get-buffer "*mocha tests*")
    (kill-buffer "*mocha tests*"))
  (let ((test-command-to-run (mocha-generate-command nil mocha-file test)) (root-dir (mocha-find-project-root)))
    (with-current-buffer (get-buffer-create "*mocha tests*")
      (setq default-directory root-dir)
      (compilation-start test-command-to-run 'mocha-compilation-mode (lambda (m) (buffer-name))))))
Whew! That is some pretty dense code, so let’s break it down bit by bit.
Check for unsaved buffers
The first thing this function does is check if there are any unsaved buffers open, and then prompt the user to save them. Sounds pretty complex, but since this is such a common operation, Emacs makes it possible with just a couple of lines.
  (save-some-buffers (not compilation-ask-about-save)
                     (when (boundp 'compilation-save-buffers-predicate)
                       compilation-save-buffers-predicate))
Clean up test buffer
Next, we search for the named buffer we use to run tests to see if it is still around from a previous test run. If it is, we kill it so we can get a fresh start.
  (when (get-buffer "*mocha tests*")
    (kill-buffer "*mocha tests*"))
Bind values
After that, the real work begins. We start by binding two values: the actual test command we are going to run and the path to the project root directory. Both values are calculated using the techniques and code we defined above.
(let ((test-command-to-run (mocha-generate-command nil mocha-file test)) (root-dir (mocha-find-project-root)))
Run test command
Finally, now that we have those two values, we actually run our test command. This is a three-step process of:
- Creating and switching to the buffer our tests will run in.
- Changing the working directory to our project root.
- Running our test command in the buffer with our custom compilation mode.
All of this is done with the last three lines of code:
    (with-current-buffer (get-buffer-create "*mocha tests*")
      (setq default-directory root-dir)
      (compilation-start test-command-to-run 'mocha-compilation-mode (lambda (m) (buffer-name))))))
Expose interface to users
Now that we have the code to run our test commands, we need to expose it to users. For explicit actions like running commands, Emacs uses interactive functions, which can be called interactively by a user via either the M-x interface or a hotkey.
To make a function interactive, you just include the (interactive) special form at the top of the function body like so:
;;;###autoload
(defun mocha-test-file ()
  "Test the current file."
  (interactive)
  (mocha-run (buffer-file-name)))
If you are not exporting the function as part of a mode, it is also customary to add the ;;;###autoload magic comment before the function, which helps other Emacs files referencing your package find the function so it can be used (for example, to bind them to a hotkey).
Once a function is defined as interactive, it will appear in the M-x interface and can be activated by a user.
And there you have it. With only a couple of functions and big dose of Emacs magic, we have created a highly configurable test runner that is integrated into our development environment.
Distributing on MELPA
Having done all the work to create a custom package, don’t you just want to share it with the world? Fortunately for you, Emacs has a built-in package manager that makes this pretty easy. The package manager is backed by several different repositories, so making your package publicly available is just a matter of getting it into one of these repositories.
The three main package repositories are ELPA, Marmalade, and MELPA. ELPA is the offical GNU repository that comes with Emacs, while Marmalade and MELPA are third-party repositories. There are a number of differences between each of the repositories, the most significant being how they deal with licensing.
ELPA and Marmalade both require that all packages are GPL- or GPL-compliant licensed. Additionally, ELPA requires you to complete an FSF copyright assignment form. MELPA, on the other hand, has no licensing requirements, although it does have a code review process that all newly added packages must go through to ensure the code is of suitable quality.
Which package repositories you choose to put your code on is up to you, but I personally use MELPA and will talk about the process of getting a package into that repository.
There are two basic steps to getting a project on to MELPA.
Format the package file
First, you need to follow standard Emacs Lisp conventions for formatting a package file, which includes adding a description header and several other sections to the file. The Flycheck package for Emacs is invaluable here, because it will mark all of the required sections that are missing as errors and guide you through adding them. Doing this correctly is important because the Emacs package manager actually parses these sections as metadata to use.
Add your recipe
Once your code is properly formatted, all you need to do is fork the MELPA project on GitHub and add a recipe for your project. MELPA has docs for configuring more complex projects, but for a simple one-file package, the recipe is really easy.
The recipe for the Mocha runner looks like this:
(mocha
 :repo "scottaj/mocha.el"
 :fetcher github)
That’s it, just a path to the GitHub repository. Once the recipe is added, you can open a pull request against MELPA. Someone will review your package and may suggest code changes. Once those are done, your pull request will be merged and MELPA will start publishing your package in its regular builds. The best part is, since MELPA pulls your code straight from your source repository, you don’t have to do anything to push updates to MELPA. It will just automatically pull down the latest version of your code.
Well, that is my short guide to creating and publishing an Emacs package. You can find the Mocha.el package I used as an example here and my Emacs config here. Drop me a comment if you have any questions!