
Article summary
Yesterday, we created the hardware, decorations, and Neopixel software for a DIY alphabet wall from Stranger Things. But what if one of your friends gets stuck in the Upside Down*? It’d be nice if our ESP8266-driven project could make full use of its wifi capabilities and receive messages wirelessly.
This blog post details how to set up MQTT on the ESP8266, connect it to an MQTT broker, and put together a tubular front-end. The final result will look like this:
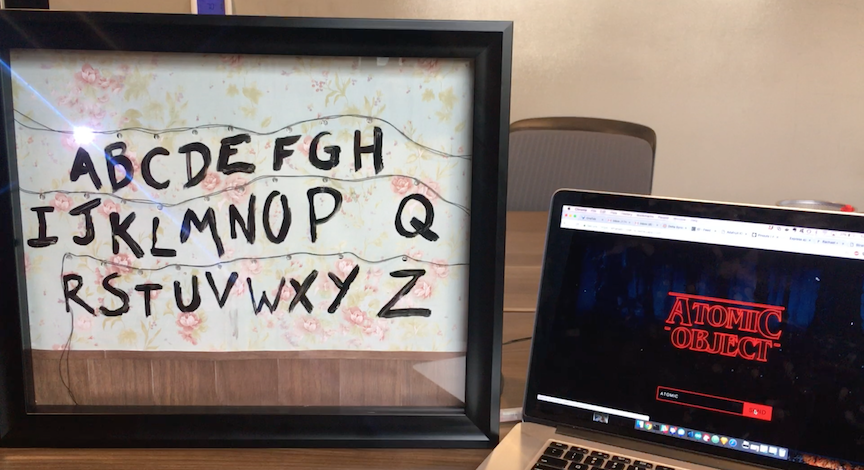
Click the image to read the post.
Setting Up Wifi and MQTT
I used MQTT to transmit messages. MQTT is a pub-sub messaging protocol which I had used before for my bathroom monitor re-write. If you are interested in a primer, here’s one from Scott Vokes.
Wifi
There are some existing ESP8266 wifi-related examples that are helpful to draw from in this project. As you’ve probably noticed, I’ve referenced a lot of example projects–both because they’re standardized projects to share, and because I wanted to get this project done by the end of the weekend without having it spill over into Thanksgiving family time.
To set up your wifi, you need to include the wifi library and define your wifi network name and password near the top of your file. You’ll also need to declare a WifiClient.
#include <ESP8266WiFi.h>

#define WLAN_SSID "WIFI_NAME_HERE"
#define WLAN_PASS "WIFI_PASSWORD_HERE"
WiFiClient client;
Note: the wifi library should come pre-installed in Arduino IDE, but if not, go to Sketch > Include Library > Manage Libraries to find and install it.
When my program starts up, I call WifiConnectionDebugPrintout() from the setup() function. WifiConnectionDebugPrintout() is a wrapper function around the Wifi.begin() call and related debug print-outs.
void WifiConnectionDebugPrintout() {
    Serial.println(); Serial.println();
    Serial.print("Connecting to ");
    Serial.println(WLAN_SSID);

    WiFi.begin(WLAN_SSID, WLAN_PASS);

    while (WiFi.status() != WL_CONNECTED) {
        delay(500);
        Serial.print(".");
    }
    Serial.println();

    Serial.println("WiFi connected");
    Serial.println("IP address: "); Serial.println(WiFi.localIP());
}
Try this out and see if you are able to successfully connect. Assuming everything checks out, let’s add MQTT next.
MQTT
First, install the MQTT library. Go to Sketch > Include Library > Manage Libraries and search for the “Adafruit MQTT Library” and install it. Then, include the following header files at the top of your Arduino sketch.
#include "Adafruit_MQTT.h"
#include "Adafruit_MQTT_Client.h"
I used the “mqtt_esp8266” example project heavily in my project. You can find it under File > Examples > Adafruit MQTT Library.
Before we get too far into MQTT setup, we’ll need to choose an MQTT broker.
I decided to use AdafruitIO for this. AdafruitIO is an out-of-the-box solution for MQTT (among other things). Rather than set up and host my own MQTT broker, as I did for the bathroom monitor, I let AdafruitIO do it for me. This saved quite a bit of time, and as mentioned previously, speed was one of the goals of the project. And, at the rate that we’ll be receiving messages for our alphabet board, it will be free.
Go to io.adafruit.com to sign up for an account. Here’s a primer on AdafruitIO. Once you have an account, make a feed called “alph.” Note: a feed in AdafruitIO is essentially a channel, in common MQTT terms.
Grab your username and key, and copy/paste them into the #defines below.
You’ll need to define your broker server name, port, username, and key, then set up an MQTT client.
#define AIO_SERVER "io.adafruit.com"
#define AIO_SERVERPORT 1883
#define AIO_USERNAME "AIO_USERNAME_HERE"
#define AIO_KEY "AIO_KEY_HERE"

WiFiClient client;  // we already added this in a previous step
Adafruit_MQTT_Client mqtt(&client, AIO_SERVER, AIO_SERVERPORT, AIO_USERNAME, AIO_KEY);
To complete our MQTT setup, we need to do three things:
- Set up a subscription to the MQTT broker’s “alph” feed.
- Set up a callback that will happen in response to a new message on the “alph” feed/channel.
- Connect to the MQTT broker.
For Step 1, globally declare a subscription (mine is called STmessages).
Adafruit_MQTT_Subscribe STmessages = Adafruit_MQTT_Subscribe(&mqtt, AIO_USERNAME "/feeds/alph");
For Step 2, in setup(), add these two lines. The first will set a callback action be called when we receive a message on the “alph” feed. The second line connects our subscription to the MQTT client we defined earlier.
STmessages.setCallback(STmessagesCallback);
mqtt.subscribe(&STmessages);
The callback (STmessagesCallback) will contain our LED code from the previous blog post. This code was previously in loop():
void STmessagesCallback(char *data, uint16_t len) {
    int i;

    for (i = 0; i<len; i++) {
        byteRead = data[i];
        if (isLowerCase(byteRead)) {
            int j = getIndexOfLetter(byteRead);
            if (0 < j) {
                int red = alphabet[j].red;
                int blue = alphabet[j].blue;
                int green = alphabet[j].green;

                pixels.setPixelColor(j, pixels.Color(red, green, blue));

                pixels.show();
                delay(1500);
                clearAllPixels();
                delay(250);
            }
        }
    }
}
Finally, to connect to the MQTT broker (Step 3), make the following changes in loop():
void loop() {
    // Ensure the connection to the MQTT server is alive (this will make the first
    // connection and automatically reconnect when disconnected).
    MQTT_connect();

    // this is our 'wait for incoming subscription packets' busy subloop
    // note:  waiting for 10 seconds means that we'll miss some messages
    mqtt.processPackets(10000);

    if(! mqtt.ping()) {
        mqtt.disconnect();
    }
}

/* This function was taken from the esp8266 example,
  and was written by Tony DiCola for Adafruit Industries. */
void MQTT_connect() {
  int8_t ret;

  // Stop if already connected.
  if (mqtt.connected()) {
    return;
  }

  Serial.print("Connecting to MQTT... ");

  uint8_t retries = 3;
  while ((ret = mqtt.connect()) != 0) { // connect will return 0 for connected
       Serial.println(mqtt.connectErrorString(ret));
       Serial.println("Retrying MQTT connection in 5 seconds...");
       mqtt.disconnect();
       delay(5000);  // wait 5 seconds
       retries--;
       if (retries == 0) {
         // basically die and wait for WDT to reset me
         while (1);
       }
  }
  Serial.println("MQTT Connected!");
}
Note that we've moved the Neopixel code out of the loop function entirely. The processPackets(10000) waits 10 seconds for subscription messages (and blocks code execution). This is obviously not what you'd want for a production app, but for a weekend project, I left it as-is (the esp8266 example project calls processPackets(10000)).
Try out your setup with a curl command.
AdafruitIO has a helpful page with all of the available commands you can send to retrieve information from or about your MQTT broker. We'll use one to post data to our MQTT broker, which our subscription (on the ESP8266) will be listening for.
Try the following curl command to test your ESP8266 and AdafruitIO MQTT setup:
curl 'https://io.adafruit.com/api/v2/YOUR_ADAFRUIT_IO_USERNAME/feeds/alph/data' -H 'X-AIO-Key: YOUR_ADAFRUIT_IO_KEY' -H 'Content-Type: application/json' --data-binary '{"value":"SOMETHING_HERE"}' Hopefully, you saw some lights on your alphabet board!
Setting Up the Website
Lastly, let's add a little bit more style.

Rather than sending curl requests, I set up a webpage with design help from my friend, coworker, and fellow Stranger Things fan Sarah Brockett.
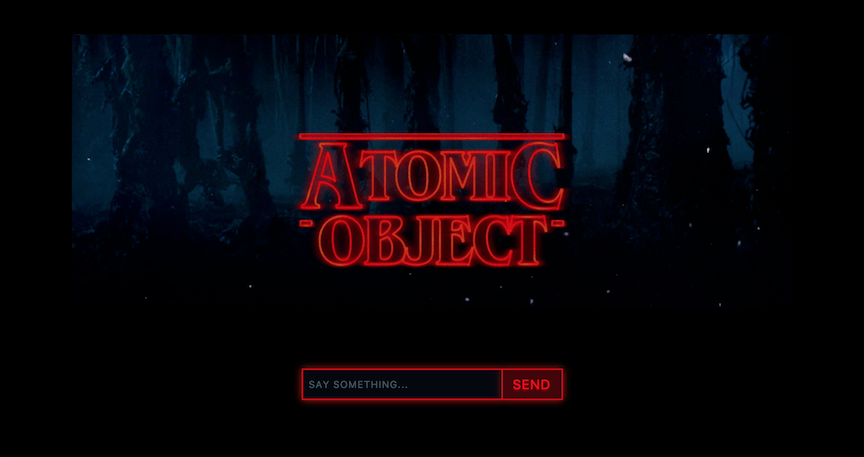
First, I wanted to add a title photo in the style of the Stranger Things iconic logo. Nelson Cash has a Stranger Things logo generator, available here. I created an "Atomic Object" logo, downloaded the picture, and cropped it.
In the interest of time, I used Express's application generator to quickly create a web app. The app has just one page, with an input box allowing people to send messages.
<div>
  <img src="images/atomic-object.png" />
  <div class="form">
    <form action="/message" method="post" class="form">
        <div>
            <input type="text" id="message" name="message" placeholder="say something..."></input>
        </div>
    <input type="submit" value="Send"></input>
    </form>
  </div>
</div>
Upon submission, the contents are posted to a /message endpoint, which posts to AdafruitIO. The user is then redirected back to the page (effectively, a page refresh). You may have noticed that my Arduino code only accepts lowercase letters, as a lazy way of handling user input. The /message endpoint will take the user-submitted data and lowercase it.
You can see the full web app at the GitHub repo.
app.post('/message', function(req, res) {
  if (!req.body.message) {
    res.error("oh no");
  }

  var headers = {
    'User-Agent':       'Super Agent/0.0.1',
    'Content-Type':     'application/application/json',
    'X-AIO-Key':        'REPLACE_WITH_AIO_KEY'
  }

  var options = {
    url: 'https://io.adafruit.com/api/v2/USERNAME_HERE/feeds/alph/data',
    method: 'POST',
    headers: headers,
    form: {'value': req.body.message.toLowerCase()}
  }

  request(options, function (error, response, body) {
    if (!error && response.statusCode == 200) {
        console.log(body)
    }
  })

  res.redirect('/');
});
Next, I implemented the styling on the input box, following Sarah's designs (see the GitHub repo for the full CSS file). I also pulled in Google Font's Roboto Condensed.

a {
  color: #C8C8C8;
  text-decoration: none;
}

a:hover {
  color: #475A66 ;
  text-shadow: 0 2px 4px rgba(255,0,0,0.50);
}

input {
  background: #050710;
  text-transform: uppercase;
  color: red;
  border: 2px solid #DD0202;
  box-shadow: 0 0 20px 0 #CD190C;
  height:52px;
}

input[type=text] {
  width: 320px;
  padding-left: 10px;
  font-size: 16px;
  height: 46px;
  color: #C8C8C8;
  letter-spacing: 1.29px;
  line-height: 24px;
}

input::placeholder{
  color: #475A66;
  letter-spacing: 1.25px;
  line-height: 24px;
}

input[type=submit] {
  border-left-width: 0px;
  background: #430407;

  width: 100px;
  font-size: 22px;
  letter-spacing: 2px;
  -webkit-appearance:none;
  border-radius: 0;
  text-shadow: 0 2px 4px rgba(255,0,0,0.50);
}

input[type=submit]:hover {
  background: #DD0202;
  border: 2px solid #DD0202;
  box-shadow: 0 0 20px 0 #CD190C;
  border-radius: 0 2px 2px 0;
  color: #030408;
  text-shadow: 0 2px 4px rgba(255,0,0,0.50);
}
Finally, I deployed to Heroku. This way, you can share the link with family, friends, and coworkers.
Final Result
See the GitHub repo for the complete project.
*We're assuming they have an internet connection, which, let's be honest, is a pretty big assumption.