Article summary
I recently upgraded to a 2018 MacBook Pro. I’m enjoying the additional cores and memory (😀) and coming to terms with the touchbar (🤨). A low point of my first week came when I plugged into my external display, and the image looked really bad. In this post, I’ll describe what I learned and how I managed to fix it.
2021 Update: a small change is necessary to apply this post’s workaround to MacOS Big Sur. Updated instructions are in a new post.
The Symptom
I’ve been using a 27″ Dell at work for a couple years, connected to my Mac via DisplayPort. It’s a pretty nice display with a bright IPS panel, good colors, and wide viewing angles. When I plugged it into my new Mac, the text looked terrible. It’s difficult to photograph, but it looked something like this:
There were strange color fringes on the edges of characters. Some narrow strokes appeared as blue or red blurs.
The effect varied with typeface and application, but it was universally distracting and difficult to read.
What’s Going On?
I’m aware of modern operating systems’ use of subpixel rendering, individually manipulating the red, green, and blue components of a pixel to improve text rasterization. My first hunch was that something was going wrong with this. Disabling it via LCD Font Smoothing helped somewhat, but the overall image was still noticeably worse than I had experienced before.
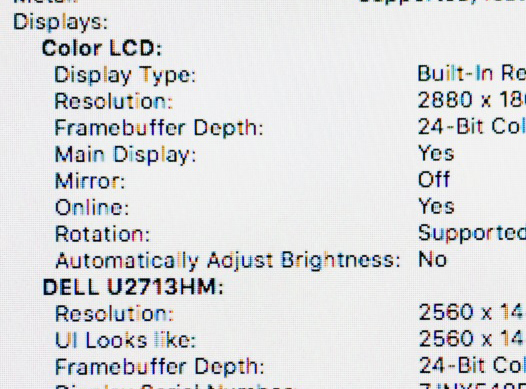
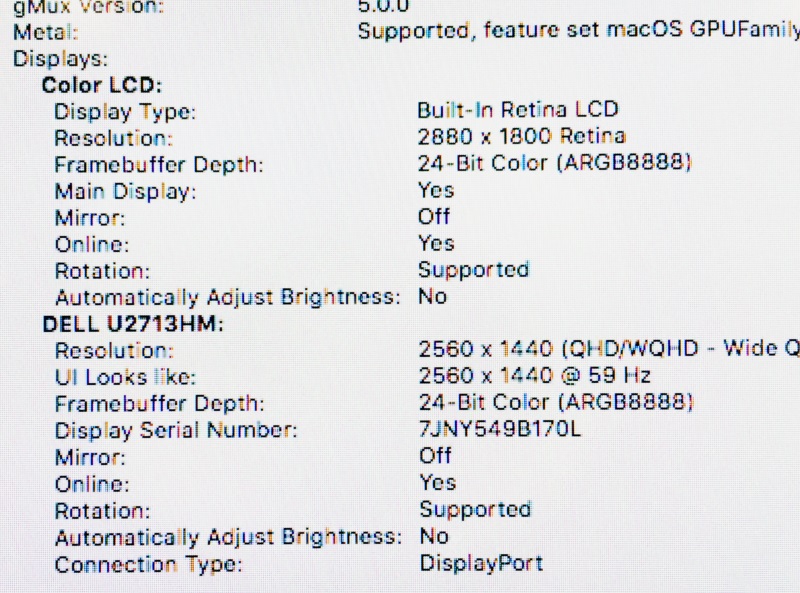
To make sure I wasn’t crazy, I plugged in my old computer, and sure enough, it looked great! Comparing further, I couldn’t find any meaningful differences reported in software. Eventually, I noticed something in the monitor’s settings: My new Mac was connecting with an Input Color Format of YPbPr, while my old Mac used RGB.
I wasn’t sure whether this mattered until I started googling and found several other instances–going back several years–of users reporting poor image quality associated with this color format across various Macs and external displays.
YPWhat?
If you’ve worked with colors on computers before, you’re probably familiar with representing colors as red, green, and blue components (“RGB”). If you’ve refilled ink on a printer, you may have encountered another decomposition: cyan/magenta/yellow/black (“CMYK”).
YCbCr/YPbPr is another color space, which represents colors with a black channel (“luminance”) and two different color channels (“chrominance”).
The only place I’ve encountered this one before is in component video, which is (confusingly) a trio of red, green, and blue RCA-style connectors that was used for high-end home theater before HDMI was a thing.
How Do I Fix It?
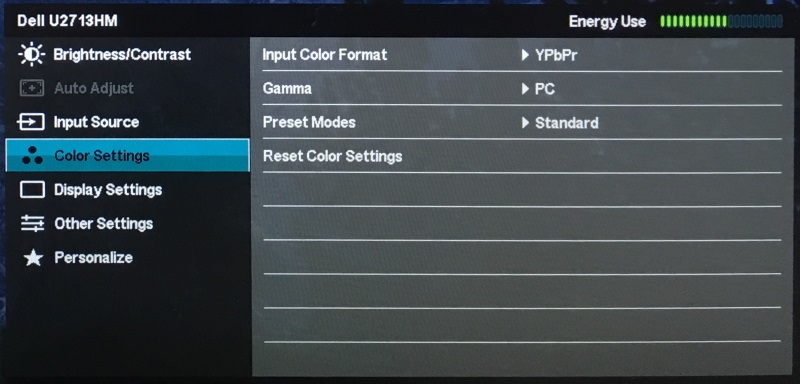
Unfortunately, I can’t just change the setting in the monitor. The menu option only seems to affect how the monitor interprets the signal it’s already receiving, rather than how the signal is negotiated in the first place.
It’s also not possible to choose the color space in software on Mac OS.
…Or is it?
EDIDs
When a display is first connected, it identifies itself and describes its capabilities by providing a blob of bits called the Extended Display Identification Data (EDID). The Wikipedia page helpfully provides the full spec.
There are a couple of bits in the middle of byte 24 that specify the accepted color formats:
00 = RGB 4:4:4
01 = RGB 4:4:4 + YCrCb 4:4:4
10 = RGB 4:4:4 + YCrCb 4:2:2
11 = RGB 4:4:4 + YCrCb 4:4:4 + YCrCb 4:2:2
My Dell emits 11, meaning that it claims to support all three color modes. Excited to have met a language partner, my new Mac insists on conversing in YCrCb, instead of the the display’s native tongue of RGB. (I’m not sure whether it’s using 4:4:4 or the [chroma subsampled] 4:2:2)
I haven’t found a way to alter this decision. Given my Dell’s EDID, macOS will always choose YCrCb.
Fortunately, macOS has a built-in mechanism to override the EDID data provided by a display. If you check out /System/Library/Displays/Contents/Resources/Overrides/, you’ll find a bunch of override files for particular displays, going way back to old beige CRTs like the [AppleVision 1710] (from 1995!).
So, the solution we’re approaching is to override the Dell’s configuration, to lie to the operating system and claim it’s only able to speak RGB. To do that, we’ll need to flip a few bits!
Patching the EDID
Fortunately, somebody else has already solved this. We’ll need to read the display’s EDID, patch it, write a new override file, and then put that file in a protected system directory.
Here’s how I did it (based on this blog comment):
- Connect the problematic display.
- Download and run this script (
./patch-edid.rb). - Take a look at the generated file and remember its path (mine was
~/Desktop/DisplayVendorID-10ac/DisplayProductID-4080). - Reboot into recovery mode (
⌘-Rat boot). - Mount your main disk (enter Disk Utility, select the gray Macintosh HD, click Mount, provide your password, close Disk Utility).
- Open up a terminal (Utilities -> Terminal), backup the overrides directory, copy in your new override file, and reboot:
cd /Volumes/Macintosh\ HD/System/Library/Displays/Contents/Resources

cp -R Overrides Overrides.bak

cp -R /Volumes/Macintosh\ HD/Users/jrr/Desktop/DisplayVendorID-10ac Overrides/

reboot
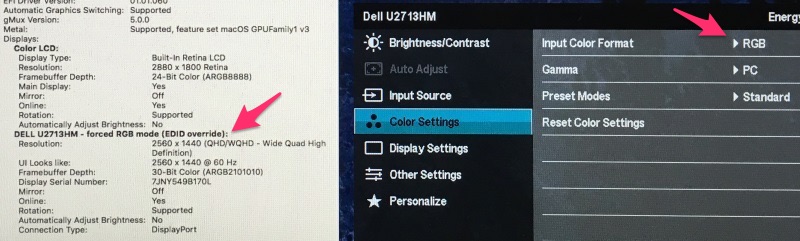
Voila! Our override appears in System Profiler, the Dell connects with RGB, and the image quality is dramatically improved.
Closing Thoughts
I learned way more about how this works than I would have ever expected, but I still don’t fully understand exactly what’s going on. Perhaps Dell’s implementation of YCbCr is poor, and it shouldn’t be advertising compatibility in the first place. Maybe I shouldn’t expect to easily use a monitor that doesn’t specifically support macOS with a vendor-provided driver.
Regardless, this experience uncovered a hole in macOS’s support for external displays:
- Why does macOS favor YCbCr over RGB?
- Why isn’t control over this exposed to the user? It shouldn’t be necessary to edit protected system files to control this behavior!
For now, this issue seems pretty rare (I was unable to reproduce it with colleagues’ 2017 MBPs), but it does seem likely to affect many upgrading users over the next couple of years. Hopefully, this hack helps a few of them keep using their old monitors!
Will you concede that Apple’s product quality is decreasing? Let’s call a spade, a spade…
I can confirm that the same thing is happening on the latest generation of Dell 27″ monitors (which have a different menu design). It started happening when I upgraded from a 2017 13″ to a 2018 15″ MacBook Pro (with discrete graphics). Presumably the 13″ was also using the YCbCr color space but worked properly for some reason? Thank you for looking into this! Hopefully a driver update can be pushed from Apple at some point.
I’m glad this helped!
How do you like the 2018’s keyboard?
I frankly never minded the new keyboards – the positive clickiness makes up for the low travel for me.
I wonder if the recovery mode bit could be skipped if sudo is used.
I wish!
jrr@jrrmbp /S/L/D/C/Resources [1]> sudo mkdir asdf
mkdir: asdf: Operation not permitted
( https://support.apple.com/en-us/HT204899 )
Ah, I see. Too bad I guess – I was hoping to try this out on a machine I don’t have physical access to.
I thought I am going mad. Talked to dell support, than Apple. Noticed color format, tried to mess with monitor settings.
Glad I found this article!
Thanks so much for this. I was having the same thoughts about it possibly being subpixel rendering, but had narrowed it down to something on the display side since screenshots blown up weren’t giving the same issues.
I really appreciate that you documented this for the rest of us.
You’re welcome. I’m glad it helped!
This didn’t work on the latest 10.13.6 with a 1080p hp monitor. Any suggestions???
You saved my day!
You’re the man! :D
Oh. My. God. This worked. I was on the brink of buying a new screen.
Thank you so much.
Worked great, thanks.
I tried this but my screen actually looked worse! I tried using the displays system prefs and calibrate with advanced options (click calibrate with alt) but this didn’t help as the tolerances were now so bad that I couldn’t get a proper brightness contrast going. I mean my screen was pretty good as it was and I thought this would give me a pure RGB to the display but I think in my case something is not right. From what I understand a true RGB signal should be such that the color settings on the display should refuse to be adjusted as the display color signal is now being driven by the computer but in my case I can still adjust saturation and such which makes believe something is not right to start with. Also, I lost the underscan and overscan features, after this change the display is being overscanned.
My display is a sharp 1080p TV with an HDMI connection, High Sierra and a MacBook Air.
As far as I am concerned, I am suspicious because I can control the color saturation levels and the independent RGB values on the TV itself which I don’t believe would be allowed if a true RGB signal were being sent to the TV.
I wish there were a terminal command that could identify if I am indeed sending out a true RGB 4:4:4 or what.
I have to investigate this further. People are reporting mixed results and I haven’t yet someone give an authoritative comment only that ‘it works’. Well, that is not too scientific for me, I just need more hard verifiable evidence because at the end of the day all I really see is a new display profile which isn’t really much.
check refresh rate
did you find out how to get Back before this steps?
Thanks a ton for this article. It solved my problem!
I had no problems with my 2014 MBP and 2015 MBP’s that my work had provided over the years and no problems with my 2017 MBP that is my personal machine, but when I was recently upgraded to a 2018 MBP, I started getting this problem. I spent way too much time trying to fix it with font smoothing :s
Thanks again.
Also, for others reading these comments in the future, I have the same monitor as the author. All hardware involved:
MacBook Pro (15-inch, 2018)
Dell U2713HM
OWC Thunderbolt 3 Dock
Mini-DisplayPort to DisplayPort cable from Amazon
Other machines that this setup had worked just fine with:
MacBook Pro (13-inch, 2017, Two Thunderbolt 3 ports)
MacBook Pro (15-inch, 2015)
MacBook Pro (15-inch, 2014)
This was really helpful, thanks.
I was worried that it was all in my head or that I needed another cable or something. It is so much better now.
Very good!!!
Thank you so much that just helped me a lot. I also have a Dell monitor. What I found out is that it could be due to the graphic drivers. My quadro k5000 shows the rgb color, my rx480 always shows the other color space yr…. in the same macpro5, but now it is solved.
Just got one of the new 2018 mac mini’s and connected it up to a 4k60hz screen. I noticed immediately that clarity was sub-par on a number of os elements, especially red. It looks like the os decided to default to YCbCr 4:2:0 which is causing significant degridation of the video quality in the red side of the color space.
I will have to try this trick and see if i can get similar results.
The monitor does have an ‘alternate’ color space mode which does appear to force RGB (or at least only present RGB as the color space for the os), but unfortunately in that mode the refresh rate is locked at 30hz, which is far from ideal, as it is really designed for backward-compatibility with older graphics hardware.
I have a new Mac Mini and am experiencing the exact same thing as you are with my 27″ 4K over HDMI. I’ve been searching for days for a answer, but so far you’re the only other person that’s noticed 4:2:2 from the new mini. I’ve posted in tonymacx86 as I’ve been a part of that community for a while. I have an eGPU on order, but really want to figure this out before then. I notice it in the edges of reds the most, just as you do.
Thank you so much for this article!
I just bought the 2018 Mac Mini, and when I started migrating my system from my 2015 rMBP, I though my eyes were playing tricks on me; on my 4K screen that was working perfectly fine with my old computer, I now saw washed out colors, blurry fonts, the whole shebang. After trying everything else I could think of in terms of hardware and software, I started googling, and found this page. I will forever be grateful to you.
And while I’m at it, I’d like to take this opportunity to send a big virtual middle finger to Apple for making a critical setting like this inaccessible to end users on a $2000+ computer. Shame on you, Apple!
I’m glad to have helped!
Since writing this I upgraded to a 4k display (Dell P2715Q), and it has the same problem, though the symptoms are much less apparent at higher pixel density.
Thank you very much John for documenting this. I’m in the processing of purchasing a new Mac Mini (2018) and have recently ordered a Dell 23″ IPS monitor (S2319H) that I expect to exhibit this same issue.
Dell’s website mentions a freeware Windows Utiility (Monitor Asset Manager) to dump EDID information. I thought that this might prove helpful for those user’s who have the ability to connect their monitor to a Windows PC in order to obtain more information. Here’s is the link to the site that has the utility:
http://www.entechtaiwan.com/util/moninfo.shtm
I downloaded, installed, and successfully tested Monitor Asset Manager on my Windows 10 laptop.
Here’s portion of the program’s output:
EDID revision………… 1.4
Input signal type…….. Digital (DisplayPort)
Color bit depth………. 10 bits per primary color
Color encoding formats… RGB 4:4:4, YCrCb 4:4:4, YCrCb 4:2:2
Screen size………….. 700 x 390 mm (31.5 in)
Power management……… Active off/sleep
Extension blocs………. 1 (DID-EXT)
I followed this guide exactly but now my tv is only displaying 1920×1080 instead of 3840×2160 and I have no idea how to change it back, I’m new to mac… I hope someone can help? I’m really regretting buying this mac mini, high quality high dpi rendering is one of the main reasons I chose this over getting a windows PC so this is really unacceptable. Apple is terrible,
After changing my tv’s hdmi input type to a low quality setting and then back again it just sorted itself out somehow.
Thanks a lot for the guide John Ruble.
I still hate Apple though… they wasted over 5 hours of my time with this nonesense.
This doesn’t seem to help w/ my Asus PA32UC in Mojave on a 2018 MacBook Pro. Any ideas? Text still looks terrible and System Report says “Television: Yes”. Tried w/ Thunderbolt 3 and DisplayPort cables. Thanks!
Great post. I’ve followed each step but my Dell U2715H still is set to YPbPr. I’ve tried several times. ‘m running a Macbook Pro 2016 with Mojave.
Any ideas?
Hey Guys,
I am also struggling with these issues. Mojave 10.14.2 + Samsung LCD Monitor.
Main problem is that there is no “Displays” folder in “Library” anymore, so I cant override old prefs to fix it.
Anyone found a solution to this?
Also not working for my u2713hm and u2515h on my 2018 15″ MBP
Maybe it has something to do with the latest Mojave update
Quit blaming Apple for your monitor issues people. Apple’s specifications are well documented, the monitor manufacturers are failing to build in firmware that recognizes and optimizes settings for macOS hardware. So here you are fighting to get your Dell working too. what brought me to this thread is that my coworker and I have matching MBP mid-2018 and matching 1080p dell u2414h monitors. My monitor, thankfully, powers on every time when connected to my computer. whereas my coworkers Dell monitor will only auto turn on sometimes, other times they have to unplug and plug back into the macOS machine to resend the signal to power on.
@brandon,
How is it anyone else’s faulty but Apple when these monitors all work fine when anything but a newer Mac is plugged in?
It’s pretty dumb to blame others when this issue is specific to 2018+ Macs.
Thanks for your solution. I think you found a way to fix it. It worked for me. I tried your solution and also a slightly expensive one ($30)
I had this issue for a while. I discovered that the adapter I used to connect my MacBook to external monitor (with HDMI socket) was not built to carry YPbPr color to the monitor. I got a new adapter (CableCreation was the name of manufacturer, I think) and it resolved my problem.
Do you have to disable “rootless” mode for this solution?
Thanks for this description.
It just works :)
Config:
Dell U2713H 2560×1440@60Hz
Macbook pro 15 2018
epico type-C HUB PRO
HAMA HDMI-HDMI cable
Thanks so much for sharing this!
It helped with the pink\red tint issue that I had. Internet suggested to change cable, but it worked with windows running on same machine, so I knew there’s something to it.
<3 much love
Thank you so much! Just spend 900$ on a new display and was ready to send it back. This trick saved me a lot of money and trouble. Thanks
Thank you so much for this, fixed the problem on my Samsung C34890 ultrawide on my MBP2018.
So I tried all of the above and nothing worked. The purple tint was a new “feature” after upgrading to 10.14.6 from 10.14.x. Was strange, the external monitor looked great when the macbook was closed.
Apple support couldn’t figure it out and I worked on it way longer than I should have but in the end it was the “True Tone” feature. When I unchecked it, things went back to normal. So go to System Preferences > Display > Uncheck True Tone
Brilliant, it works with my BenQ PD32000U. Thanks a lot!
Worked in Mojave, still works in Catalina wit my Dell U2417H. Thanks!!!
Glad to hear this still works in Catalina!
I had the same problem when using below combinations. The color space is by default YPbPr and if I change the setting from the OSD menu to RGB, the screen becomes freaking purple!
MBP 2018
Philips USB C 8 in 1 adapter
HDMI Cable
Dell P2416Db
I spent $8 on a CableCreation (Made in China) USB C to DP 4K60HZ adapter and then connected to the same display using Dell’s original DP cable and my problem is fixed. By default the color space becomes RGB. And now I am reading this post and I won’t try it :-p
Hello. I have done all the steps you had described and it worked fine on my MacBook Pro 2019 on catalina with Dell monitor, but the issue happened again after I had changed the HDMI cable slot from 2 to 1? How it could be fixed forever?
I cannot thank you enough! I have a hackintosh with AMD RX580, and a Dell U2515 monitor, and I had the exactly same problem. I thought it’s a hackintosh thing, but after few weeks of frustation I found your article. The problem is gone, and I’m happy :)
Thank you!
This works for my macbook pro 2018 with ASUS VE276Q monitor through HDMI cable.
You save my monitor! Thank you so much!!!!
Glad to help!
Thank you, John, for your well-written and helpful post. I have a 2019 MacBook Pro running macOS Catalina that I’m using with an old Dell U2410 monitor. Things clearly weren’t displaying properly on the monitor, but the EDID override fixed the problem.
HDMI 1.2a displays (and HDMI 1.2a cables) look like they don’t support 2560×1440@60Hz 4:4:4. Wikipedia says HDMI 1.2a has a 3.9Gbit/s rate, and:
pixels = 2560*1440
bpp = 24bits
hz = 60
bits_per_second = pixels*bpp*hz => 5,308,416,000 bits
4:2:2 coding knocks a third off the bit rate, giving 3.5Gbit/sec. That’s under the limit. So if you have an HDMI 1.2a-compliant system and want 2560×1440@60, you are stuck with 4:2:2. Assuming your hardware and software can do it.
HDMI 1.3 bumps the rate up to 8.16Gbit/sec, so there is enough room for 2560×1440@60. But then we have a different problem:
pixels = 3840*2160
bpp = 24bits
hz = 60
bits_per_second = pixels*bpp*hz => 11,943,936,000 bits
So at 3840×2160@60Hz, there simply aren’t enough bits in HDMI 1.3 to display 24-bit color at 4:4:4. Going to 4:2:2 would knock 1/3rd off the bit rate, and it theoretically could fit.
pixels = 3840*2160
bpp = 24bits * (2/3)
hz = 60
bits_per_second = pixels*bpp*hz => 7,962,624,000 bits
HDMI 2.0 bumps the effective bitrate to 14.4Gbit/sec. We’re still not out of the woods, though; what about deep color aka “billions of colors”?
pixels = 3840*2160
bpp = 30bits
hz = 60
bits_per_second = pixels*bpp*hz => 14,929,920,000 bits
Looks like we need to use 4:2:2 again to make that fit.
Am I getting my math wrong?
Got this working on Catalina 10.15.4 with 2 Dell U2414H monitors!
Could you please guide me how did you do that ?
Thanks for sharing this! It helped me with my 2018 Mini with Catalina and an LG IPS235 monitor.
The monitor was OK with another computer, and the computer was OK with another display. Tried changing the HDMI cables also. Nothing helped. Then I found this, 5 minutes and two reboots later: voilà, the day is saved! :)
The display had totally twisted colors (greenish-purpleish), impossible to see it for more than 30 seconds. After applying the override, reboot, the purple-black came back for a few seconds, then everything fixed.
I cannot thank you enough for this. I followed instructions from different sources but this one worked in second go (probably because of some spelling errors to change directory and copy etc.)
Solved problem: device specifications: I have Dell 2007fpb external display which is connected via VGA to my MacOS Catalina. It gave purplish tinted external screen. Even though I use same cables etc to connect the same MacBook with another device which works fine, which hinted that my connections have no problem. This led me to try this solution.
Thank you again :)
Thanks! This helped me correct my monitor’s color input format being set to YPbPr when connected through a kvm switch. The video output from the switch makes my MacBook identify the monitor as a 4K 30hz display for some reason
Hello!
Does this also work with an 2016 macbook pro? I don’t have real issues with the dell monitor, mainly just the greys that are more beige than on my macbook (annoying with foto editing)
.I tried it a few times and I can’t seem to run the created DisplayVendorID file in the terminal. How do I run it? Copy the text from the file, or drag the file in the terminal? Nothing really seems to work.
Hope someone can help. Thanks in advance!
Running on Catalina by the way!
I had the same problem with a BenQ BL3201 monitor, and this post saved my sanity. Thanks so much!
I added the instructions from this post to an answer to my question on the Apple Stack Exchange site, so people can still find it if this blog post ever becomes inaccessible: https://apple.stackexchange.com/questions/394552/external-display-attached-to-macbook-pro-has-washed-out-colours/394796#394796. I hope that’s OK.
Reproducing the instructions on Stack Exchange is fine by me. Thanks for citing the post. Glad it helped!
I have a 6-core Mac min 2018 which works perfectly with a 27″ LG 27UK850 4K monitor (USB-C connection).
But I cannot get a DELL P2418D 23.8″ QHD to work well with my Early 2015 Retina MacBook Pro 13″.
Both run macOS 10.14.6.
The forced RGB mode does improve the text but I can only really get it bearable by choosing a lower 2048 x 1152 resolution.
A further slight improvement comes with choosing Generic RGB for the display profile.
Running the monitor from ThunderBolt 2 to DisplayPort adaptor with lid closed so the external display is the main monitor.
I seem to recall that LG make the displays for Apple, and LG displays are available to buy from the Apple Store …
Further to my last post – a solution. This works for my Early 2015 Retina MacBook Pro 13″, and a Mid-2017 15″ MacBook Pro, connected to the display via TB2-DP and TB3-DP adapters and the displays are mirrored.
1) Leave the MBPro screen up and on (but you can dim it to black)
2) In System Preferences | Displays, select the DELL P2418D (your monitor) Panel and choose “Optimise for built-in Retina display”
3) If you wish, then click Scaled. You can then choose one of 5 scaling options.
If you close the lid the external display will become the main display, the “Optimise for built-in Retina display” option vanishes, and even if you then change the resolution to exactly match those in the scaling options seen in 3 above (e.g. by using the RMD app) the text still looks fuzzy.