
For my next side quest, I investigated Blender geometry nodes. In particular, I’ve found tutorials offering up sweet synth-scapes using geometry nodes. One of the busiest Blender makers online is Ducky 3D, which hosts many cool tutorials featuring sci-fi structures and landscapes. After scouring the offerings, I settled on this tutorial because it gave me Tron vibes.

This article highlights aspects of the tutorial that showcase bits of Blender’s raw power and goes beyond the tutorial to describe a cool way I made an animation into a full-length video featuring music from Midnightout’s new album Simulation Heat.
The Tutorial
A few of the best Blender features I found in this tutorial involve geometry nodes (duh), instancing, cameras and lighting, and the noise texture node.
Geometry nodes: why are they cool?
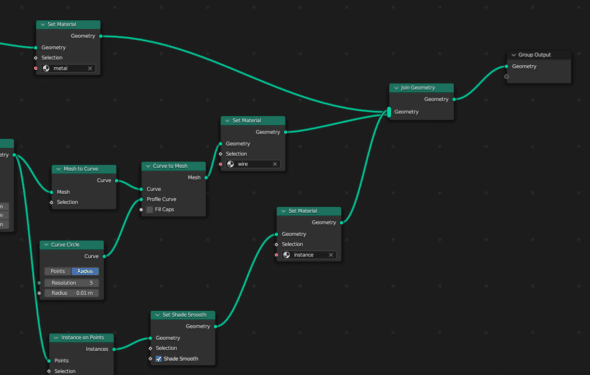
Geometry Nodes per Blender are a “system for modifying geometry of an object with node-based operations.” In oversimplified terms, using geometry nodes allows us to interact and modify the geometry of an object.
To give you an idea, during the tutorial, we started with a plane (the object) and initially added a noise texture (Texture node). This was meant to create the ridged-looking texture you see in the below picture. I could have also done this by going into Edit Mode and manually editing vertex groups. However, adding a node took considerably less time and with better (and still random) results. For more info on node-based workflows, check out my previous post.

Instancing
In Blender, instancing is the process of duplicating and rendering multiple copies of an object or collection without creating separate objects. This means creating objects that share the same geometry, which is great for performance (reducing memory usage and rendering times), but, for this tutorial’s purposes, made the construction of the main scene much easier.
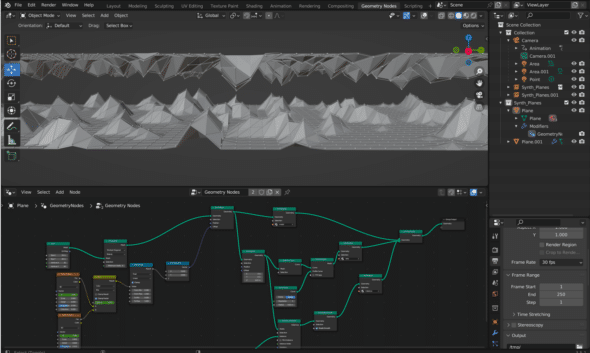
In the above screenshot, note the gray, craggy surfaces. Both are a plane, but the bottom one is the original while the top is a flipped instance of the plane below. This act of instancing made the scene ridiculously easy to set up as it applied all the same materials, textures, and other node properties on each plane. The result was a uniform-looking sci-fi landscape.
What you maybe can’t see unless you follow the tutorial is that there are a total of six planes, three on top and three on the bottom. They are lined up in such a way that the scene appears to be an endless loop. Let’s explore that because cameras are another spectacular Blender feature.
Camera and Lighting
Each time I wind up working with a camera in Blender, I come away with some new tricks and tools I never had before. This tutorial is no exception.
In one of my very first animations, I was able to follow a camera rigging tutorial that introduced me to the concept of parenting a camera to a Bezier curve. The act of parenting a camera to the curve allowed me to move the camera fluidly along with the curve.
As the parent of the camera, the curve’s scaling, rotation, and movement affect the children. This means that, instead of manually selecting camera positions along a manual trajectory, I can simply select new camera positions relative to the curve. This gave my beginner-level animation a more polished feel.
For my Tron-like landscape, I picked up yet another camera parenting trick, but this time with lights. Take a gander at the screenshot below:

Now, note the black arrow. The white circle with three arrows (red, blue, and green) highlights the location of the camera in the scene. The camera alone isn’t the cool part though. Take a look at the yellow arrows. Each arrow points to an area light object emitting blue or red light. In this animation, I parented these two lights to the camera. By parenting each area light to the camera, they follow it as it moves from the edge of the plane, lighting the camera’s way.

Truly, the act of parenting lights to the camera made this scene—the colorful lighting reflects off metallic surfaces, showcasing the complexity of each material and texture. Lastly, the white arrow points out the point light object, which emits a pink hue adding to the mixture. Though it is not parented to it, the point light serves as a sort of North Star for the camera.
Noise Texture: the real MVP.
Beyond the colors and the grid triangulation, my favorite part of the landscape is the random noise variations of the plane, or the rolling peaks. This was done using the Noise Texture node combined with Map Range, Combine XYZ, and a few other nodes.
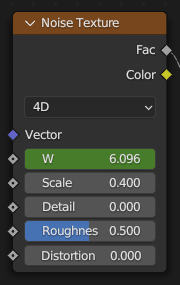
Noise Texture is my favorite because of its ability to create displacement maps. What is displacement? Displacement is a technique used to modify the geometry of a 3D mesh by displacing its vertices based on a texture or a procedural pattern. It is what gives us our surface details like bumps and wrinkles, or, in this case, the peaks and ridges.
Noise Texture , with help from Mix and Map Range , handled all movement of the landscape outside of the cameras and lighting. By manipulating the W input, you can create dynamic variations in the noise pattern, which allows us to create rolling peaks during the animation.
Behold! The Power of FFmpeg
Here is where I acknowledge the irony of writing an article about Blender’s sheer power and then not using it. Blender certainly can serve as a video editor, however, I chose to use a different tool. Doing so has everything to do with my own overhead of learning new functionalities in Blender and nothing to do with the blessed power tool itself. So, back to the familiar tool I used: FFmpeg.
FFmpeg
FFmpeg is an open-source software suite for handling multimedia data. Remember that prior animation I mentioned? I used FFmpeg to string together rendered png files to make a video. Yes, it’s that cool and great for gifs.
For my purposes in this tutorial, I initially used the command-line tool to map the eight-second Blender animation to Midnightout’s “Parallax.” Here’s the command I used:
Command:
ffmpeg -stream_loop -1 -i ~/Documents/Funsies/0001-0250.mp4 -i
~/Desktop/Midnightout_parallax.m4a -shortest
-map 0:v:0 -map 1:a:0 -y scisynthwave.mp4
Let’s break it down:
ffmpeg: command to invoke the FFmpeg software.stream_loop -1: option that tells FFmpeg to loop the input file indefinitely (-1) during processing.i ~/Documents/Funsies/0001-0250.mp4: specifies the input file path for the video. In this case, it is located at~/Documents/Funsies/0001-0250.mp4.shortest: option that tells FFmpeg to stop encoding when the shortest input stream ends. In this case, it ensures that the output video duration matches the shortest input stream, the audio file.map 0:v:0: selects the first video stream (0:v:0) from the first input file.map 1:a:0: selects the first audio stream (1:a:0) from the second input file.-y scisynthwave.mp4: specifies the output file path and name. In this case, the output video will be saved asscisynthwave.mp4. Theyoption automatically overwrites the output file if it already exists.
What this power command gave me was a looping animation set to my desired audio file. I liked it, but I wanted to polish it in a way that made the loop less herky-jerky. After messing around with an FFmpeg command to trim the video, I had my desired output.
Parting Words and Thanks
My overall takeaway from this tutorial is that Blender is a power tool you can spend years learning and still find cool features. Blender opens up a world of creative opportunity. With geometry nodes, you can create complex procedural models and effects. Instancing enables the replication of objects or elements across a scene. Cameras and lighting provide control over composition with stunning results. And, the noise texture node adds randomness and variation to materials and objects.

My final product after following the tutorial and playing around with FFmpeg is this: Tron-like animation. I want to give bunches of thanks to Midnightout who generously allowed me to use the song “Parallax” from their album, Simulation Heat. The song served as inspiration while making this animation.
Links n’ Stuff
Ducky 3D — thanks to this guy for all the great content.
Sci-fi Animation — here’s the tutorial.
Midnightout — or you can check ‘em out on YouTube.