Article summary
As of MacOS 11, it’s still possible to override your display’s EDID in order to force RGB mode when you get a problematic YCbCr connection, at least on Intel macs. Here’s how.
Background
A couple of years ago, I wrote about a strange problem I encountered when I upgraded my Mac: my external display’s image looked terrible. It turned out that my new Mac was using the wrong color space, but there was a workaround to force it back into RGB.
I no longer have the problematic monitor, but the post still receives a fair amount of traffic, so I wanted to check if the procedure still works. To help anyone landing here in 2021, I set out to answer a few questions:
1. Is it still a problem?
I think so. I first encountered the issue on MacOS 10.13 (High Sierra). Comments on the original post suggest that the workaround was necessary and successful on 10.14 (Mojave) and 10.15 (Catalina). Googling around, I see evidence that people are still trying to force RGB on MacOS 11 (Big Sur), and that the previous version of the workaround no longer works.
2. Is it still possible to perform the workaround?
Fortunately, yes! With one small change. One thing that made the old workaround so absurd was that you had to bend over backward to write to the protected /System directory. Since then, Apple has continued to tighten security, and it’s no longer practically possible.
Though MacOS’ built-in overrides still live there — specifically, in /System/Library/Displays/Contents/Resources/Overrides — it’s not necessary to put your new overrides there. Instead, you can put them in /Library, and you don’t even have to use recovery mode to write them. Just sudo.
As with the old workaround, I don’t deserve any credit for this discovery. I learned about it from this developer.apple thread.
For more specifics on Big Sur’s changes to MacOS’ System volume, see Ars Technica.
3. Does the workaround still fix the issue?
I can’t say firsthand, since I no longer have the problematic monitor. But I see reports of success (here and here), so I’m going to go with “yes”, at least on Intel Macs. Unfortunately, it looks like the workaround doesn’t work on M1 macs.
The Steps
As of MacOS Big Sur, here’s how to override your display’s EDID to force RGB mode:
- Connect the problematic display.
- Download and run patch-edid.rb and take note of the directory it produces (e.g.,
DisplayVendorID-10ac). - Create the new overrides directory:
sudo mkdir -p /Library/Displays/Contents/Resources/Overrides. - Copy in your new override:
sudo cp -R DisplayVendorID-10ac /Library/Displays/Contents/Resources/Overrides/. - Disconnect and reconnect the display — no reboot necessary!
The End of the Road
I hope that this post is useful for anyone dealing with this now several-year-old problem on Big Sur. This may be the last hurrah for overriding EDIDs on MacOS, though, if Apple doesn’t decide to make it work on ARM Macs in the future.
If you’re in this unenviable position — a problematic display with an M1 Mac — you might have no choice but to shop for a new monitor. Or, if you’re really motivated, perhaps look into solving the problem in hardware with an EDID emulator.
Appendix 1: Other Things You Can Override
While investigating the status of this issue on Big Sur, I tried the displays around my house (three monitors and a TV), and none of them suffered from the color space issue.
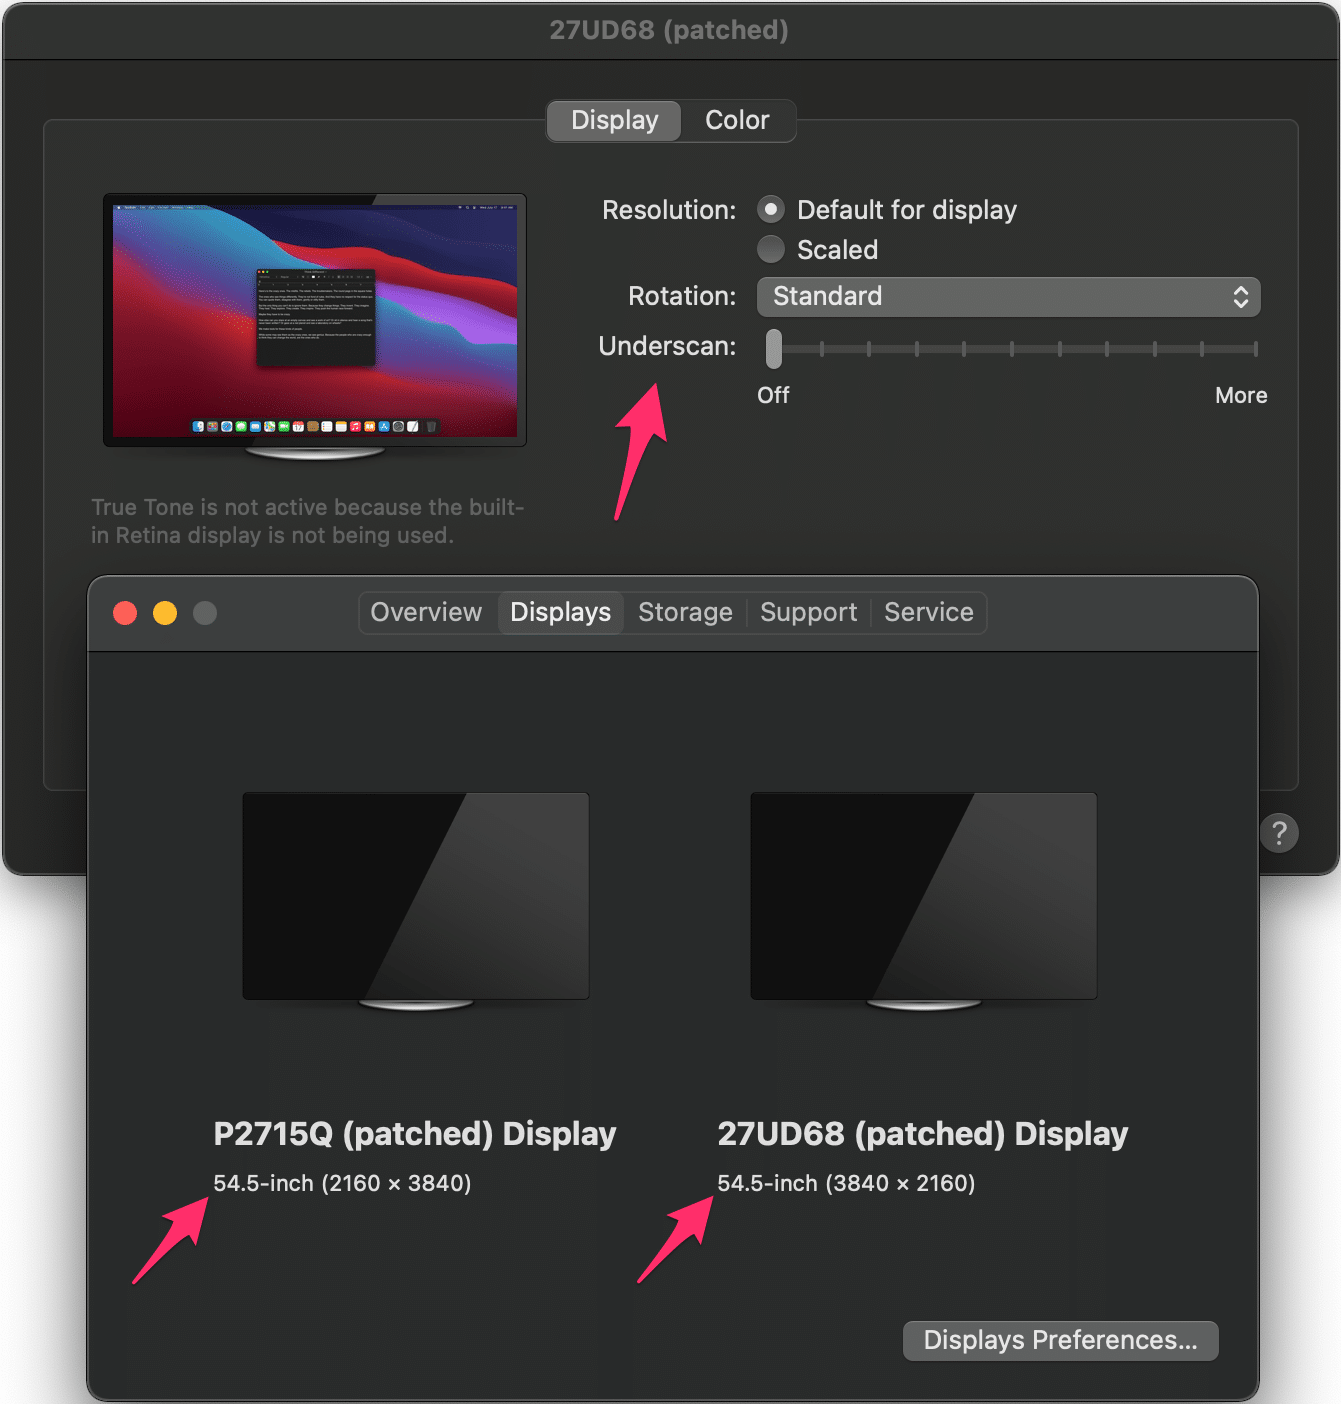
So I set out to look for evidence of other fields MacOS respects in an overridden EDID. I found one that was interesting: display dimensions.
I learned that if you lie about the screen size (bytes 21 and 22 of the EDID), MacOS will dutifully report the false numbers and may also enable the Underscan adjustment (typically meant for TVs) in display settings:
Do you see anything else in the EDID table that might be useful to override?
Hello,
thank you for the updated post! I checked your old post and the new one. I tried both approaches, but my old monitor is still not showing the colors the right way.
I received a Macbook Pro (13-inch, 2020) from my workplace this week, but only one of my monitors works perfectly with my machine. The other one is blurry and showing off the colors in the wrong way. (But on my Windows laptop both monitors work perfectly).
This monitor is Sony Bravia one. I use an HDMI cable to connect to an adapter, which connects to the machine. Do you have maybe any ideas what else I can try to solve this?
Thank you!
Hi ZGabor,
What are the exact models of the display and the adapter?
Can you see anywhere in the monitor’s settings whether it’s using RGB or YCbCr?
Can you see whether the EDID override is taking effect? (it should change the display’s name in System Information -> Graphics/Displays, like in this image from the old post: https://spin.atomicobject.com/wp-content/uploads/20180729221530/dell-osd-rgb.jpg )
-John
Hello John,
my monitor/tv is a Sony (Bravia) KDL-24EX320 . I’ve a bought a HDMI – USB Type C cabel, and the issue is the same as with the adapter.
Hi,
greetings.
How can i undo my override?
I tried to force my Samsung CRG9 Monitor to use RGB.
Now if i choose my correct resolution, the screen is blurry.
I copied the produced directory (made with the script) to system/library.
is it possible to delete the directory to reset to my default settings for the
monitor?
how is the terminal script for the delete?
hope you can help me.
Greetings
Tobi
Hi
As above is there any way to undo this if needed?
I seem to have success with on M1 MBk Air, by creating the EDID in an intel 2016 13″ Mbk Pro and copying over to the M1 Air.
I say “seem” bcos there are a lot of internal (Panasonic Viera 40″ 4k TV) settings that will also affect things and i had to tweak those a bit to get close to something like the Air’s internal screen. BUT this is way way better than the heavily posterized, really hard on the eyes picture i was getting prior. So i’m very happy for now. But this has taken be about 6 weeks of persistant research and experiments to even get to the “force RGB” solutoin and then resolve. AFTER having had to get to grips with the mac > TB3 > DP > HDMI chain required to get 4k/60fps. Given the number of monitors and displays that have this issue, why apple, is there not a “Force RGB checkbox in the displays settings, or at least the calib ration wizardy thing?
BLESS YOU!
You restored my less-than-a-week-old Mini to life after a disastrous upgrade to Big Sur 11.4
Glad to help!
Fantastic! It worked like a charm. Thank you very much!
thank you sir! This worked (mac os 11.5.1). I had no idea how to install a ruby file, but a little extra googling and I managed to pull this off. Time for me to go watch Hackers and feel like I belong.
This still work for Monterey (12.0.1)! Thanks!
This is also much easier than previous method!
I just used these steps on Monterey 12.1, and it solved my display problem: purple / pink / magenta image. Now my external monitor is working 100%.
Thank you very much and I wish you divine blesses!
Regards,
Richard
Can’t thank you enough for sharing this oh kind internet stranger.
It still is working on macOS Monterey 12.2! Thank you!!!
It worked!
I can’t tell you how grateful I am for your persistence in keeping up with this problem throughout different mac models. I’ve gone through every version of your guides and I finally found the one for Big Sur.
You saved me eye strain, headaches, and the $500 I was about to spend on a new monitor. Not all heroes wear capes *phew*
Glad it helped! Thanks for sharing.