Article summary
This holiday season, Michigan received a pre-Christmas blizzard. The mountains of snow outside left me cooped up in my house with only one thing on my mind — hobby projects. Specifically, I wanted to make my own MIDI controller. This project appealed to me because it combines my interests in programming microcontrollers and electronic music. Best of all, it’s a great beginner project you can complete in an afternoon, while also providing plenty of opportunity for future expansion.
In this post, I’ll walk you through my MIDI project step-by-step. After reading this, I hope you’ll understand more about how MIDI controllers work and maybe even feel inspired to create your own!
What is MIDI?
First things first, what are we making here? The acronym ‘MIDI’ stands for Musical Instrument Digital Interface. Simply put, MIDI is a technical standard that defines communication between computers and electronic instruments. It is widely used for musical production. A MIDI message consists of an eight-bit status byte followed by one-to-two additional bytes of data. These messages represent MIDI events that control audio output.
A MIDI controller is a device used to sequence and control audio by sending MIDI messages to a computer or synthesizer, which interprets these signals to produce sounds. Humans initiate MIDI events by pressing a key or button, turning a knob or moving a slider. Controllers then convert these physical actions to MIDI messages that tell the computer to adjust audio attributes such as volume, pitch or tone.
Off-the-shelf MIDI controllers typically consist of various combinations of knobs, buttons and sliders and often include a piano-style keyboard. However, if you think outside the box, anything that produces a digital or analog signal can be a MIDI controller. For example, this ring or this glove.
Project Setup
Hardware Setup
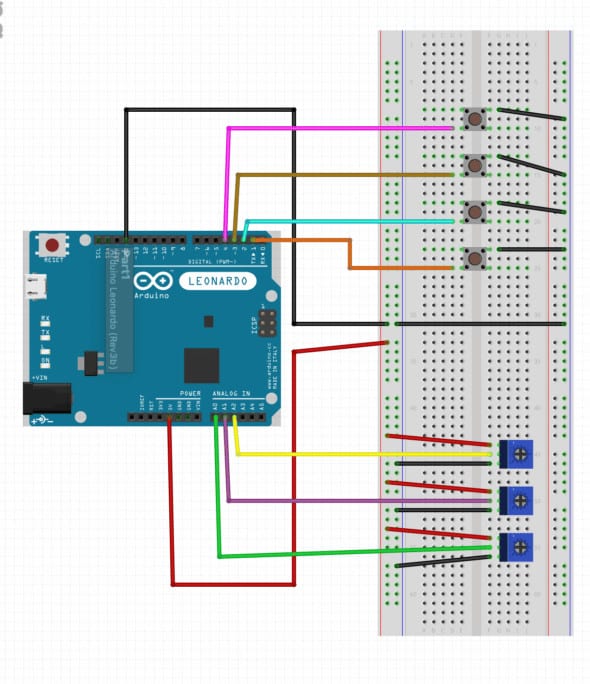
For my MIDI controller, I decided to use only components that I already had on hand. Fortunately, engineering school left me with a variety of prototyping boards and components. I used four buttons and three potentiometers for my controller. My final schematic appears below.
A note on microcontrollers
When choosing a microcontroller for this project, I wanted something easy to program that would be able to read digital and analog inputs and support USB communication. Many controllers would fit the bill here. I settled on the Arduino Leonardo board (based on the ATmega32u4), which turned out to be an excellent choice. It came with header pins already soldered to allow quick prototyping and was simple to program using the Arduino IDE.
Code
Once I completed my hardware setup, it was time to program the board. Thanks to the Arduino sketch linked in this post from Dolce Wang, which makes use of this MIDI library, this was very easy. All I had to do was modify the code for my particular hardware setup and program the board using the Arduino IDE.
This program reads digital inputs from the buttons and analog inputs from the potentiometers and converts these signals to MIDI events, which are sent over USB. ‘Note ON’ and ‘Note OFF’ events correspond to button pushes, and ‘Control Change’ events are fired off when the potentiometer reading changes.
Testing
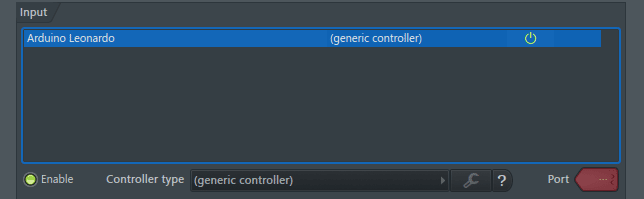
To test it out, I needed a program to receive the MIDI messages from the controller and convert them to audio output. I chose FL Studio, one of the most popular DAW (digital audio workstation) programs. Although music production software feels intimidating, I found this video helpful for getting started. With a very rudimentary understanding of FL Studio, I could finally test out my controller. FL Studio makes this very simple. I chose my MIDI controller as an Input device in the MIDI Settings menu with the ‘generic controller’ type and selected “Enable”.
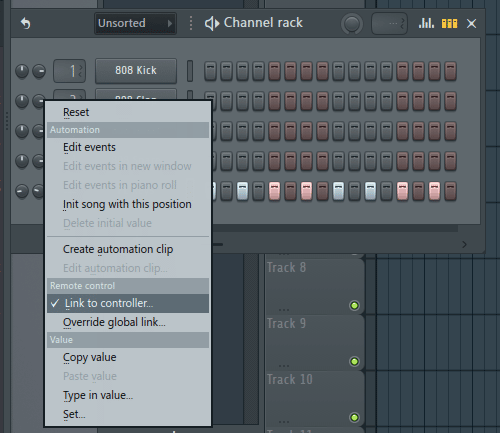
With the controller enabled, I was able to immediately hear the tones produced by the pushing the buttons on my controller. To test the potentiometers, I linked them to controls in the FL Studio by right choosing a knob in the Channel rack and selecting ‘Link to Controller’. With the pots linked to controls FL Studio, I could use them to control the master volume and pan of specific tracks.
Final thoughts
I hope you enjoyed reading about my project! With my basic prototype working, I can see a lot of opportunity to expand this project. I would like to add more buttons and pots and eventually move the project off the breadboard and into a custom enclosure that will allow me to use the controller much more easily. If you have any questions or ideas for how I could take this project further, let me know in the comments!