
I recentl picked up a couple of new SSDs that I wanted to add as a mirrored array to one of my Proxmox instances. I’m doing the naughty-naughty here and have them attached via USB enclosures, so creating them as a mirrored zfs array wasn’t working (to no one’s surprise, the array was too unstable). I decided to give it a whirl as an LVM Thin pool instead. Proxmox doesn’t have a GUI to do this, so here’s how I (mostly) did it by hand.
Overall process
Here are the high-level steps we’ll be going through:
- Use
mdadmto create the raid 1 array. - Create a physical volume and and volume group.
- Create logical volumes for our data and metadata and combine into one LVM Thin pool.
- Confirm Proxmox can see the new thin pool.
- Add a Proxmox storage based on the new pool.
Throughtout this example, I will be using the /dev/sda and /dev/sbd block devices.
Create the raid 1 array
mdadm --create --verbose /dev/md0 --level=1 --raid-devices=2 /dev/sdb /dev/sdc
In my case this shared a warning about using this array as a boot device. That doesn’t apply to me, so I ignored it.
Run cat /proc/mdstat to verify the array is showing up — in my case, as md0.
Lastly, we run a couple of commands to ensure the array is reassembled during bootup:
mdadm --detail --scan --verbose >> /etc/mdadm/mdadm.conf
update-initramfs -u
At this point I rebooted and confirmed the array was still available.
Create a physical volume and volume group
Since I want to use both disks in their entirety for one volume, creating the physical volume and volume group is straightforward:
pvcreate /dev/md0
vgcreate galba-usb /dev/md0
In this case I name my volume group galba-usb, which is based on my hostname and the fact this volume is hosted on a usb device.
Running the commands pvs and vgs will confirm the physical volume and volume group are present.
Create logical volumes for our data and metadata and combine into one LVM Thin pool
This is the trickiest part of the process and the part I’m most uncertain about. What we need to do here is allocate space for our main volume, and then also some space for metadata that complements the main volume.
The hard part is sizing — I wasn’t able to find a succinct command that would create both volumes, in tandem, with sizes relative to each other (e.g. 99% for the data volume and 1% for the metadata volume). Since I didn’t have percentages working, I had to fall back on calculating fixed sizes. But even then, I was getting the math wrong or not understanding something, since I was still getting “not enough space” errors coming out of the lvm commands.
One last bit of context — this authoritative-looking article from Red Hat says “It can be hard to predict the amount of metadata space that will be needed, so it is recommended to start with a size of 1GiB which should be enough for all practical purposes.” That’s good enough for me, so I’ll proceed with 1gb metadata and the rest to the main data volume.
Here is where I eventually landed:
- Running the
vgscommand shows the size of my volume group to be 238.35 gb. - Next I run
lvcreate -L 1G -n galba_meta galba-usbto create a 1gb volume on thegalba-usbvolume group. - Next I run
lvcreate -L 236G -n galba galba-usbto create a separate 236gb volume. - Lastly I run
lvconvert --type thin-pool --poolmetadata galba-usb/galba_meta galba-usb/galbato create a unified LVM Thin volume. (This command did take a few minutes to run and I could see lots of drive activity happening.)
Some trial-and-error was required for setting the main data volume size. 237gb didn’t work and gave an error like Volume group "galba-usb" has insufficient free space (89 extents): 256 required. Why the math doesn’t work out here is beyond me. Regardless, I eventually landed on 236gb and that’s close enough to max capacity for my purposes.
At this point the thin pool is created. You can run lvs -a -o +seg_monitor to get a detailed display of the logical volumes. In my case, I now see the galba related volumes, as well as Proxmox’s own volumes.
Confirm Proxmox can see the new thin pool
One part of this process that was automated was Proxmox seeing the new pool. In my browser, I went to my galba Proxmox instance, then Disks, then LVM-Thin and the new galba thinpool is already listed. I’m thankful for that, as manually editing Proxmox config files is something I’m personally not wild about.
(P.S. for people who’ve noticed the Create: Thinpool button on this interface — the reason I am not using that is because it can only create a pool based on one drive, not multiple like I have.)
Add a Proxmox storage based on the new pool
The last step here is to create a new Proxmox storage that uses the new pool. To do this, we go to Datacenter, then Storage, then click the Add button, and pick LVM-Thin. In this interface, I set:
- ID:
galba - Nodes:
galba - Volume group:
galba-usb - Thin pool:
galba - Content: Disk image, Container
- Enable: checked
Click the add button, wait a moment, and then you will see the new galba storage showing up. Click on it to confirm things show up as expected (e.g. it has no VM Disks or CT Volumes yet).
Conclusion
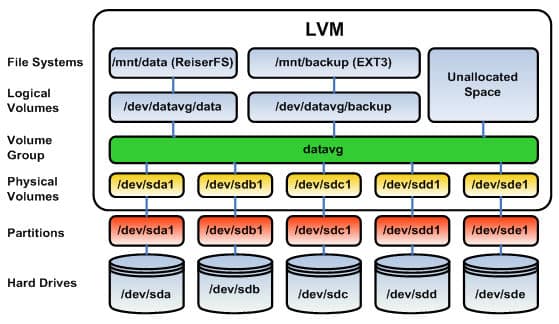
Adding a couple of drives like this to create an LVM Thin pool that Proxmox can use is a fair number of steps. But aside from the math I can’t explain, none of these steps is too hard — at least as long as you have the picture I referenced at the top of this post. Thanks again to SWEWorld for the extraordinarily helpful image.
Next up for me is to create a new Ubuntu Desktop virtual machine, pass the iGPU to it, and have its VM disks saved on this new usb-based storage. Because it’s USB I’m quite nervous it won’t work well in the long term. But I’m willing to try and see what happens!