
If you’ve ever worked on a software project with a complex relational data model and an ORM, you’ve probably written a lot of boilerplate code to set up data for tests. Any time you create a record that has a required foreign key to another table, you must either create or connect to an existing record in that table. In production code, this is exactly what we want, but in data setup for tests, we often don’t care about the underlying tree of data for a specific record.
Take, for example, a data model that involves users, messages, and attachments:
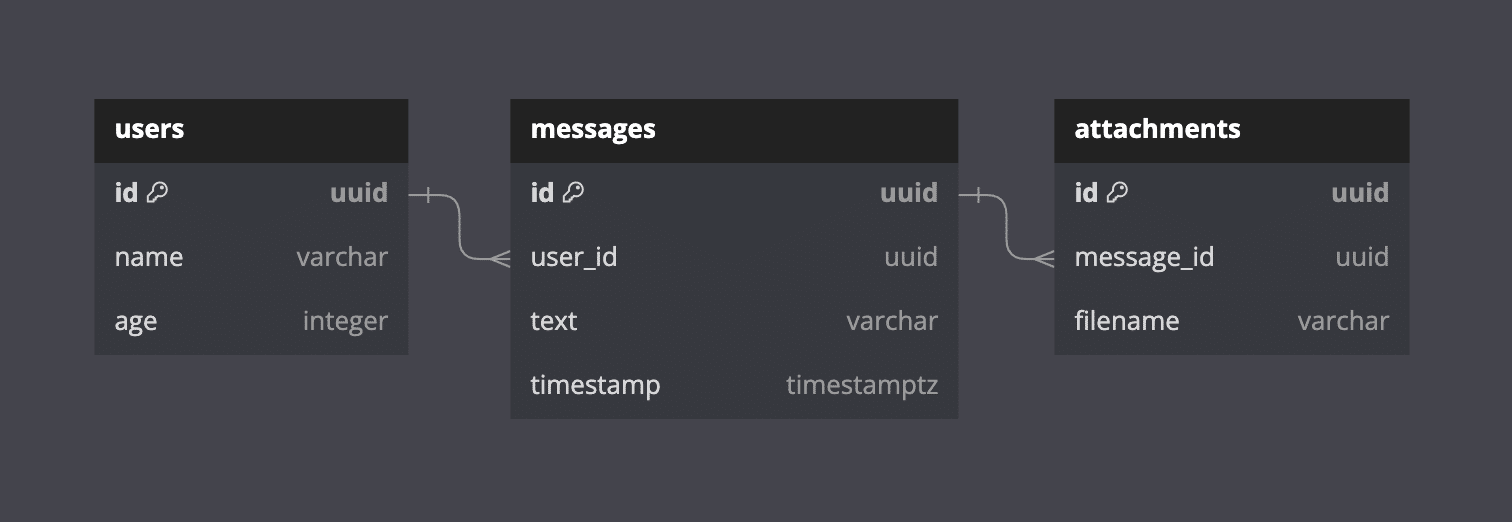
Let’s say we’re using Prisma and want to test the capabilities of attachments. To seed a single attachment, you can’t just do the following:
const attachment = await prisma.attachment.create({
  data: { filename: 'foo.txt' } // error: id and message_id are required fields
});
Instead, you have to create both the message and user associated with the attachment:
const attachment = await prisma.attachment.create({
  data: {
    id: uuid(),
    filename: 'foo.txt',
    message: {
      create: {
        id: uuid(),
        text: 'hello world',
        timestamp: new Date(),
        user: {
          create: {
            id: uuid(),
            name: 'user'
          }
        }
      }
    }
  }
});
This small example is already a lot of boilerplate. With a more complex data structure, this quickly balloons to extremely long, hard-to-read Prisma calls, often filled with dummy data we don’t even care about.
Of course, you could create a setupAttachment function that takes in a filename and sets up the data tree for you, but doing so just kicks the can down the road and will inevitably require you to create more setup functions for other use cases.
Enter Blueprints, an easy way to set up a complex tree of data in a concise, type-safe manner. This is not a library, it’s simply a pattern you can introduce into your codebase whether you’re using Prisma, Drizzle, Knex, or any other ORM.
Our First Blueprint
The concept of blueprints is simple: for every model you want to test, you have a “blueprint” function that takes in only properties of that model. For any properties you don’t specify, the function should take care of generating a dummy value for you. Here’s an example of a User blueprint, using the data model from above:
const userBlueprint = async (data?: Partial) => {
  return await prisma.user.create({
    data: {
      id: uuid(),
      name: 'user',
      age: 25,
      ...data
    }
  });
}
With this blueprint in place, you can seed a user in your test with a single line:
const user = await userBlueprint();
Or, if you want the user to have specific properties, you can specify those explicitly, while falling back to defaults for all other properties:
const user = await userBlueprint({
  name: 'user2'
});
Of course, we can take this a step further by introducing a library like Faker to generate dummy values for us:
import { faker } from "@faker-js/faker";

const userBlueprint = async (data?: Partial) => {
  return await prisma.user.create({
    data: {
      id: uuid(),
      name: faker.name.fullName(),
      age: faker.datatype.number({ min: 1, max: 100 }),
      ...data
    }
  });
}
Nested Blueprints
But what if we want a blueprint for a model that references some other model, like the Message model from our example above?
The answer: just call a blueprint from the blueprint!
import { faker } from "@faker-js/faker";

const messageBlueprint = async (data?: Partial) => {
  const userId = data?.userId ?? (await userBlueprint()).id;

  return await prisma.message.create({
    data: {
      id: uuid,
      userId,
      text: faker.lorem.sentence(),
      ...data
    }
  });
}
As we traverse down the tree, we reach the Attachment model. Now that we have a blueprint for messages, we can follow the same pattern for our attachment blueprint:
import { faker } from "@faker-js/faker";

const attachmentBlueprint = async (data?: Partial) => {
  const messageId = data?.messageId ?? (await messageBlueprint()).id;

  return await prisma.attachment.create({
    data: {
      id: uuid(),
      messageId,
      filename: faker.system.fileName(),
      ...data
    }
  });
}
Now we can use a simple one-liner to seed an attachment in a test:
const attachment = await attachmentBlueprint();
Improved Dev Ergonomics
To make it easier to create new blueprints as the project grows, you can introduce a generic type to represent blueprints:
export type Blueprint<T> = (data?: Partial<T>) => Promise<T>;
Now, you can simply declare your blueprint function as a Blueprint of whatever model you’re creating. This allows you to remove the type of the data parameter, plus, you’ll get type errors if the function returns the wrong data type.
import { faker } from "@faker-js/faker";

const attachmentBlueprint: Blueprint<Attachment> = async (data) => {
  const messageId = data?.messageId ?? (await messageBlueprint()).id;

  return await prisma.attachment.create({
    data: {
      id: uuid(),
      messageId,
      filename: faker.system.fileName(),
      ...data
    }
  });
}
I also like to put all blueprint functions in a shared Blueprints object, so instead of separately importing all blueprints, you can just import one Blueprints object. Since we’re only using this for tests, tree-shaking isn’t super important.
export const Blueprints = {
  user: userBlueprint,
  message: messageBlueprint,
  attachment: attachmentBlueprint,
};

// in some test file:
import { Blueprints } from 'blueprints'

const attachment = await Blueprints.attachment();
The Power of the Blueprint Pattern
The blueprint pattern offers a powerful and flexible way to manage complex data setup in tests when working with ORMs like Prisma. By abstracting the creation of data models into simple, reusable, and type-safe blueprint functions, you can significantly reduce boilerplate code and improve readability. Incorporating this pattern into your testing workflow can lead to cleaner code, faster development, and a more pleasant testing experience.