Article summary
In our daily development routine, environment files are the silent security workhorses, holding the keys to the kingdom—database connections, third-party service credentials, you name it. Traditionally, when new developers join a project, they’re greeted with a README file (hopefully!) and the uncertain, clunky task of obtaining these carefully guarded keys securely. This can involve scouring through infrastructure files, pinging teammates, or trying to navigate a key bespoke decryption process. It’s not just awkward. It’s a time sink, and it opens the door to accidental secret mishandling. Wouldn’t it be better to have a trusted system in place that takes care of this initiation ritual?
Let’s explore how combining 1Password with a sprinkle of scripting magic can transform this tedious task into a simple and smooth operation. I’ll show a step-by-step example of setting this type of development environment for an application that needs to integrate with a fictional CoolSAAS platform.
🎥 Prefer Video-based Learning? Skip the reading and scroll to the bottom of this post to watch a full video walkthrough. 🎥
Step 1 – Create a project-specific 1Password vault.
When working on a software development project, it is common to share several credentials or application secrets among the team. API keys and secrets are obvious, but there’s also the occasional shared credentials needed to administer any number of web services. Best case scenario: each team member has their own login for things like that but that’s not always possible or feasible.
Using a shared 1Password vault is a great solution for keeping your project-specific credentials safe, organized, and accessible to those who need them. To create a new vault, just open the 1Password app and click the + icon next to the Vaults heading in the sidebar menu. Enter a name for your vault that identifies which project it’s for. In this example, I named my vault, OP-ENV-GEN-PROJECT (one password environment generation project).

Step 2 – Add credentials to the vault.
Now that we have a Vault, we can fill it with logins, passwords, secret notes, credit card details, and anything else we want to keep secure.
Continuing with our example, I’ll add a login for our CoolSAAS platform. In the login, I’ve added two password fields: one for the API key and another for the API secret.

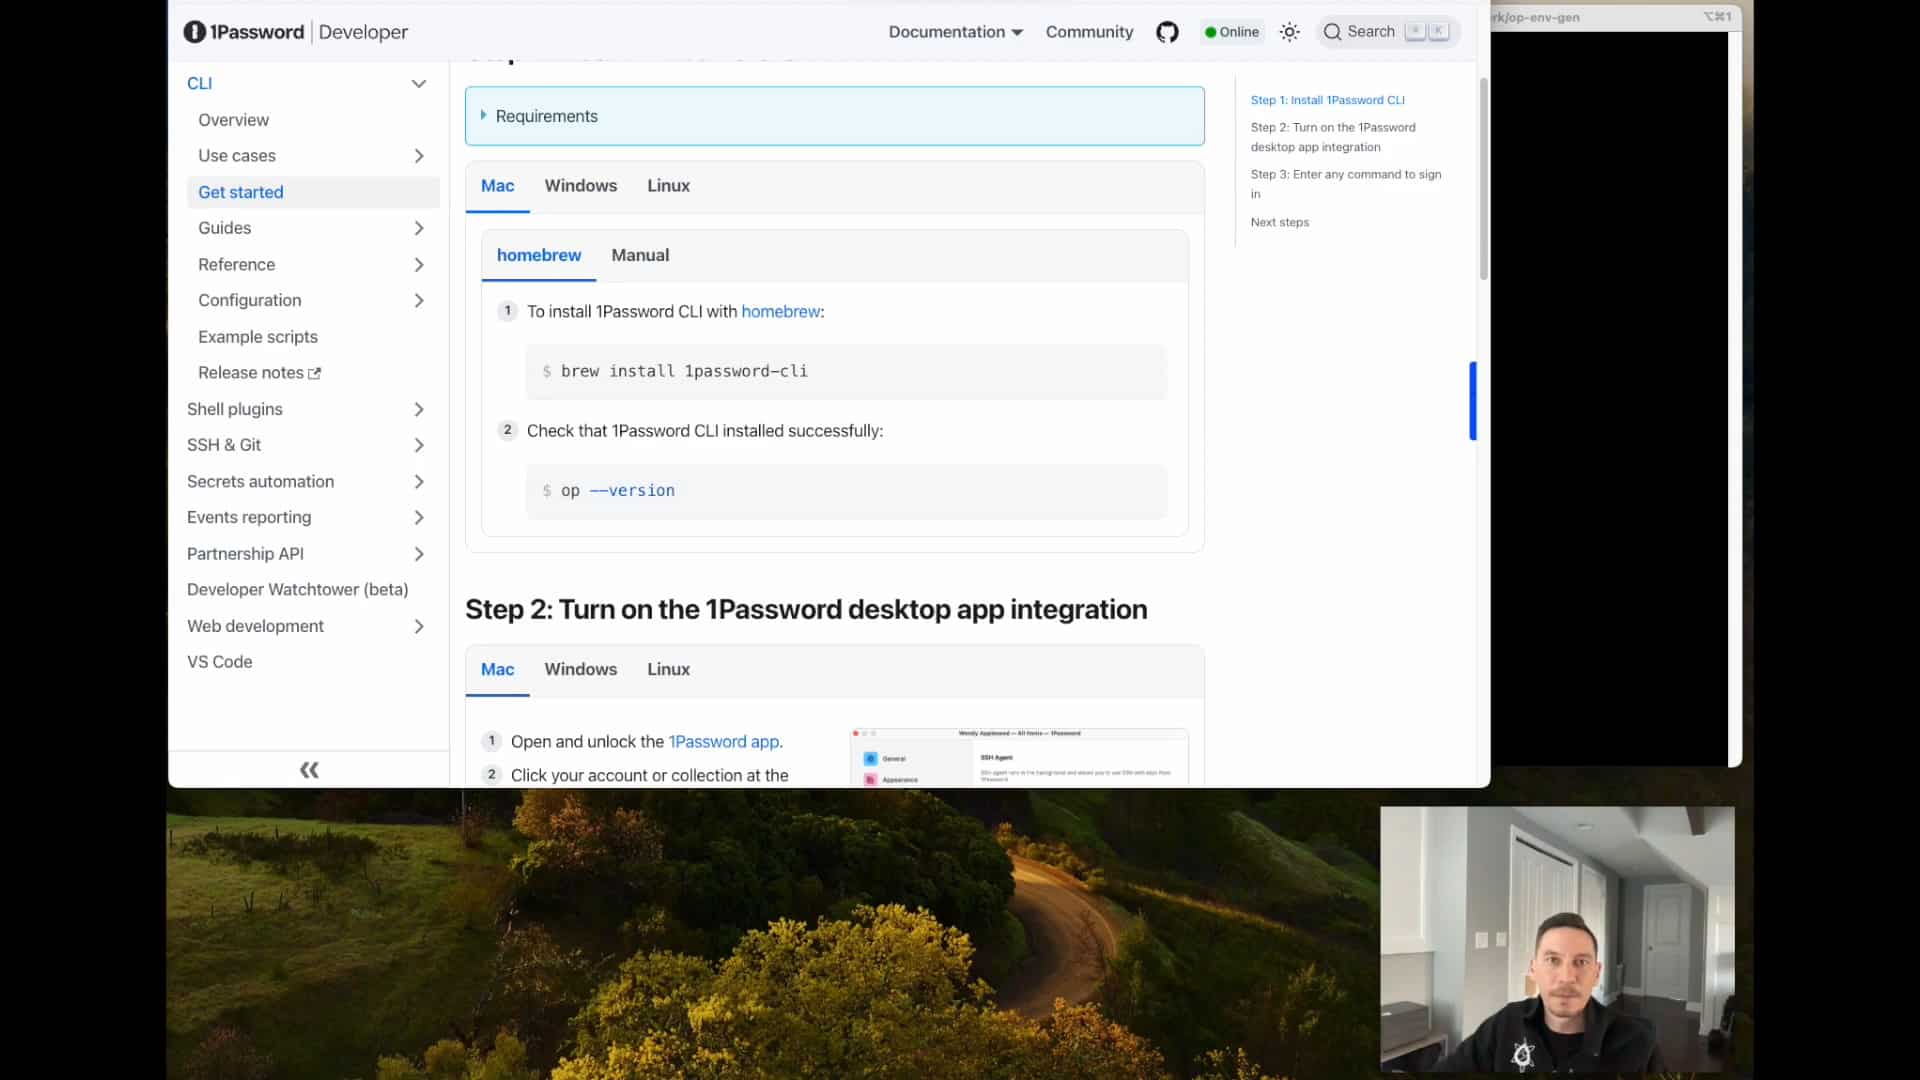
Step 3 – Install the 1Password CLI.
For the automation in this process to work, you’ll need to install the 1Password CLI. This allows you to access your vault, and the credentials within it, programmatically.
The Getting Started page in the 1Password documentation includes detailed instructions for installing the CLI on any common operating system. Since I’m using a Mac, I simply ran,
brew install 1password-cli
Document this step in your README file or configure it in your infrastructure definition however applicable.
Step 4 – Create an environment file template.
Normally, our environment file(s) is added to the .gitignore file so it doesn’t get committed to the repository. This prevents us from pushing our app secrets into the codebase which is universally agreed upon as a “bad idea”. However, with this setup, we can commit an environment file template, or group of templates to the repo and keep the actual secrets out of them.
In my example project, I created a sub-directory called scripts and added a file called .env.tpl to it. This will be my template. Feel free to name yours whatever you want. Just make sure it’s not the same name as your actual environment file.
Next, I added constants for the API key and secret of the CoolSAAS platform with placeholders for the corresponding secret values.
/scripts/.env.tmp
COOL_SAAS_KEY=”key goes here”
COOL_SAAS_SECRET=”secret goes here”
Step 5 – Add secret references.
Our script will inject the real key and secret into the template and generate an output file for our application to consume. For the script to know where to get the real values and where to inject them, we need to add secret references to the template. A secret reference is a special syntax that the 1Password CLI understands. It’s essentially a path to the item within the 1Password app.
So next, open the 1Password app again, navigate to your Login record, and hover your cursor over the first secret you want to inject into your environment file. You’ll see a menu with an item that says “Copy Secret Reference”. Click that!

Do this for each secret and paste the references into your template. It should look something like this:
COOL_SAAS_KEY="op://OP-ENV-GEN-PROJECT/COOL_SAAS/API_KEY"
COOL_SAAS_SECRET="op://OP-ENV-GEN-PROJECT/COOL_SAAS/API_SECRET"
That’s it! The template is ready for action.
Step 6 – Create a script to generate output file.
The last step needed to complete our setup is to make a script that can use the 1Password CLI, and our new template, to generate our environment file. Build automation can be done using many tools, but for this simple example, I’ve just made a Bash script called gen_env.sh.
You only need one single command to perform the file generation task, but I added a few extra instructions for logging purposes.
#!/bin/bash
echo "Generating .env file..."
op inject -i ./scripts/.env.tpl -o .env
echo "File generation complete!"
The second line of code in the above snippet executes the inject command within the 1Password CLI (op). It also passes it two parameters: the input file with -i (the template) and the output file with -o (our generated environment file).
Finally, I make my script executable with:
chmod +x /scripts/env_gen.sh
And run it with:
./scripts/env_gen.sh
For the CLI to access the secrets, you must unlock your 1Password vault. When the inject command is run, it brings up the Access Requested dialog below automatically.

All you have to do is authorize access using whatever method you have set up in 1Password and… Voila! We now have a .env file with the actual secret values injected into it.
/.env
COOL_SAAS_KEY="W-7yPVnps7Gnc9aNgdbQdn@qRG3prKyE"
COOL_SAAS_SECRET="gtnYKHQAo8zMqUKBABGhjc.JEmELUh2o"
Other Benefits
I already mentioned how this setup can benefit new team members joining a project as it makes it easier for them to get their development environment set up. There are of course other benefits as well. For example, you could use this approach to generate multiple environment files for use in different environments such as dev, staging, and production — all of which could leverage shared or unique templates.