
I’ve tried to build My Perfect Personal Organization System with The Perfect Task Management Tool more times than I could count. But, invariably, I abandoned each one because it got too complicated and clunky to keep up. But when I started building my simple weekly planner in Miro, I realized I was onto something: Miro as a personal organization tool. It took a few tries, but I’ve been using my latest iteration pretty consistently for the past four months. I think this one might actually stick, you guys!
What is Miro?
In the company’s own words, “Miro is your team’s visual platform to connect, collaborate, and create — together.” It’s effectively an infinite whiteboard app that allows you to diagram out pretty much anything you want. We use it for everything from project planning to sprint retros to virtual design thinking exercises to architecture diagramming, and that’s just my current project team! I love it for these things, but I also love it to manage my tasks. I’ve created a private board in our instance where I organize all my to-dos in a very visual, colorful, and to me, highly satisfying way. (Psst! They also have a free tier if you want to give it a try.)
Why Miro?
Here are just a few things I like about Miro as a personal organization tool:
It’s open.
You have full use of lots of space. Being able to arrange my thoughts in 2-dimensional space is a game changer for me. I find that I’m able to more accurately represent how my mind’s eye is seeing my tasks and time. Sometimes I want to put things next to each other, or overlap them, or just toss them to the side for a bit, and in document-style tools like Notion or Evernote, you can’t really do that. You will also never run out of room, in any direction, so you can always keep building!
It’s rearrangeable.
The benefit of working in a digital space is that you create and destroy things on a whim. When I was bullet journaling, I would write everything in pen and if I wanted to change the layout, I would either have to start over on a new spread or just wait till next week to make the change. Even an IRL whiteboard can be a burden to wipe and rewrite. Paper stickies work great for this, but I can’t always justify the waste or the space. At the office, I wouldn’t have any room to do what I’m doing in Miro, let alone privately.
It’s simple but powerful.
It has the simple drawing features I need and not too much more. I can build templates that I can reuse in a snap, draw connections between things that have dependencies, or add a little cloud or star shape to change things up. Check out my handy tips below for some helpful little tricks I’ve picked up so far.
How Do I Use Miro?
I build my weekly planner with three basic building blocks:
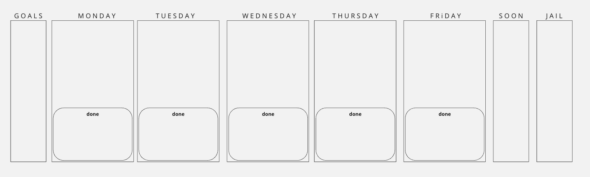
Buckets.
I have a really simple layout consisting mostly of vertical boxes. Left to right, I start with a box for my Goals for the week. These are usually things that I know I need to get done but haven’t planned a specific time for yet, or bigger tasks that need to be broken down further when I’m ready to plan them. Then I have a box for each day of the week, and each one of those has a smaller box inside labeled Done.
As I’m planning my day or week, I’ll put my to-dos in the top part of the box, and then as I complete them, I move them into Done. It’s so satisfying to see the main section empty out and the Done boxes fill up! Then a box for Next Week, for shorter-term reschedules. And last comes, my favorite box, Jail. Jail is for those things that are just not getting done anytime soon, whether they’re completely abandoned or just not a pressing priority.
Visual cues.
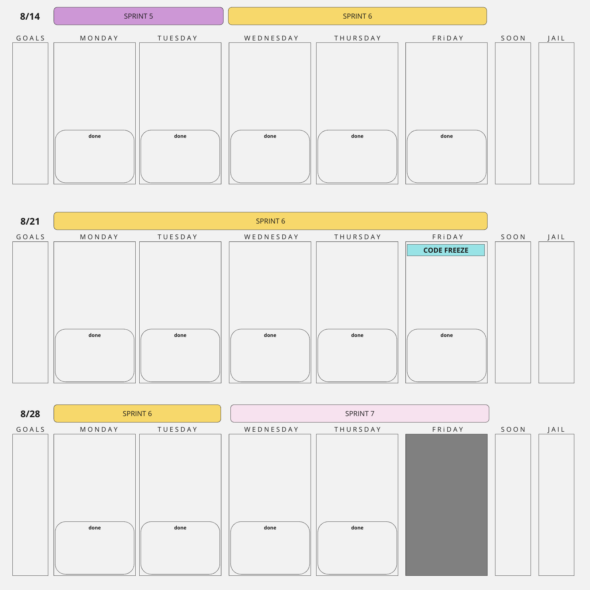
I use banners and colors to help me stay oriented concerning time. On my current project, our two-week sprints start on a Wednesday and end on a Tuesday, so your standard weekly layout is not enough for me to keep track of where we’re at in the sprint. I put a colorful banner across the relevant days, and if I have a major goal for that sprint, I’ll add that text as well. I also like to put smaller blocks down for code freezes and other milestones. Lastly, if I have PTO scheduled, I grey out that day so that it’s really clear to me what time I have available and can plan accordingly.
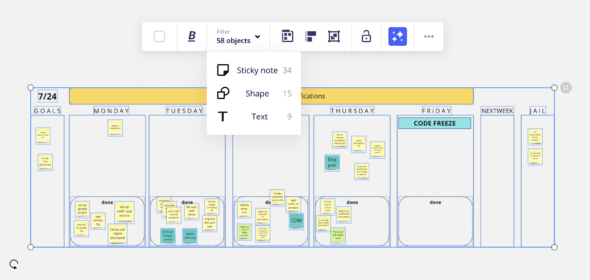
Stickies.
I use stickies to represent all of my to-dos. Anything that can be scheduled and/or completed is represented as a sticky, including meetings. I like to color-code them and stick with a pretty simple scheme. Right now I’m using light yellow (the classic) for to-dos, green for client interactions, and teal for Atomic-specific tasks. You can resize them as you like, but I tend to stick with their presets: small, medium, and large. Most of my tasks are small, but I promote the ones that I feel will take a lot more time, or mental or emotional energy, like a big bug or demo, to medium or large. This helps me gauge how much I can take on each day.

Why Is It Working? Have I Found The One?
Maybe, maybe not! I think the biggest reasons it’s working so far is that, first, I’m just using it when I need it and, secondly, the scope is relatively narrow: work stuff only. I’m not trying to track my entire life in one place, and I put exactly zero pressure on myself to keep it perfectly up to date. This Miro board is my space to work things out when I’m getting overwhelmed and don’t feel like I can hold all the things I need to do in my head.
On a couple of recent sprints, I didn’t use it at all because I had one or two major goals, and I felt like I had a handle on them. It’s a place to dump my thoughts when my brain is swirling, and that’s all I really need right now. Could that change in the future? Absolutely! And (hopefully) Miro will be there to adapt to my changing needs.
P.S. Some Handy Tips
Some things I’ve found that make Miro easier and more fun to work with:
- Group and lock your elements to keep them all together in one spot, especially as you’re dragging around those stickies.
- Copy cells from your favorite spreadsheet app and then paste them in as stickies! This is perfect for those of us who love to move between structured and freeform planning tools.
- Filter your selection by element type. Reusing my template is super easy. I just drag-select the whole week, copy, and paste. Then I isolate all of the stickies using the toolbar and delete them. Voila! A fresh new week!
I discovered your blog website on google and verify a couple of of your early posts. Proceed to keep up the superb operate. I simply additional up your RSS feed to my MSN News Reader. Seeking ahead to reading extra from you later on!…