Much of digital design has drifted away from raster and towards the math-based vector. Traditional tools like Photoshop introduce hurdles when designing with vectors, making the design process less efficient. This isn’t a criticism of Photoshop, but rather the realization that medium constraints effect what type of tool that’s needed to design efficiently.
As a designer I’m always exploring new ways to make my workflow more efficient when it comes to expressing my ideas visually and on through to implementation. So over the past several months, I’ve been starting the design process in Illustrator, then continuing to use Illustrator to finalize my high-fidelity visual assets.
Here are a few lessons I’ve learned trying to use a native vector tool to design application UI.
1. Set Illustrator on a Pixel Path
Jump into Illustrator’s Preferences, and make sure you set things up to think pixel instead of vector based measurements. Notice these specific areas:
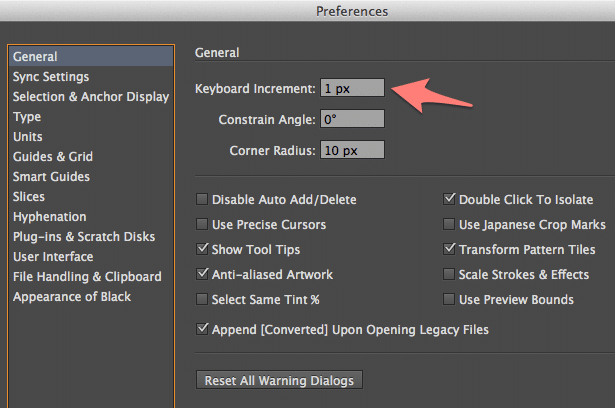
General > Keyboard Increment: 1px
Make sure this is set to a whole number. You’ll be frustrated using the keyboard to move objects if this is 1.599px!
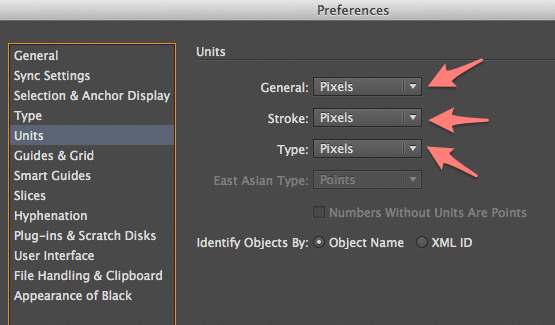
Units > General, Stroke & Type
Make sure these are all set to Pixel
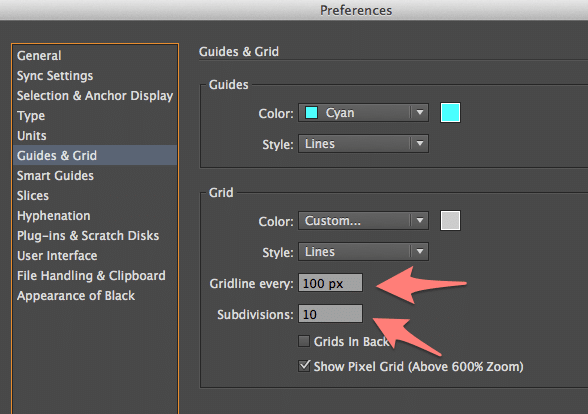
Guides & Grids
I prefer to use guides in increments that make sense for digital. I use Gridline every: 100px and Subdivisions: 10px.
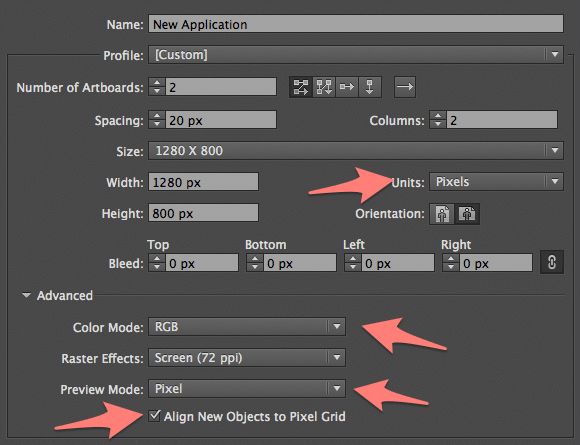
2. Start a New Document Off Right
When starting a new Illustrator document, make sure you change three settings:
- Set Units: Pixel
- Set Color Mode: RGB
- Set Preview Mode: Pixel
- Check “Align New Objects to Pixel Grid”. This option attempts to drop new objects squarely onto a pixel, helping you avoid nasty anti-aliasing of what you’d expect to be sharp crisp lines.
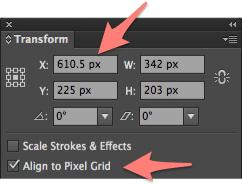 If you ever find that pixels don’t display as you expect, the first place to check is the Transform pallet. Make sure objects are not only whole pixel width and height, but that they are also sitting on the canvas at a whole x and y coordinate.
Illustrator’s Weaknesses
As careful as you are with the Transform palette and aligning objects to the Pixel Grid, you may find that getting a crisp image can still be tricky. Here are a couple of sticking points I’ve found with Illustrator:
- Duplicating and then moving a canvas will disrupt pixel placement. One way to avoid this, is to simply not move a canvas once it’s been duplicated.
- One unfortunate consequences of Pixel Preview is that you lose ALL snapping to other objects. This, in my opinion, is the most frustrating part of using Illustrator for digital design.
Overall, Illustrator has a lot going for it when it comes to digital design. What are you using to design Web, mobile and desktop apps?
I’d like to add that if you open the preferences panel while no other files/projects/windows are open in side Illustrator, you will be able to save the settings as default settings. This way when you open a new project those setting will be preset even when you close Illustrator and restart your computer.