When building a user interface, I appreciate an IDE that allows me to easily change visual elements without having to write code. Writing code for simple things like colors, borders, fonts, or shadows clutters my project. Fortunately, I work with talented designers at Atomic Object who can already use Xcode to make some of these aesthetic changes in the UI without needing to write extra code.
However, while these designers can currently make selective changes to some controls, not all of what they want to do is possible in the IDE. For instance, I cannot set a border or shadow on a UIView without writing code or change the font of a UISegmentedControl. I wish Xcode’s interface builder was more capable of changing simple properties as these.
Fortunately, there is a feature of Xcode’s interface builder that will allow you to manually add user defined runtime attributes. You tell it the name of the property you want to change then specify the type of the property and finally the value.
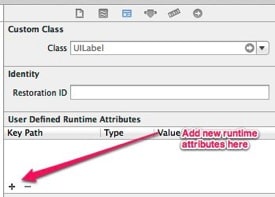
The user-defined runtime attributes feature limits the type of properties that can be changed to Boolean, NSNumber, NSString, CGPoint, CGSize, CGRect, NSRange, and UIColor. If the property you want to change has a different type, then you have to write code to modify the property.
This is the problem, for example, when setting the color on a border. The type of a layer’s borderColor property is CGColor, which is not one of the types allowed. With the help of an Objective-C category, you can get around this limitation and modify properties of different types.
The Objective-C Category that Makes It Possible
The first example I will show you is how to change the border and shadow color of any UIView. The runtime attribute feature allows us to set a UIColor type, which we need to translate to a CGColor type. To accomplish this, we need to extend the CALayer class with a property that will translate the UIColor to the CGColor we need for the border and shadow.
You can extend classes in Objective-C using a category. I added two properties called borderIBColor and shadowIBColor that are of type UIColor. The IB stands for interface builder. I have to give these properties a unique name to avoid name conflicts with the original properties called borderColor and shadowColor that are of the type CGColor.
CALayer+RuntimeAttribute.h
@import QuartzCore;

@interface CALayer (IBConfiguration)

@property(nonatomic, assign) UIColor* borderIBColor;
@property(nonatomic, assign) UIColor* shadowIBColor;

@end
CALayer+RuntimeAttribute.m
#import "CALayer+RuntimeAttribute.h"

@implementation CALayer (IBConfiguration)

-(void)setBorderIBColor:(UIColor*)color
{
    self.borderColor = color.CGColor;
}

-(UIColor*)borderIBColor
{
    return [UIColor colorWithCGColor:self.borderColor];
}

-(void)setShadowIBColor:(UIColor*)color
{
    self.shadowColor = color.CGColor;
}

-(UIColor*)shadowIBColor
{
    return [UIColor colorWithCGColor:self.shadowColor];
}

@end
The setters for borderIBColor and shadowIBColor take in the UIColor value and set the layer’s shadow and border color properties appropriately. The iOS runtime will set the value based on what you have defined in the runtime attributes.
Sample UI
Here is a test UI that I put together to test our new runtime attributes. The gray rectangle is a UIView that we will add a border and shadow to. I also have a couple UISegmentedControls that we will customize later in this post.
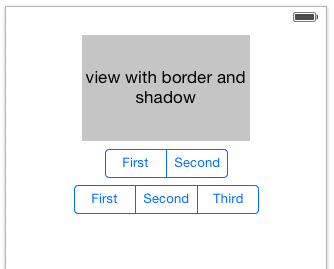
Make sure the gray UIView is selected, and add the following runtime attributes:
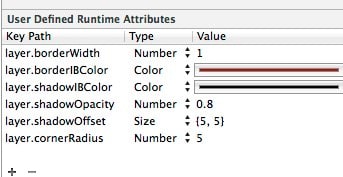
Notice that we are using our new properties on UILayer borderIBColor and shadowIBColor. You can set these to any color value you want. I used black for the shadow and red for the border. I also set the borderWidth, shadowOpacity, shadowOffset, and cornerRadius to give you an example of what other properties you can modify using the runtime attributes feature.
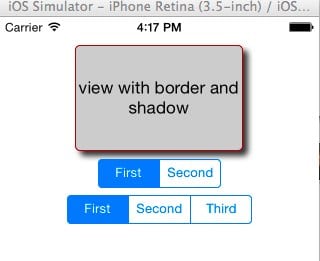
Please note that you will not see any changes to the UI in interface builder when you change the value of a property in the runtime attributes. Your view will still look like a plain gray rectangle. These properties are set at runtime, so you have to run the simulator to see your changes at runtime.
You should see a view like this:
Change Segmented Control Font Family and Size
Next we will configure the font of a UISegmentedControl. I can change the tint color using a runtime attribute, but I can’t change the font size or font family. The title font is more complicated to set because you can have different text based on the selected state. We can use the same technique, using a category to extend UISegmented control, and change the font family and size with the runtime attributes and assume we are setting the title font for the normal state.
UISegmentedControl+RuntimeAttribute.h
@import UIKit;

@interface UISegmentedControl (IBConfiguration)

@property(nonatomic, assign) NSNumber *fontIBSize;
@property(nonatomic, assign) NSString *fontIBName;

@end
UISegmentedControl+RuntimeAttribute.m
#import "UISegmentedControl+RuntimeAttribute.h"

@implementation UISegmentedControl (IBConfiguration)

-(void)setFontIBName:(NSString*)name
{
    CGFloat cgSize = [self.fontIBSize floatValue];
    [self setTitleTextAttributes:@{NSFontAttributeName:[UIFont fontWithName:name size:cgSize]} forState:UIControlStateNormal];
}

-(NSString *)fontIBName
{
    NSDictionary *attributes = [self titleTextAttributesForState:UIControlStateNormal];
    UIFont *font = attributes[NSFontAttributeName];
    return font.familyName;
}

-(void)setFontIBSize:(NSNumber *)size
{
    CGFloat cgSize = [size floatValue];
    [self setTitleTextAttributes:@{NSFontAttributeName:[UIFont fontWithName:self.fontIBName size:cgSize]} forState:UIControlStateNormal];
}

-(NSNumber *)fontIBSize
{
    NSDictionary *attributes = [self titleTextAttributesForState:UIControlStateNormal];
    UIFont *font = attributes[NSFontAttributeName];
    return (font != nil) ? @(font.pointSize) : @15.0;
}

@end
Now select one of the segmented controls and add the following runtime attributes. You can select any color you want. If you want a list of possible font family names, you can go to iosfonts.com.
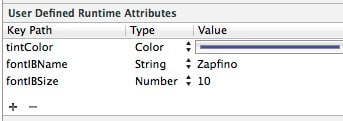
You should see a view like this:
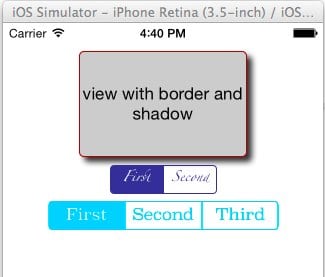
My example is a bit ugly, but you get the point. You can now change all of these properties without having to modify code. If you would like to try this code out yourself to see it in action, I have the entire project on GitHub. Using the same technique, can you think of other customizations to change at runtime for other controls?

Hi, thanks a lot for this tutorial. Is there a way to make the segmented control look like 3d? If there is how? Thanks
Any reason you’re using ‘assign’ retain management instead of ‘strong’ for your properties? Is that because you’re guaranteed that the objects will exist for as long as the nib is loaded?
thanks very much.
Is QuartzCore necessary for this to work? Going to try anyway, but just thought I’d post the question for the next person coming along…