I have been working on a project for a cross-platform mobile application using Xamarin.Forms, and my team has found it surprisingly difficult to determine the best way to handle orientation changes in the application.
The Xamarin.Forms framework has some basic functionality built in to handle transitions between orientations. Its docs include an entire page on ways to handle orientation changes. Most of these solutions involve using existing layouts and adjusting them so the view looks good (but the same) in both portrait and landscape.
Unfortunately, these solutions are designed for very basic views, and they did not work for the complex design of views for our application.
After some research and experimentation, here are four methods I found to handle orientation changes in Xamarin.Forms, along with the final method we are using in our application.
Goal
To test each of these implementations, I designed an example page with different layouts for portrait and landscape orientations. I specifically made these designs so that the transition between orientations could not be achieved using the built-in orientation-handling approach from Xamarin.Forms.
I then created a page based on these designs, using each implementation of orientation-handling that I researched. I noted the heavy-lifting code, as well as the pros and cons of each implementation.
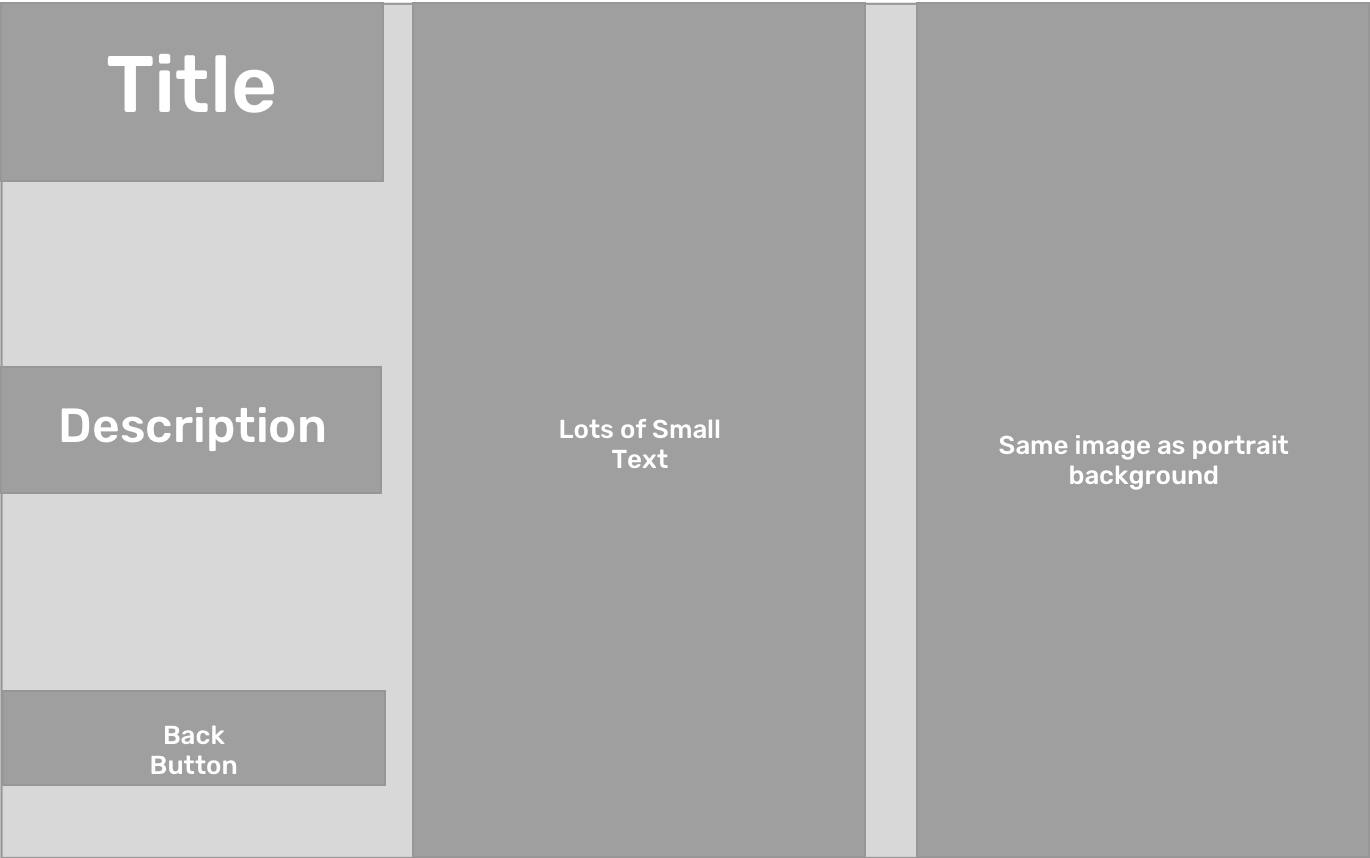
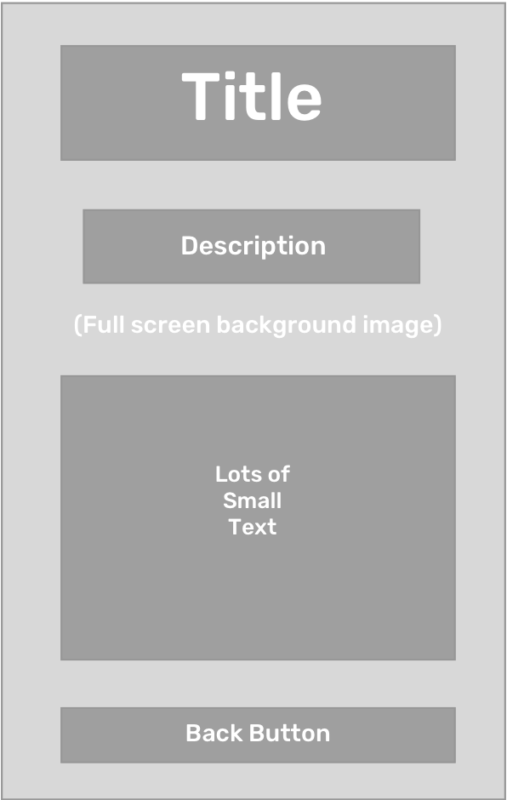
Portrait:
Landscape:

Implementation 1: Rearrange the Page
This is the recommended implementation pulled right from the Xamarin.Forms documentation. This way of handling orientation change involves setting up the view using the xaml, being sure to give the elements names. You then override the OnSizeAllocated method in the code-behind for the page, manaually checking if width is greater than height to determine if the device is now in landscape or portrait. From there, you can rearrange the layout however you like.
In my implementation, I defined a grid in the xaml, along with the elements for each component, giving them appropriate names. Then in OnSizeAllocated, I determined the orientation and set up the grid accordingly.
Code:
public partial class OnSizeAllocatedRearrangePage : ContentPage
{
	private double width = 0;
	private double height = 0;

	public OnSizeAllocatedRearrangePage()
	{
		InitializeComponent();
		width = this.Width;
		height = this.Height;

		back.Command = new Command(() => Navigation.PopModalAsync());

	}

	protected override void OnSizeAllocated(double width, double height)
	{
		base.OnSizeAllocated(width, height); //must be called

		if (this.width != width || this.height != height)
		{
			this.width = width;
			this.height = height;

			UpdateLayout();
		}
	}

	void UpdateLayout()
	{
		grid.RowDefinitions.Clear();
		grid.ColumnDefinitions.Clear();
		grid.Children.Clear();

		if(width > height)
		{
			SetupLandscapeLayout();
		}
		else
		{
			SetupPortraitLayout();
		}
	}

	void SetupLandscapeLayout()
	{
		grid.RowDefinitions.Add(new RowDefinition { Height = new GridLength(1, GridUnitType.Star) });
		grid.RowDefinitions.Add(new RowDefinition { Height = new GridLength(1, GridUnitType.Star) });
		grid.RowDefinitions.Add(new RowDefinition { Height = new GridLength(1, GridUnitType.Star) });

		grid.ColumnDefinitions.Add(new ColumnDefinition { Width = new GridLength(1, GridUnitType.Star) });
		grid.ColumnDefinitions.Add(new ColumnDefinition { Width = new GridLength(1, GridUnitType.Star) });
		grid.ColumnDefinitions.Add(new ColumnDefinition { Width = new GridLength(1, GridUnitType.Star) });

		grid.Children.Add(view: title, left: 0, top: 0);
		grid.Children.Add(view: description, left: 0, top: 1);
		grid.Children.Add(view: fullTextLayout, left: 1, right: 2, top: 0, bottom: 3);
		grid.Children.Add(view: back, left: 0, top: 2);

		BackgroundColor = Color.DarkBlue;
		background.Opacity = 1.0;

		grid.Children.Add(view: background, left: 2, right: 3, top: 0, bottom: 3);
		grid.LowerChild(background);

	}

	void SetupPortraitLayout()
	{
		grid.RowDefinitions.Add(new RowDefinition { Height = new GridLength(2, GridUnitType.Star) });
		grid.RowDefinitions.Add(new RowDefinition { Height = new GridLength(2, GridUnitType.Star) });
		grid.RowDefinitions.Add(new RowDefinition { Height = new GridLength(2, GridUnitType.Star) });
		grid.RowDefinitions.Add(new RowDefinition { Height = new GridLength(1, GridUnitType.Star) });

		grid.Children.Add(view: title, left: 0, top: 0);
		grid.Children.Add(view: description, left: 0, top: 1);
		grid.Children.Add(view: fullTextLayout, left: 0, top: 2);
		grid.Children.Add(view: back, left: 0, top: 3);

		BackgroundColor = Color.Black;
		background.Opacity = 0.6;

		grid.Children.Add(view: background, left: 0, right: 1, top: 0, bottom: 5);
		grid.LowerChild(background);
	}
}
Pros
- This is the official Xamarin.Forms way of handling orientation change.
- It provides a lot of flexibility for defining views in each orientation, if you’re willing to use the same layout in each orientation.
- The Xamarin.Forms docs have example code that makes it easy to get started with this implementation.
Cons
- It feels tedious to have to subscribe to an event that doesn’t explicitly deal with orientation changes, and then manually check
widthagainstheightto determine the current orientation. - The code-behind is much busier than I would prefer for a true MVVM setup. This is a lot of backend logic.
Implementation 2: Swap Out Views
At a glance, this method is very similar to the previous one. Again, I will override OnSizeAllocated and update my height and width values, using them to determine which layout I want to display. However, instead of programatically rearranging the layout of the page, I will replace the page’s Content value with an instance of either the portrait layout or the landscape layout.
Code:
public partial class OnSizeAllocatedSwapViewsPage : ContentPage
{

	private double width = 0;
	private double height = 0;

	private SwapLandscape Landscape;
	private SwapPortrait Portrait;

	public OnSizeAllocatedSwapViewsPage()
	{
		InitializeComponent();
		Portrait = new SwapPortrait();
		Landscape = new SwapLandscape();
		UpdateLayout();

	}

	protected override void OnSizeAllocated(double width, double height)
	{
		base.OnSizeAllocated(width, height); //must be called

		if (this.width != width || this.height != height)
		{
			this.width = width;
			this.height = height;

			UpdateLayout();
		}
	}

	void UpdateLayout()
	{
		if (width > height)
		{
		Content = Landscape;
		}
		else
		{
			Content = Portrait;
		}
	}
}
Pros
- The code-behind is simpler and easier to read.
- If working with a
Grid, you don’t have to struggle with the confusing syntax of programmatically adding elements to it. - You have complete control over the design and layout of each page and are not constrained to use the same
Layoutobject for each orientation. (In this implementation,SwapPortraituses aGridas the parent container butSwapLandscapeuses aStackLayout.)
Cons
- It essentially doubles the workload from a UI standpoint.
- This approach still feels more like a hack than a true way of handling orientation change.
Implementation 3: Using Xamarin.Essentials
Xamarin.Essentials is a new NuGet package, currently in pre-release, that adds additional functionality to cross-platform applications built in Xamarin. One of these new features is the ability to ping the device for the current orientation by accessing the DeviceDisplay.ScreenMetrics.Orientation property. This returns the current device orientation, which can be used to determine which layout to render.
Code:
public partial class XamarinEssentialsPage : ContentPage
{
	private bool IsPortrait;
	public XamarinEssentialsPage()
	{
		InitializeComponent();
		IsPortrait = DeviceDisplay.ScreenMetrics.Orientation == ScreenOrientation.Portrait;
		UpdateLayout();
		back.Command = new Command(() => Navigation.PopModalAsync());
	}

	void UpdateLayout()
	{
		grid.RowDefinitions.Clear();
		grid.ColumnDefinitions.Clear();
		grid.Children.Clear();

		if(IsPortrait)
		{
			SetupPortraitLayout();
		}
		else
		{
			SetupLandscapeLayout();
		}
	}

	void SetupLandscapeLayout()
	{
		grid.RowDefinitions.Add(new RowDefinition { Height = new GridLength(1, GridUnitType.Star) });
		grid.RowDefinitions.Add(new RowDefinition { Height = new GridLength(1, GridUnitType.Star) });
		grid.RowDefinitions.Add(new RowDefinition { Height = new GridLength(1, GridUnitType.Star) });

		grid.ColumnDefinitions.Add(new ColumnDefinition { Width = new GridLength(1, GridUnitType.Star) });
		grid.ColumnDefinitions.Add(new ColumnDefinition { Width = new GridLength(1, GridUnitType.Star) });
		grid.ColumnDefinitions.Add(new ColumnDefinition { Width = new GridLength(1, GridUnitType.Star) });

		grid.Children.Add(view: title, left: 0, top: 0);
		grid.Children.Add(view: description, left: 0, top: 1);
		grid.Children.Add(view: fullTextLayout, left: 1, right: 2, top: 0, bottom: 3);
		grid.Children.Add(view: back, left: 0, top: 2);

		BackgroundColor = Color.DarkBlue;
		background.Opacity = 1.0;

		grid.Children.Add(view: background, left: 2, right: 3, top: 0, bottom: 3);
		grid.LowerChild(background);

	}

	void SetupPortraitLayout()
	{
		grid.RowDefinitions.Add(new RowDefinition { Height = new GridLength(2, GridUnitType.Star) });
		grid.RowDefinitions.Add(new RowDefinition { Height = new GridLength(2, GridUnitType.Star) });
		grid.RowDefinitions.Add(new RowDefinition { Height = new GridLength(2, GridUnitType.Star) });
		grid.RowDefinitions.Add(new RowDefinition { Height = new GridLength(1, GridUnitType.Star) });

		grid.Children.Add(view: title, left: 0, top: 0);
		grid.Children.Add(view: description, left: 0, top: 1);
		grid.Children.Add(view: fullTextLayout, left: 0, top: 2);
		grid.Children.Add(view: back, left: 0, top: 3);

		BackgroundColor = Color.Black;
		background.Opacity = 0.6;

		grid.Children.Add(view: background, left: 0, right: 1, top: 0, bottom: 5);
		grid.LowerChild(background);
	}
}
Pros
- This is a cleaner way to determine current orientation.
Cons
- This NuGet is in pre-release, and adding it to an application now means that it’s quite likely that an application-breaking change could be added to the package before initial release, giving you something else to handle.
- Though this implementation determines the orientation correctly on page start-up, there is no logic to handle the device rotating once the page has been loaded. Xamarin.Essentials offers no additional event to which you can subscribe. Once the page is loaded, it has no way of triggering a check to update the
IsPortraitBoolean.
Implementation 4: Create a Base Page
I found this implementation to be popular in the Xamarin.Forms Forum, particularly from this post. The method essentially creates a new class that subclasses ContentPage and fires custom PageOrientationEventArgs from the OnSizeAllocated method. Pages that subclass this OrientationContentPage have an OrientationChanged method that derives the new orientation based on the PageOrientationEventArgs.
Code:
public partial class UsingBasePage : OrientationContentPage
{
	public UsingBasePage()
	{
		InitializeComponent();
		back.Command = new Command(() => Navigation.PopModalAsync());
		OnOrientationChanged += OrientationChanged;
	}

	private void OrientationChanged(object obj, PageOrientationEventArgs e)
	{
		switch (e.Orientation)
		{
			case PageOrientation.Horizontal:
			SetupLandscapeLayout();
			break;
			case PageOrientation.Vertical:
			SetupPortraitLayout();
			break;
			default:
			Console.WriteLine($"Orientation {e.Orientation} not recognized!");
			break;
		}
	}

	void SetupLandscapeLayout()
	{
		grid.RowDefinitions.Clear();
		grid.ColumnDefinitions.Clear();
		grid.Children.Clear();

		grid.RowDefinitions.Add(new RowDefinition { Height = new GridLength(1, GridUnitType.Star) });
		grid.RowDefinitions.Add(new RowDefinition { Height = new GridLength(1, GridUnitType.Star) });
		grid.RowDefinitions.Add(new RowDefinition { Height = new GridLength(1, GridUnitType.Star) });

		grid.ColumnDefinitions.Add(new ColumnDefinition { Width = new GridLength(1, GridUnitType.Star) });
		grid.ColumnDefinitions.Add(new ColumnDefinition { Width = new GridLength(1, GridUnitType.Star) });
		grid.ColumnDefinitions.Add(new ColumnDefinition { Width = new GridLength(1, GridUnitType.Star) });

		grid.Children.Add(view: title, left: 0, top: 0);
		grid.Children.Add(view: description, left: 0, top: 1);
		grid.Children.Add(view: fullTextLayout, left: 1, right: 2, top: 0, bottom: 3);
		grid.Children.Add(view: back, left: 0, top: 2);

		BackgroundColor = Color.DarkBlue;
		background.Opacity = 1.0;

		grid.Children.Add(view: background, left: 2, right: 3, top: 0, bottom: 3);
		grid.LowerChild(background);

	}

	void SetupPortraitLayout()
	{
		grid.RowDefinitions.Clear();
		grid.ColumnDefinitions.Clear();
		grid.Children.Clear();

		grid.RowDefinitions.Add(new RowDefinition { Height = new GridLength(2, GridUnitType.Star) });
		grid.RowDefinitions.Add(new RowDefinition { Height = new GridLength(2, GridUnitType.Star) });
		grid.RowDefinitions.Add(new RowDefinition { Height = new GridLength(2, GridUnitType.Star) });
		grid.RowDefinitions.Add(new RowDefinition { Height = new GridLength(1, GridUnitType.Star) });

		grid.Children.Add(view: title, left: 0, top: 0);
		grid.Children.Add(view: description, left: 0, top: 1);
		grid.Children.Add(view: fullTextLayout, left: 0, top: 2);
		grid.Children.Add(view: back, left: 0, top: 3);

		BackgroundColor = Color.Black;
		background.Opacity = 0.6;

		grid.Children.Add(view: background, left: 0, right: 1, top: 0, bottom: 5);
		grid.LowerChild(background);
	}
}
Pros
- This implementation provides a nice layer of abstraction, hiding the
OnSizeAllocatedoverride in the base class. - It reduces code duplication by only overriding
OnSizeAllocatedin one place.
Cons
- Because
OrientationChangeonly fires on a rotation, there is no built-in way built to know the orientation at the initialization of the page. You have to rotate the device first to trigger the event.
Our Implementation: A Combination
Though there are pros and cons to each of these implementations, I found that a few of them seemed to fill in gaps left by a different implementation. Taking this into account, I merged different implementations to create my own custom way of handling orientation changes.
I created a base page that overrides OnSizeAllocated. It calls an UpdateLayout method that, in turn, calls virtual methods SetupLandscapeLayout and SetupPortraitLayout by comparing the height and width of the screen.
The default setup methods simply swap the page’s content with the defined portrait or landscape view. But if you want more control over either or both layouts, any page that subclasses this new base page can override the setup methods.
This implementation blends the abstraction of using a base page with the simplicity of swapping out views, while also allowing for more custom layout handling like the Xamarin.Forms docs recommend.
I decided against using Xamarin.Essentials in my final implementation due to the fact that the NuGet is still in pre-release.
Code:
public partial class PreferredPage : PreferredOrientationContentPage
{

	public PreferredPage()
	{
		InitializeComponent();
		this.PortraitLayoutType = typeof(SwapPortrait);
	}

	protected override void SetupLandscapeLayout()
	{
		Content = new SwapLandscape();
		Content.BackgroundColor = Color.DarkSlateGray;
	}
}
Pros
- There’s a huge reduction in the size of the code-behind.
- It provides a default implementation that you can override if you want more detail.
Cons
- This approach requires more up-front work to create the base class.
Final Thoughts
Handling changes in device orientation is something that all mobile developers have to do. Though different applications will have different requirements, it’s always good to know what your options are.
The code for each of these implementations can be found on my GitHub account.