JSON Server is an easy and quick-to-set-up module that you can use to fake or mock an API. You can find the basics in the documentation, and many articles regurgitate the same info. In this post, though, I intend to cover a few of the more complex things you can do with JSON Server.
If you want to know why you should build a fake API, then read Building a Fake API for Testing & Development.
Getting Started
For the bare-bones basics, install json-server globally and create a JSON database named db.json where you can send requests.
npm install -g json-serverHere is a database with a users array:
{
  "users": [
    {
      "id": 1,
      "userId": 101,
      "name": "Alice"
    },
    {
      "id": 2,
      "userId": 102,
      "name": "Bob"
    },
    {
      "id": 3,
      "userId": 103,
      "name": "Carol"
    }
  ]
}
This call will run your database file on your localhost.
json-server --watch db.jsonYou can send requests to:
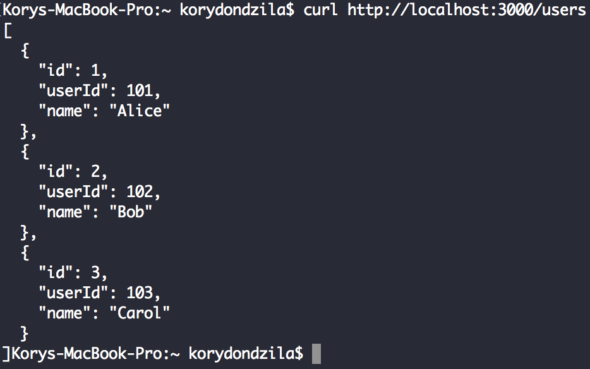
curl https://localhost:3000/users
GET requests work as expected and will return data based on the query given. Doing a POST request will add new elements into the database and increment their id. This changes the file locally.
curl -d "userId=104&name=Dan" https://localhost:3000/users
You can use other request types as well, but I’ll refrain from detailing those here.
Beyond the Basics: Custom Routes
The above approach works fine for some fake APIs, but typically, you will want requests that do more or use alternate routes. For this, you’ll need a package.json and a server.js.
{
  "name": "json-server-test",
  "main": "server.js",
  "scripts": {
    "start": "node server.js"
  },
  "devDependencies": {
    "json-server": "^0.14.0"
  }
}
Fairly simple: json-server is installed as a dev dependency, and there’s a start script.
const jsonServer = require('json-server');
const server = jsonServer.create();
const router = jsonServer.router('./db.json');
const middlewares = jsonServer.defaults();
const port = process.env.PORT || 3000;

server.use(middlewares);
server.use(router);
server.listen(port);
For the server.js we need to create the server, set the database as the router, and use the default middlewares. Then listen on the port. Running the start script will give us what we had before with the same functionality, but now we can do a lot more.
For some basic extended routes, all you need to add is the rewriter.
server.use(jsonServer.rewriter({
  '/api/users': '/users'
}));
Previously, you could do this using the routes flag and another JSON file, but I’ll show them here instead. The Readme goes into a bit more detail on these.
Everything so far is fine if you want to return results from queries as-is. However, for anything else, you’ll want custom routes, which you can have by calling the respective method on the server. Routes should be added after middlewares are loaded.
server.get('/get/user', (req, res) => {
  // TODO
});
Let’s say that, in our project, we want to make a GET request to query a user, but we don’t want the id. To do this, we need a reference to our database. We’ll add this to the top of our server.js.
const db = require('./db.json');Then we can grab the query from the request, checking that our expected parameter, userId, is valid.
let userId = req.query['userId'];
if (userId != null && userId >= 0) {
  // TODO
} else {
  res.status(400).jsonp({
    error: "No valid userId"
  });
}
We use the userId to find the matching user.
let result = db.users.find(user => {
  return user.userId == userId;
})
If the user is found, we return the result after first using array destructuring to remove id.
if (result) {
  let {id, ...user} = result;
  res.status(200).jsonp(user);
} else {
  res.status(400).jsonp({
    error: "Bad userId"
  });
}
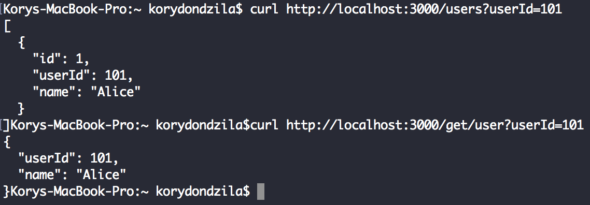
It’s that simple. Comparing the basic route with a filter for the user with userId=101, with our new route, we have this:
curl https://localhost:3000/get/user?userId=101
We can see that the basic version returns an array with the correct user, but it still has the id. The custom route returns the single user without the id.
Beyond the Basics: POST Routes
The problem with GET routes is that the query is in the URL. That’s fine for some applications, but others might want this hidden in a POST. Or maybe you have a weird back-end API where everything is a POST.
The main difference with POST routes is that you need to use the bodyParser.
server.use(jsonServer.bodyParser)
server.post('/post/user', (req, res) => {
  if (req.method === 'POST') {
    let userId = req.body['userId'];
    if (userId != null && userId >= 0) {
      let result = db.users.find(user => {
        return user.userId == userId;
      })

      if (result) {
        let {id, ...user} = result;
        res.status(200).jsonp(user);
      } else {
        res.status(400).jsonp({
          error: "Bad userId"
        });
      }
    } else {
      res.status(400).jsonp({
        error: "No valid userId"
      });
    }
  }
});
As you can see, the only difference is that we get the body from the request instead of the query. If you tried this without the bodyParser, then body would be undefined.
curl -d "userId=101" https://localhost:3000/post/user
Beyond the Basics: Faking Data
When faking an API, it can take a long time to manually enter the data you need to build up the database. This might be fine for some entries, but for anything that requires a large array of data, it would be better to generate fake data.
To do this, I suggest using a module that provides fake data. Faker-js is the one I recommend. An older version of this post used Marak’s faker, but that library was removed in early 2022, you can read about that here
npm install @faker-js/faker --save-devThe Readme gives a good explanation of how all the available methods work and the information they return. Using it with json-server is simple. Just make a JS file that requires Faker, and export a method that returns an object of generated data.
const { faker } = require('@faker-js/faker');

function generateData() {
    const messages = [];
    for (let id = 0; id < 10; id++) {
        let priority = faker.datatype.number({min: 1, max: 2});
        let date = faker.date.between("2018-01-01", "2018-07-31").toISOString().split("T")[0];
        let fromId = faker.datatype.number({min: 1000, max: 9999})
        let message = faker.hacker.phrase();
        let status = faker.datatype.number(1);
        messages.push({
            "id": id,
            "from_userId": fromId,
            "date_sent": date,
            "priority": priority,
            "message": message,
            "status": status
        });
    }

    return {messages};
}

module.exports = generateData;
json-server generate-data.js
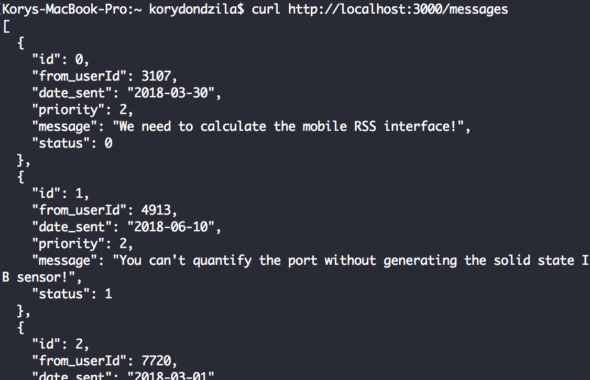
With the generated data now available, it can be copied into the database with its own route or kept in its JSON file so you can write custom routes to access it. It could be possible to use Faker on the fly in routes, for completely random data, but that might not work well with certain kinds of testing.
Beyond the Basics: Hosting JSON Server on Heroku
The process for hosting on Heroku is easy and free (if you are using your personal account). You can host it like any other project you have. It's best to keep a Git repo that Heroku can watch to deploy new builds when there is a new commit in the master branch.
There's really not much else to say, but here is a link to a repo that can explain more json-server-heroku. It also provides a few other places for hosting.
I think you'll find that JSON Server is an easy-to-use module for most of your API faking needs. I am currently using this on a client project to mock out an API they have yet to build. Hosting on Heroku makes it fast and easy to add additional content to the database when needed or asked for by QA.
The full code can be found here.
See also: Use jq to create JSON


Mock servers are great, but today with the pace at which APIs change sometimes you require a more lightweight process, consider this no-code approach with a browser extension: https://tweak-extension.com/
Cheers!