Article summary
In a recent WPF project, the need arose to overlay the entire window except for a particular control, to create a strong impression of unavailability to the user. The control in question was showing progress of an important external operation that really shouldn’t be interrupted by a stray click on the close button. I’ll show you how we solved this using Adorners.
The initial implementation simply set the controls elsewhere in the window to disabled state (IsEnabled = false). This automatically creates a grayed-out impression for most controls. But not everything looks unavailable this way (custom themes, some borders), and it’s a lot of work to ensure everything responds correctly.
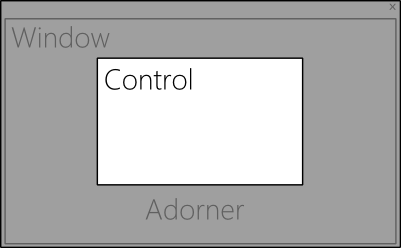
Our approach was to create a transparent overlay (we call it a “smoke screen”) that occluded the entire Window except for the desired Control. I had some simple ideas that would avoid breaking our MVVM pattern’s preference for no “code behind.”
The first idea involved a Rectangle occupying the same Grid location as the main Border. This turned out to make it impossible to avoid overlaying the intended control. I had thought a dynamic clipping rectangle could do the job, but I was stymied by the lack of DependencyProperties in the Geometry namespace: I couldn’t define a clipping area that allowed arbitrary size changes in our visible control.
I also tried dynamically changing the sizes of four Rectangles in the visual tree to surround my control. This resulted in a messy coupling of my View to my ViewModel, either through code-behind or complicated Bindings.
The Adorner Solution
Eventually I found WPF’s Adorners. The Adorner layer of a WPF control allows drawing on top of the rest of the application. These are commonly used to create notifications, tooltips, or badges.

In my case, an adorner simply needed to draw a single rectangle with a semi-transparent gray color. The rectangle should occlude the entire window except for the control it is “adorning.” I accomplished this by implementing overrides for two methods in my Adorner subclass: OnRender and GetLayoutClip.
protected override void OnRender(DrawingContext drawingContext)
{
    drawingContext.DrawRectangle(screenBrush_, null, WindowRect());
    base.OnRender(drawingContext);
}

protected override Geometry GetLayoutClip(Size layoutSlotSize)
{
    // Add a group that includes the whole window except the adorned control
    GeometryGroup grp = new GeometryGroup();
    grp.Children.Add(new RectangleGeometry(WindowRect()));
    grp.Children.Add(new RectangleGeometry(new Rect(layoutSlotSize)));

    return grp;
}
The OnRender method handles drawing our rectangle, and the GetLayoutClip method handles setting a clipping Geometry that avoids drawing on top of the adorned control.
Both methods make use of a simple utility method that determines the Rect that defines the main Window:
private Rect WindowRect()
{
    if (control_ == null)
    {
	throw new ArgumentException("cannot adorn a null control");
    }
    else
    {
	// Get a point of the offset of the window
	Window window = Application.Current.MainWindow;
	Point windowOffset;

	if (window == null)
	{
	    throw new ArgumentException("can't get main window");
	{
	} else
	    GeneralTransform transformToAncestor = control_.TransformToAncestor(window);
	    if (transformToAncestor == null || transformToAncestor.Inverse == null)
	    {
		throw new ArgumentException("no transform to window");
	    }
	    else
	    {
		windowOffset = transformToAncestor.Inverse.Transform(new Point(0, 0));
	    }
	}

	// Get a point of the lower-right corner of the window
	Point windowLowerRight = windowOffset;
	windowLowerRight.Offset(window.ActualWidth, window.ActualHeight);
	return new Rect(windowOffset, windowLowerRight);
    }
}
To do that, we find the vector from the origin of the control to the origin of the Window, invert it, and apply it to a Point at 0,0. We then find the ActualWidth and ActualHeight of the window and create a Rect with those and our translated Point.
The clipping area is defined with negative geometry: first we add the whole window rectangle as described above, then add a rectangle for the border of the control to be shown. This creates a “cut-out” with everything shadowed except our desired control.
Here’s how to use the new overlay adorner:
public partial class YourControl : UserControl
{

    public YourControl()
    {
        InitializeComponent();
        Loaded += OnLoaded;
    }

    private SmokeScreenAdorner _adorner;

    private void OnLoaded(object sender, RoutedEventArgs args)
    {
        var layer = AdornerLayer.GetAdornerLayer(this);
        _adorner = new SmokeScreenAdorner(this);
        layer.Add(_adorner);
    }
}
That’s it! Sure, you need a little “code in the behind” to add this to your View, but it’s mostly encapsulated in the Adorner subclass. Don’t worry too much about it.
There are lots of other uses for custom Adorners of course, but I hope you enjoyed this quick look at one solution for faking modal overlays in WPF.
