
Article summary
Anyone who knows me very well could probably tell you that I’m a pretty big fan of Particle, a provider of hardware and software components for building internet-connected products (IoT). I love their product suite because they have abstracted the common functions of IoT products into easy-to-use components while still allowing access to all the nitty-gritty details for those of us who need to get down to that level.
Recently, I was working on a project where I needed to add a display to a device that I had built. I wanted to use the Particle Photon to present some status to the user, so I picked up a cheap OLED display on Amazon, wired it up, and within no time, I was rendering text and graphics on the display. Below, I will outline the process I followed to get it working.
Choosing a Display
Finding a display was the first step. I searched Amazon for “SPI OLED Display” and quickly found the product shown below.

The one I bought was from a seller called HILetGo, but there were actually many sellers offering essentially the same thing. If you’d rather not go through Amazon, you can buy a similar device from Adafruit or SparkFun.
These types of displays can be controlled by either I2C or SPI. Personally, I prefer working with SPI because it’s easier to implement, and it’s usually faster for transferring data.
The resolution of this display is 128 x 64. Each pixel is either on or off; there is no color variation, but you can vary the brightness. You can also find displays with different color options.
This display, and the others like it, all use the same display driver chip, the SSD1306. This chip accepts commands via I2C, SPI, or parallel interfaces. Open-source libraries are readily available for talking to them.
Wiring It Up
To communicate with this chip via an SPI interface, you will need five micro-controller pins. Three are the typical SPI signals for Clock, MOSI, and Chip Select. The other two are the DC (Data/Command) and Reset signals.
Additionally, the board requires power and ground as usual. This particular display can be powered from three tp 5VDC, but not all of them accept that wide of a range, so check the datasheet.
The labeling on these boards doesn’t make it super-obvious which pins are for what purpose. That’s because the pins are used for different purposes depending on which interface you are utilizing. When using the SPI interface, the signals map to the pin labels as follows:
SPI Clock: “D0”
SPI MOSI: “D1”
Data/Command: “DC”
Chip Select: “CS”
Reset: “RES”
Next, you’ll need to figure out which pins to connect these to on your Particle device. The DC, CS, and Reset pins can be connected to any GPIO pins that you have available. The other two require the use of the SPI peripheral, so you’ll need to check the Particle reference document to determine which pins connect to the SPI Clock and MOSI.
For the Photon, those pins are A3 and A5, respectively. If for some reason those pins are unavailable, there is a second SPI peripheral available on the Photon.
Adafruit Libraries
Now that you have the display wired up to your Particle board, the next step is to pull in a library so that you can talk to it. Conveniently, Adafruit has written an open-source library called Adafruit_SSD1306 which is specifically designed for talking to this display driver. The Adafruit_SSD1306 is really just a thin wrapper on top of another library, Adafruit_GFX, which does most of the heavy lifting of rendering lines, shapes and fonts. The Adafruit_SSD1306 library handles the SPI/I2C communication and the formatting of the commands and data to send to the driver.
If you’re building your project with Particle’s web-based IDE, then adding the library is as simple as clicking on the Libraries icon, searching for “Adafruit_SSD1306”, and clicking Add. If you are using the Particle CLI to build your project, you can add the library by executing the following command: particle library add Adafruit_SSD1306. After that, you’re ready to start writing code and printing things to your display.
Sample Code
To initialize the display, all you have to do is create an instance of the Adafruit_SSD1306 class and call the begin() function on it. The code below initializes the display driver and shows the Adafruit splash screen for two seconds.
#include "Adafruit_SSD1306.h"

#define OLED_DC A1
#define OLED_CS A2
#define OLED_RESET A0

static Adafruit_SSD1306 display(OLED_DC, OLED_RESET, OLED_CS);

void display_init()
{
  display.begin(SSD1306_SWITCHCAPVCC);
  display.display(); // show the splash screen
  delay(2000);
  display.clearDisplay(); // clear the screen buffer
  display.display();
}

The Adafruit_GFX library can render text with various sizes and can even invert the pixels to produce a highlighted effect. The following code sets the font size and cursor position, then renders a few lines of text to the display.
  display.clearDisplay();
  display.setTextSize(2);
  display.setTextColor(WHITE);
  display.setCursor(0,0);
  display.println("Atomic");
  display.println("Object!");
  display.println("SSD1306");
  display.display();
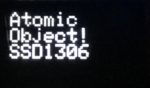
Sorry for the poor images. My display is covered by a piece of plexiglass that has a couple small scratches on it!
Rendering bitmap images is really easy, too. Start out with a bitmap image with a resolution that’s less than or equal to your display. Using a program like Adobe Photoshop, adjust the image so that every pixel is either white or black. Then, use a program like Image2Code to convert the image to an array of bytes. Finally, add the byte array to your program and call display.drawBitmap(...) to render the image.
  uint8_t const ao_logo[] = { ... output from Image2Code here ... };
  display.clearDisplay();
  display.drawBitmap(0, 0, ao_logo, 128, 64, WHITE);
  display.display();
![]()
![]()
There is a ton more that you can do with this library, including drawing lines, curves, importing different fonts, etc. Hopefully this is enough to get you started. Now go make pretty things!
Resources
Display on Adafruit
https://www.adafruit.com/product/326
SSD1306 Datasheet
https://cdn-shop.adafruit.com/datasheets/SSD1306.pdf
Tutorial on Adafruit
https://learn.adafruit.com/monochrome-oled-breakouts?view=all
Adafruit_SSD306 Source Code
https://github.com/adafruit/Adafruit_SSD1306
Adafruit_GFX Source Code
https://github.com/adafruit/Adafruit-GFX-Library