
WebSockets are a useful tool that allow for two-way communication between a web server and a browser. In this post, I am going to introduce the basics of WebSockets by making a (very) simple chat application using Express, HTML, and vanilla JavaScript.
Setting Up
We are going to be using Yarn to install our dependencies, but feel free to use npm instead.
To start, make a new directory, and install Express, Socket.IO, and nodemon using the following command:
mkdir web-sockets-tut && cd web-sockets-tut && yarn add express nodemon socket.io
We are using Express as our webserver, nodemon to ensure that our server updates as our code changes, and Socket.IO as our WebSockets library.
After this, we want to set up the server with the following code in our index.js file:
// index.js
// Get our dependencies
var express = require("express");
var socket = require("socket.io");

// initialize our express app
var app = express();

var port = 3000;

// have our app start listening
var server = app.listen(port, function() {
  console.log("Listening at https://localhost: " + port);
});

// Specify a directory to serve static files
app.use(express.static("public"));

// initialize our socket by passing in our express server
var sock = socket(server);

// respond to initial connection with our server
sock.on("connection", function(socket) {
  console.log("made connection with socket " + socket.id);
});
This gives us a basic server that will respond to a WebSocket connection. Now that we have that, let’s hook up our client. Create a public directory, and create a file named index.html.
<!-- public/index.html -->
<html>
<head>
  <meta charset="utf-8">
  <script src="/socket.io/socket.io.js"></script>
  <title>Gage’s WebSocket Tutorial</title>
</head>
<body>
  <div>
    <input id="userName" type="text" placeholder="UserName" />
    <input id="message" type="text" placeholder="Message" />
    <button id="send">Send</button>
    <div id="messages"></div>
    <div id="typing"></div>
  </div>
  <script src="/chat.js"></script>
</body>
<html>
The important parts of this file are the two script tags, the first one giving us access to the socket.io library on the client side, and the second being the file with our client code. Now make another file in the public directory named chat.js with the following contents:
// public/chat.js
// connect to a socket at localhost:3000
var socket = io.connect("<https://localhost:3000>");
Now that we have a client and server, we can finally start our application using npx nodemon index.js and loading localhost:3000 in a browser. Once the page has loaded, your server logs should indicate that a WebSocket connection has been made.

Emitting Events on the Client Side
Now that our client and server are connected, we can start emitting events between the two. Let’s start with the client. Add the following code to public/client.js:
//public/chat.js
var socket = io.connect("https://localhost:3000");

// get dom elements
var message = document.getElementById("message");
var userName = document.getElementById("userName");
var sendBtn = document.getElementById("send");
var messages = document.getElementById("messages");

// add click listener to our button
sendBtn.addEventListener("click", function() {

// after hitting send emit a “chat” event to our server with data containing our message and userName
socket.emit("chat", {
    message: message.value,
    userName: userName.value
  });
});

// Listen for “chat” events
socket.on("chat", function(data) {
  // When we receive a “chat” event, display the message to the user
  messages.innerHTML +=
    "<p><strong>" + data.userName + ": </strong>" + data.message + "</p>";
});
We now have a simple client that can send and receive chat events on a WebSocket. If you try sending a message right now, nothing will happen. That is because we haven’t set up any event handlers on the server yet.
Emitting Events on the Server Side
We can handle these events on the server side with the following code:
//index.js
var express = require("express");
var socket = require("socket.io");

var app = express();

var port = 3000;

var server = app.listen(port, function() {
  console.log("Listening at https://localhost: " + port);
});

app.use(express.static("public"));

var sock = socket(server);

sock.on("connection", function(socket) {
  console.log("made connection with socket " + socket.id);

  // when the server receives a chat event
  socket.on("chat", function(data) {
    // use emit to send the “chat” event to everybody that is connected, including the sender
    sock.sockets.emit("chat", data);
  });
});
At this point, our server can receive chat events from the client and send chat events to everyone that is connected to a socket on the server.
To test this, open up two windows on localhost:3000 and try sending some messages. You should be getting updates on both browsers.

Broadcasting Events on the Server
WebSockets also allow us to send events to everyone except for the person who just emitted an event. This is done with the broadcast function. To demonstrate this, we are going to add a “user is typing” indicator to our chat app.
First, let’s change the client code:
// public/chat.js
var socket = io.connect("https://localhost:3000");

var message = document.getElementById("message");
var userName = document.getElementById("userName");
var sendBtn = document.getElementById("send");
var messages = document.getElementById("messages");
// add another dom reference
var typing = document.getElementById("typing");

sendBtn.addEventListener("click", function() {
  socket.emit("chat", {
    message: message.value,
    userName: userName.value
  });
});

socket.on("chat", function(data) {
  messages.innerHTML +=
    "<p><strong>" + data.userName + ": </strong>" + data.message + "</p>";
  // clear the typing indicator when we receive a message
  typing.innerHTML = "";
});

// emit a “typing” event when we start typing
message.addEventListener("keypress", function() {
  socket.emit("typing", userName.value);
});

// when we receive a typing event, show that a user is typing
socket.on("typing", function(data) {
  typing.innerHTML = "<p><em>" + data + " is typing</em></p>";
});
Next, let’s change the server code:
// index.js
var express = require("express");
var socket = require("socket.io");

var app = express();

var port = 3000;

var server = app.listen(port, function() {
  console.log("Listening at https://localhost: " + port);
});

app.use(express.static("public"));

var sock = socket(server);

sock.on("connection", function(socket) {
  console.log("made connection with socket " + socket.id);
  socket.on("chat", function(data) {
    sock.sockets.emit("chat", data);
  });

  socket.on("typing", function(data) {
    // send an event to everyone but the person who emitted the typing event to the server
    socket.broadcast.emit("typing", data);
  });
});
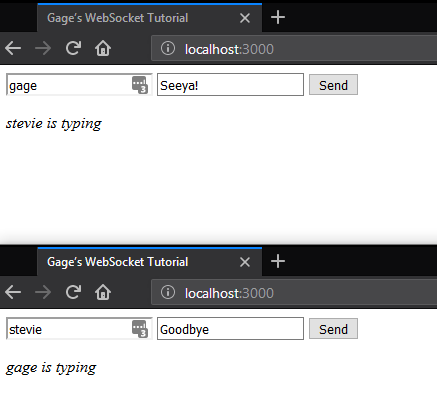
By using broadcast, everyone but the person who is typing will be notified that someone is communicating:
Conclusion
WebSockets are a simple yet powerful tool. I’ve barely scratched the surface of what they can do, so I encourage you to experiment further!