
One of my recent projects required us to make an existing web application work offline. Initially, we considered making a progressive web app. We quickly eliminated this option since PWAs have several limitations, most importantly storage size.
Eventually, we decided to embed our web application into a WebView within a React Native application since we could take advantage of the device’s file system and keep re-implementation to a minimum. In order to do this, we needed a way to host our web application from within React Native.
We landed on the library react-native-static-server for hosting our web app for two reasons. First, we only needed to serve static assets. And secondly, it worked out of the box.
This post will focus on serving HTML, JavaScript, and CSS using react-native-static-server, along with viewing that content in a WebView in both Android and iOS.
1. Setup
For the sake of this tutorial, we are going to start with a fresh React Native project, so let’s run react-native init <ProjectName> && cd <ProjectName>.
Next, install the necessary project dependencies with the following commands:
## NOTE: At the time of writing this article, the latest release of react-native-static-server's release process is broken. The repo at this commit fixes that issue
yarn add git://github.com/futurepress/react-native-static-server.git#390303423ef1d2185d64eff246532bdc8b57fb33
yarn add react-native-webview
react-native link react-native-static-server
react-native link react-native-webview
cd ios && pod install && cd -
2. Running the Server
Once your dependencies are installed, put the following code into your App.js file:
import React from "react";
import { SafeAreaView, Text, View } from "react-native";
import StaticServer from "react-native-static-server";
import WebView from "react-native-webview";

class App extends React.Component {
  state = {
    url: null
  };
  componentDidMount() {
    this.server = new StaticServer(8080);
    this.server.start().then(url => {
      this.setState({ url });
    });
  }

  componentWillUnmount() {
    if (this.server && this.server.isRunning()) {
      this.server.stop();
    }
  }

  render() {
    if (!this.state.url) {
      return (
        <SafeAreaView>
          <Text>Hello World</Text>
        </SafeAreaView>
      );
    }
    return (
      <SafeAreaView>
        <Text>{this.state.url}</Text>
        <View style={{ height: "100%", width: "100%" }}>
          <WebView
            style={{ flex: 1, marginBottom: 20 }}
            source={{ uri: this.state.url }}
          />
        </View>
      </SafeAreaView>
    );
  }
}
export default App;
This code does a few things:
- It creates a static server that points at the document directory by default. (Note: This code will only work in iOS since the library does not contain a default directory for Android.)
- It starts the server and sets the URL of the server’s endpoint in the components state.
- It waits until the URL is set in the state to render a WebView that points at the local server.
- It kills the web server after this component un-mounts.
3. Displaying Content
If you run this code, you will notice that no content is being displayed.

This is because the server does not have any content to serve. In order to change this, we need to package our app with our desired assets.
First, let’s add a directory named assets/www to our project. We’ll insert the following files:
index.html:
<html>
  <head>
    <link rel="stylesheet" type="text/css" href="index.css" />
  </head>
  <body>
    <p id="text">Hello World!</p>
    <div id="newStuff"></div>
    <script type="text/javascript" src="./index.js"></script>
  </body>
</html>
index.css:
#text {
  color: red;
}
index.js:
document.getElementById("newStuff").innerHTML = "The javascript works?";
These files will help us prove two things: that our device is capable of serving HTML, and that any files referenced in the HTML will also be served.
4. Addding Files to Native Platform
Next, we need to add these files to each individual Native platform.
iOS
In order to add these assets to iOS:
- Open your project in Xcode by opening up
ios/<ProjectName>.xcodeproj. - Right-click the top-level directory of your project and select ‘Add Files to “<ProjectName>”’.
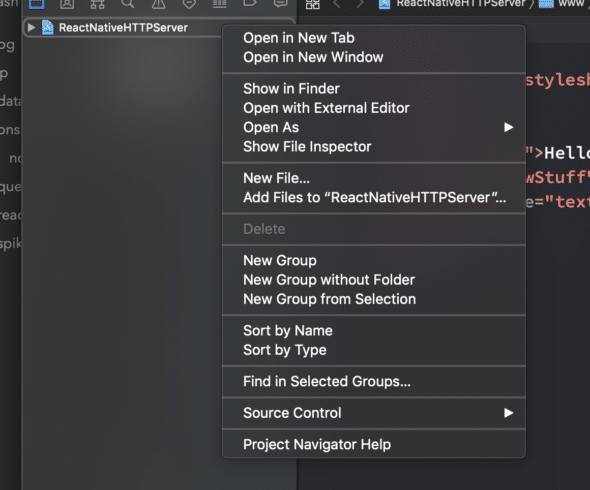
- In the base of your project directory, select the
assets/www/directory.
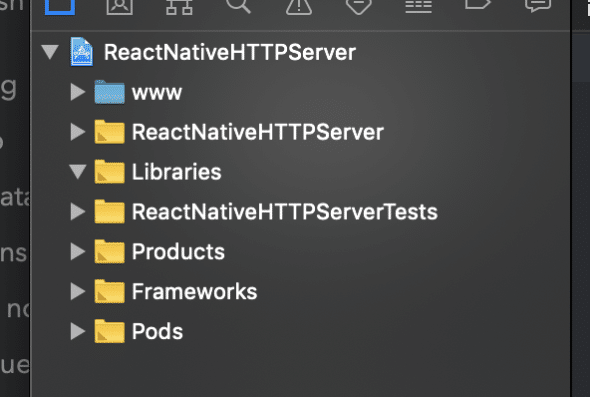
Your assets are now bundled in your iOS project! Your Xcode project directory should look something like this:
Android
To add your assets to your Android project, add the following code to your app/build.gradle file:
android {
...
    sourceSets { main { assets.srcDirs = ['src/main/assets', '../../assets'] } }
}
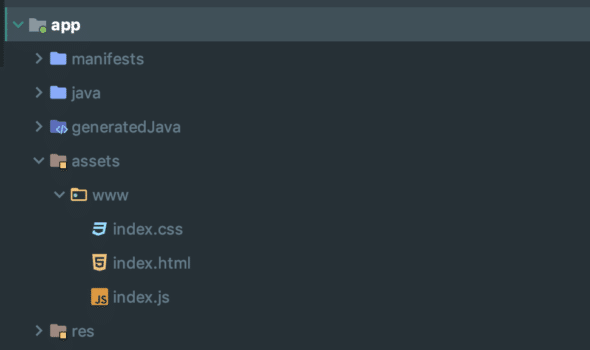
That’s it! If you open up your android directory in Android Studio and view your directory in Android mode, it should look something like this:
After you have linked your assets, we need to add react-native-fs so we can move our files and get the directories where our content is located. To do this, run the following commands:
yarn add react-native-fs
react-native link react-native-fs
Now, add the following code above your App component in App.js
function getPath() {
  return Platform.OS === "android"
    ? RNFS.DocumentDirectoryPath + "/www"
    : RNFS.MainBundlePath + "/www";
}

async function moveAndroidFiles() {
  if (Platform.OS === "android") {
    await RNFS.mkdir(RNFS.DocumentDirectoryPath + "/www");
    const files = ["www/index.html", "www/index.css", "www/index.js"];
    await files.forEach(async file => {
      await RNFS.copyFileAssets(file, RNFS.DocumentDirectoryPath + "/" + file);
    });
  }
}
And change your componentDidMount method to this:
  async componentDidMount() {
    moveAndroidFiles();
    let path = getPath();
    this.server = new StaticServer(8080, path);
    this.server.start().then(url => {
      this.setState({ url });
    });
  }
This change is required for two reasons:
- Our server needs a directory to serve content.
react-native-static-serverdoesn’t let you serve assets from the asset directory.- Android doesn’t have a MainBundle directory, so it requires a different path.
We’re all done! If you run the project, you should see something like this:

If you would like to see this code in its complete form, check out the code here.
Thank you so much. It helped me a lot to setup static http server using react native.
I followed your instructions but when I run the app I get the message:
WARN Error opening URL: [Error: Unable to open URL: file:///Users/ekkis/Library/Developer/CoreSimulator/Devices/9F96B01B-3C66-4ABA-96A5-B58049FB9212/data/Containers/Bundle/Application/FE52D527-F5A4-4555-8613-6F5A293E738F/browser.app/]
the value returned by `getPath()` is:
/Users/ekkis/Library/Developer/CoreSimulator/Devices/9F96B01B-3C66-4ABA-96A5-B58049FB9212/data/Containers/Bundle/Application/FE52D527-F5A4-4555-8613-6F5A293E738F/browser.app/www
from which I can see there’s supposed to be a “www” directory, but there isn’t. is there some step I’m supposed to take after adding the `assets/www` directory in XCode to my project?