
Perhaps you have heard of the Model View Controller (MVC) pattern in iOS, also known as “Mostly View Controller.” It got this name because, without much effort, your UIViewController code can get very large.
In this blog post, I will show you how using container views and ReSwift (a Redux implementation in Swift) can be a perfect match.
What Are Container Views?
A container view allows you to create a reusable component that all of your view controllers can share. Another use for a container view is to break up your view controller into logical chunks of functionality.
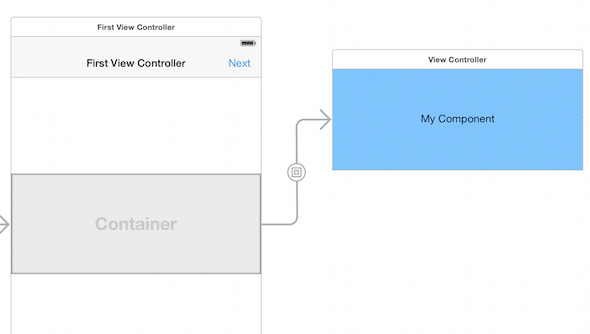
Each container view hosts a child view controller. That way, all of your lifecycle events like viewDidLoad or viewWillAppear can be called for all the children. If you want to know how to create a container view in Xcode, you can read a blog post I wrote in 2015, Adding an iOS Container View in Xcode. The method is still the same in 2019.
The problem with container views is that it can be difficult to pass data back and forth from the parent view controller to the child container views/view controllers or from one child to another. You end up with a heavy use of the delegate pattern.
When I wrote that post in 2015, a few people asked me how to pass data to the container views. The old way I did this is detailed here. It involved using prepareForSegue to get a pointer to the child view controller and passing it the information it needed.
Today, I would do it differently using ReSwift.
What is ReSwift?
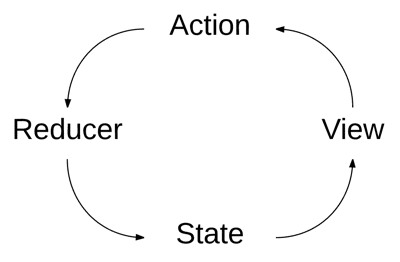
ReSwift is a Redux-like implementation in Swift. It is a unidirectional data flow architecture.
To picture how it works, imagine someone clicking a button. That button generates an action. The action, and any data associated with it, are passed to a reducer. The reducer then generates a new application state that is passed to all views that are subscribed to state events.
For more information on ReSwift, see their documentation and examples.
Break Up Your View Controller
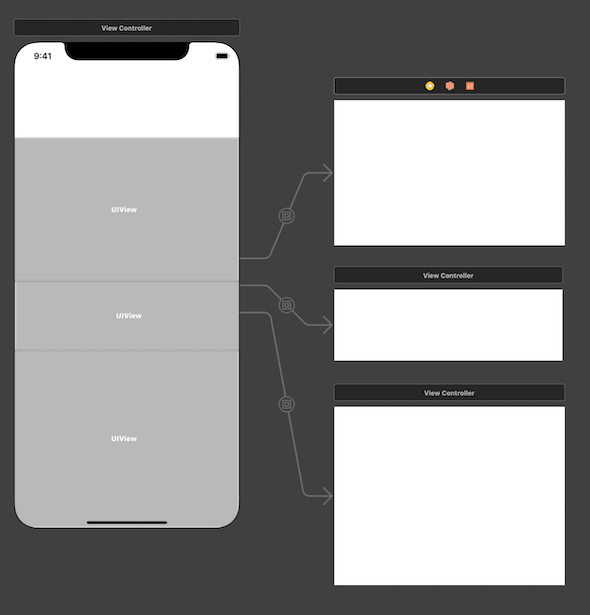
To avoid the “Mostly View Controller” problem, you can break up your view using container views. For each container view, a new child view controller will be automatically embedded into your main view controller. I suggest breaking up your view wherever you can identify logical chunks of functionality.
For example, if you were creating a media player, the media controls (play, pause, next) might be in one container view. The view that shows you what is currently playing might be another container view, and so on.
Use ReSwift For Data Flow
It is easy for your entire application to share data with all of your components. Just follow the Getting Started Guide on ReSwift. You need to install the framework, create your application state, then add any actions and reducers you may need.
In each of my component view controllers, the first thing I do is subscribe for state updates. I like to do this in the viewWillAppear and unsubscribe in viewDidDisappear. That way my view controllers do not get state updates when they are not visible.
override func viewWillAppear(_ animated: Bool) {
    super.viewWillAppear(animated)

    appStore.subscribe(self) {
        $0.select { state in state }
    }
}

override func viewWillDisappear(_ animated: Bool) {
    super.viewWillDisappear(animated)

    appStore.unsubscribe(self)
}
The next thing to do is implement the StoreSubscriber protocol. This involves just one function that gets called whenever your application state has changed.
extension MyComponentViewController: StoreSubscriber {
    func newState(state: AppState) {
        // Update view with new state
    }
}
If you need to modify state in your view controller, you can do that by dispatching an Action. The following code dispatches a TogglePlay action when a user presses a button.
@IBAction func playToggled(_ sender: Any) {
    appStore.dispatch(TogglePlay())
}
The action will get dispatched and sent to your reducer, which will then update state. Anyone who is subscribed as a StoreSubscriber will get the new state that the media is playing or paused based on the previous state. That completes the unidirectional data flow, from the button click in the view that caused an action to get dispatched, to the reducer that changed state, back to the view with the new state update.
Using container views with ReSwift is a great way to break up your view controllers so that they do not get too large. In my experience, keeping view controllers small makes it easier to test and easier to understand.