

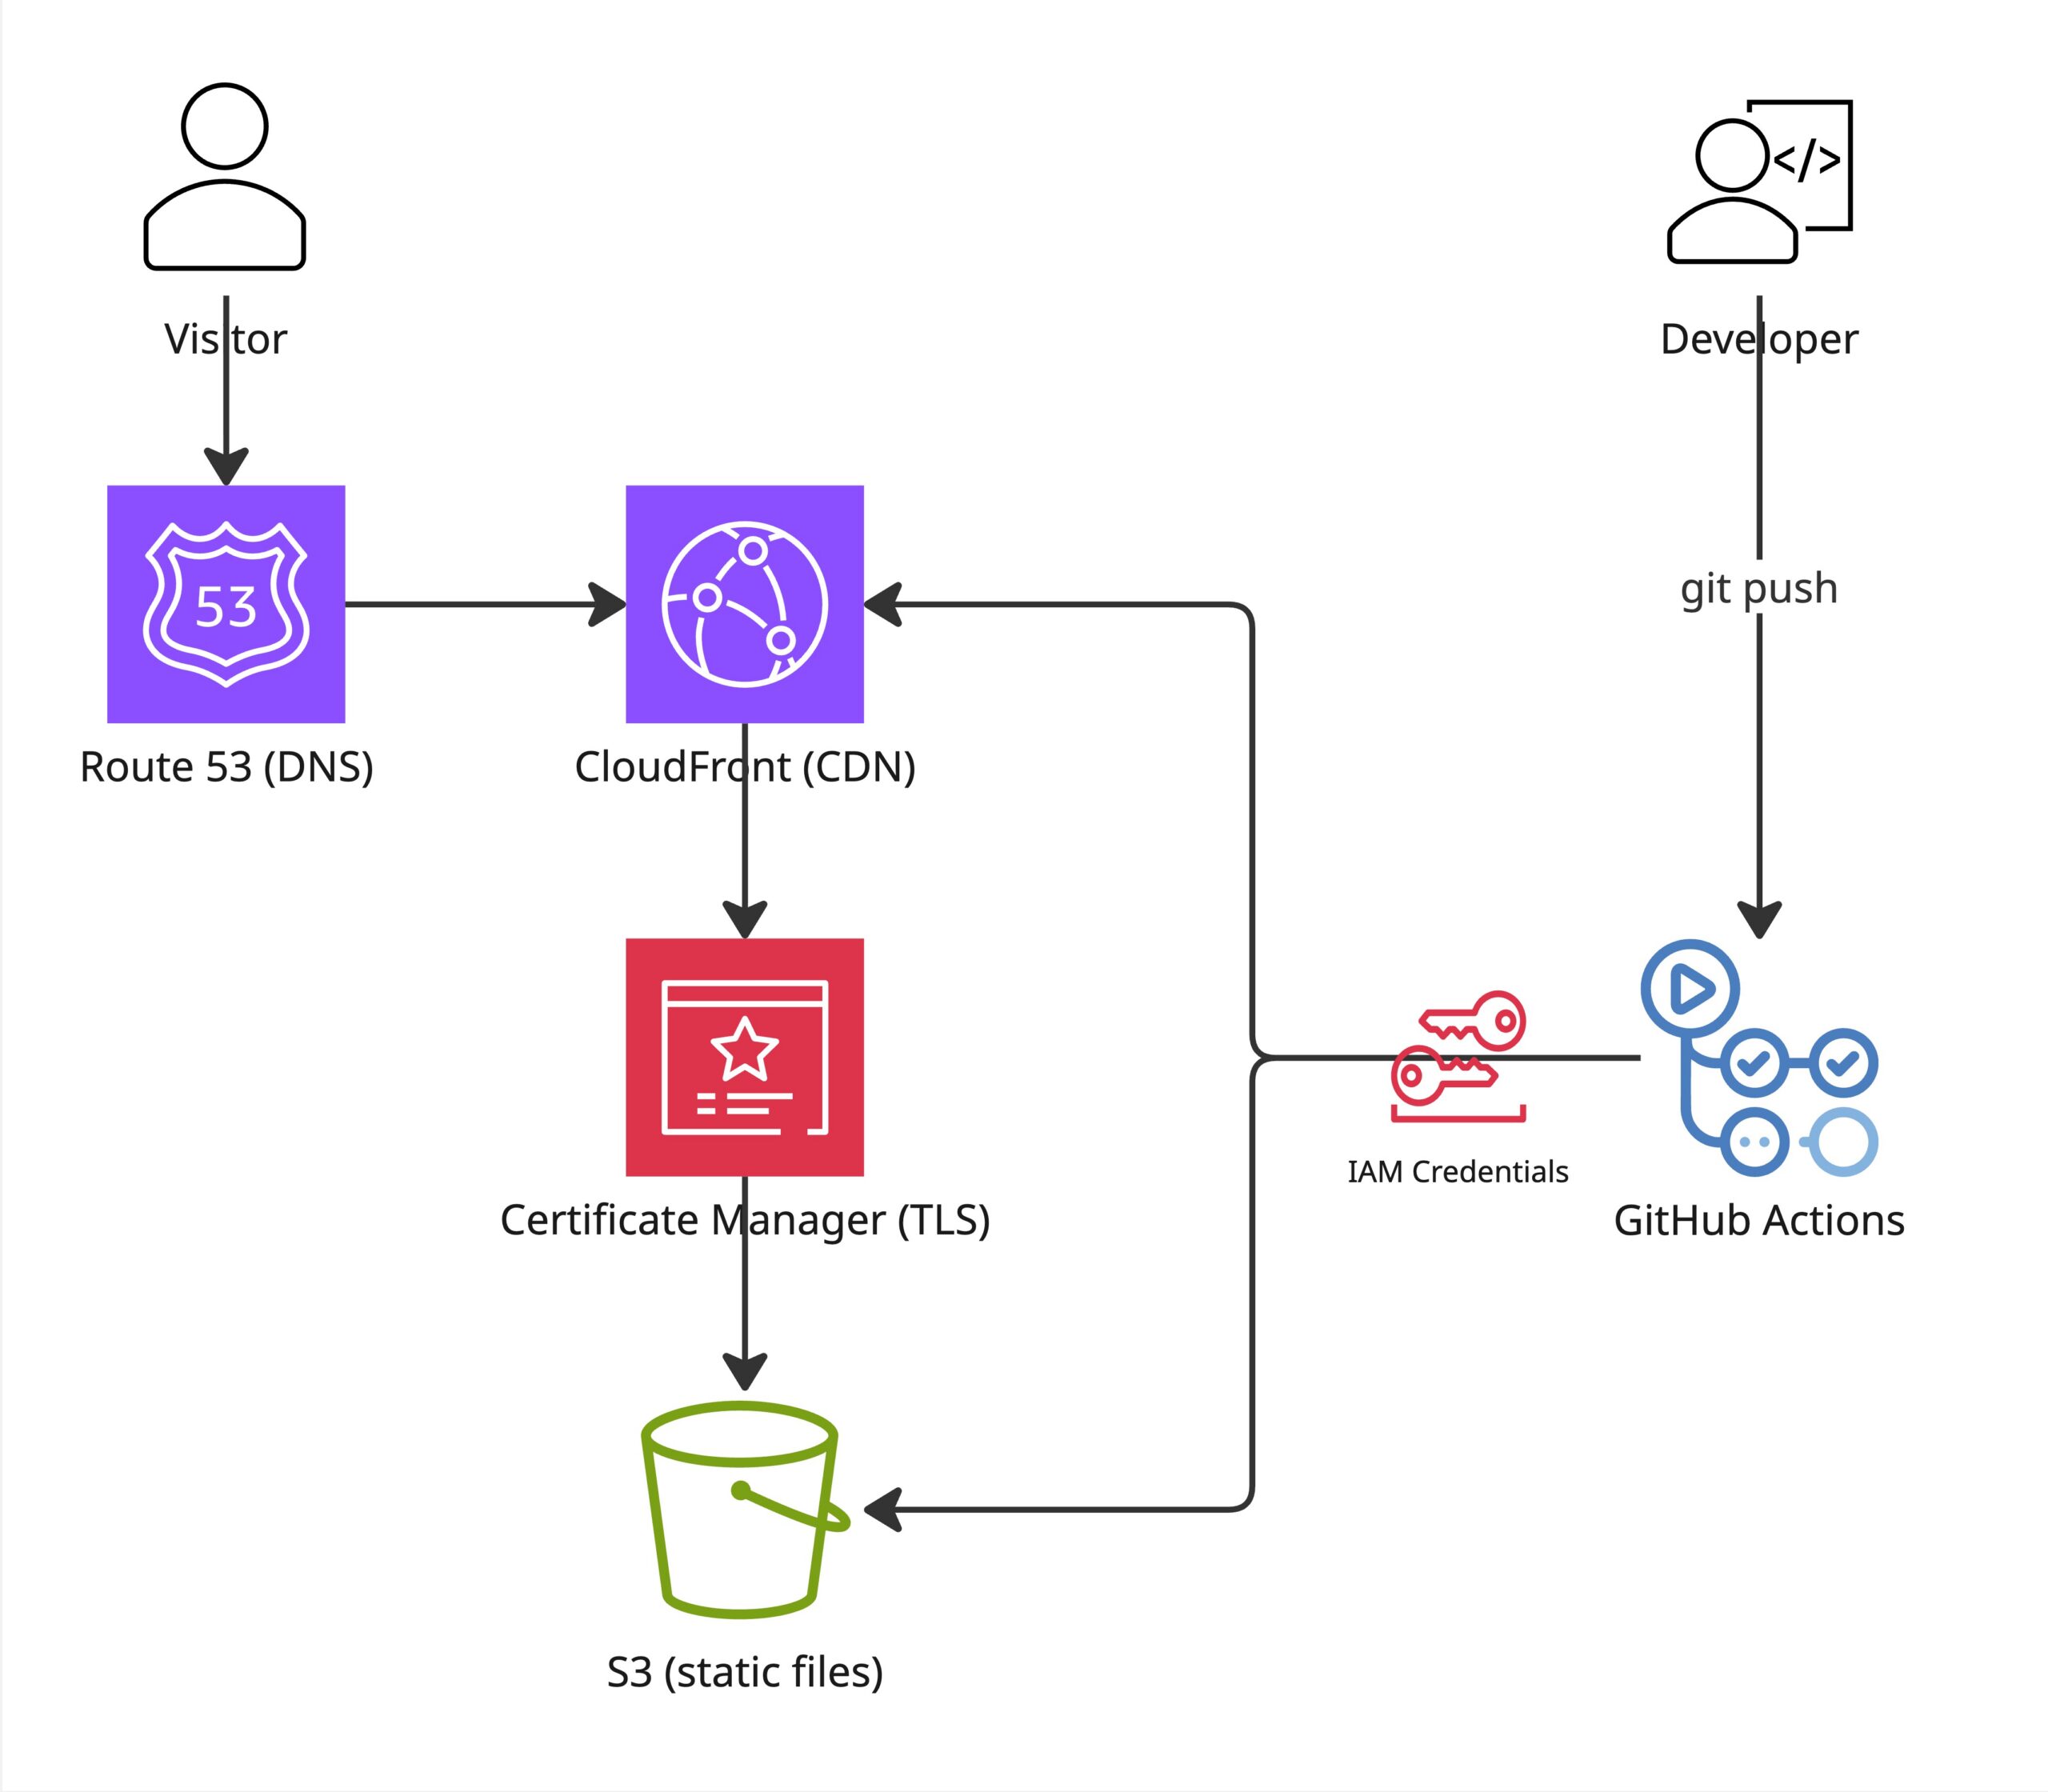
Article summary
My husband runs a pop-up bakery called Molta, and he needed a website. Nothing fancy: who he is, what he bakes, where to find us, etc.
For a site this small, the obvious move is to pay for a Squarespace site (or something similar), click a few templates together, and be done in an afternoon. But why do that when I can do it myself!
If you’ve ever wondered what it actually looks like to host your own static site on AWS, this guide is for you — some AWS experience helps, but it isn’t required. I’ve used the AWS CDK to build complex infrastructure at work, and that same toolkit makes hosting a personal site surprisingly approachable, for about two dollars a month.
So this is the walkthrough I wish I’d had: a static site on AWS, with the whole stack defined in code and automatic deploys on git push. I’ll be honest — I care far more about the backend than the front end, so for the UI I described what I wanted, let AI generate the React components, and moved on. This guide stays focused on the part I actually sweated: the hosting, the pipeline, and the AWS stack that puts the site online.
What you’ll build
Hosting a static site on AWS comes down to three services:
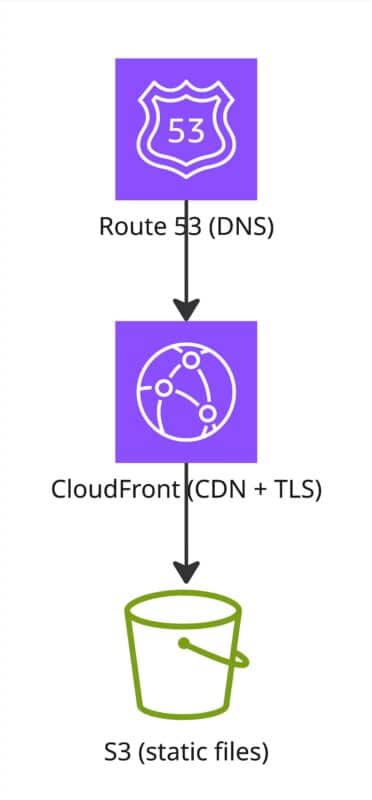
S3 holds the built site. CloudFront puts it on a global CDN and terminates HTTPS. Route 53 points moltabakery.com (and www.) at CloudFront. An ACM certificate covers the TLS. That’s the entire production footprint — and it costs just cents a month on top of the domain.
We’ll define all of it with the AWS CDK, then wire up GitHub Actions to deploy automatically. Here’s the full picture — the request path (what visitors hit) and the deploy path (what happens when you push):
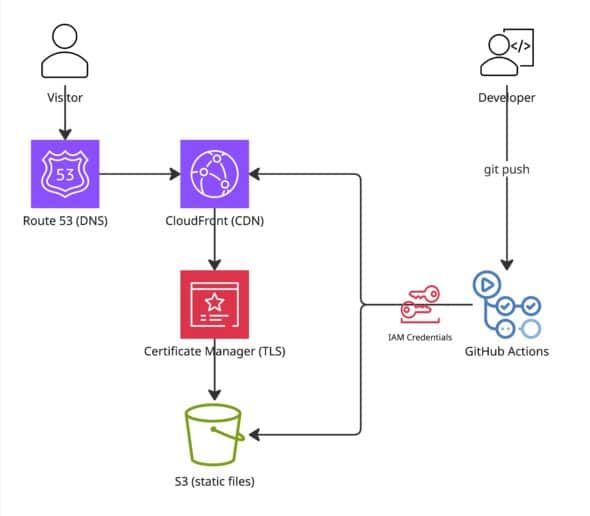
Before you start
You’ll need:
- An AWS account
- A registered domain (I bought
moltabakery.comthrough Route 53 for about $15/year) - Node.js and npm, Python 3, and the AWS CLI installed and configured (
aws configure) - The AWS CDK (
npm install -g aws-cdk)
Step 1 — Register your domain and let Route 53 manage DNS
Register your domain in Route 53 (or transfer DNS to it). Doing so automatically creates a hosted zone — the thing that answers DNS queries for your domain.
This is the one piece that spends money and can’t really be rolled back, so it lives outside the infrastructure code. Instead of creating the hosted zone, our stack just looks it up:
hosted_zone = route53.HostedZone.from_lookup(self, "HostedZone",
    domain_name=domain_name,
)
Treating the domain as a prerequisite rather than a managed resource means a cdk destroy can never accidentally take your domain registration with it.
Step 2 — Describe the infrastructure as code
I used the AWS CDK in Python. CDK lets you describe your resources as real code that synthesizes down to CloudFormation — and if you’d rather stay declarative, you can always write that CloudFormation as YAML or JSON by hand instead. I picked it over raw CloudFormation or Terraform because I wanted loops, types, and the ability to test my infrastructure.
The core of the stack is small enough to read in one sitting — an S3 bucket for the files, a certificate, and a CloudFront distribution in front:
domain_bucket = s3.Bucket(self, "DomainBucket",
    bucket_name=domain_name,
    public_read_access=True,
    website_index_document="index.html",
    removal_policy=RemovalPolicy.DESTROY,
)

certificate = acm.Certificate(self, "WebsiteCertificate",
    domain_name=domain_name,
    subject_alternative_names=[subdomain],  # www.moltabakery.com
    validation=acm.CertificateValidation.from_dns(hosted_zone),
)

distribution = cloudfront.Distribution(self, "SiteDistribution",
    certificate=certificate,
    default_root_object="index.html",
    domain_names=[domain_name, subdomain],
    default_behavior=cloudfront.BehaviorOptions(
        origin=origins.S3StaticWebsiteOrigin(domain_bucket),
        viewer_protocol_policy=cloudfront.ViewerProtocolPolicy.REDIRECT_TO_HTTPS,
    ),
)
Then two A records alias both the apex domain and the www subdomain at the distribution, so either one works:
route53.ARecord(self, "SiteAliasRecord",
    zone=hosted_zone,
    target=route53.RecordTarget.from_alias(
        route53_targets.CloudFrontTarget(distribution)
    ),
)
Step 3 — Deploy, and finish the one manual step
With the stack written, it’s time to deploy! CDK uses your local AWS CLI credentials, so make sure they’re active first — whether that’s aws configure, an SSO login, or exported environment variables. If aws sts get-caller-identity returns your account, you’re good to go:
cdk deployWatch out for two things that tripped me up:
- Your certificate has to live in
us-east-1. CloudFront only reads ACM certificates from that one region, no matter where everything else lives. - Certificate validation pauses for a human. ACM issues the cert, but proving you own the domain requires DNS records. On the first deploy, open the ACM console, find the certificate, and click “Create records in Route 53” to complete validation. After that it’s automatic forever.
Step 4 — Create a locked-down deploy user
Now we want git push to ship the site. The temptation here is to paste your personal AWS admin keys into GitHub secrets and call it done. Don’t. 🙅♀️
Instead, have the stack provision a dedicated IAM user for deploys whose policy is scoped to exactly two jobs: write to this one bucket, and invalidate this one CloudFront distribution.
github_deployment_user.add_to_policy(iam.PolicyStatement(
    actions=["s3:ListBucket", "s3:GetObject", "s3:PutObject",
             "s3:DeleteObject", "s3:PutBucketWebsite"],
    resources=[domain_bucket.bucket_arn, f"{domain_bucket.bucket_arn}/*"],
))

distribution_arn = (
    f"arn:aws:cloudfront::{self.account}:"
    f"distribution/{distribution.distribution_id}"
)
github_deployment_user.add_to_policy(iam.PolicyStatement(
    actions=["cloudfront:CreateInvalidation"],
    resources=[distribution_arn],
))
If those credentials ever leak, the blast radius is “someone can mess with a bakery’s static files,” not “someone owns my entire AWS account.” The stack generates the access key and stores it in Secrets Manager; you copy it into GitHub’s encrypted secrets once.
Step 5 — Automate deploys with GitHub Actions
With a deploy user in hand, a GitHub Actions workflow does the rest: build the site, sync it to S3, and invalidate the CloudFront cache so changes show up immediately.
- name: Build
  run: npm run build

- name: Deploy to S3
  run: aws s3 sync out/ s3://$S3_BUCKET_NAME --delete

- name: Invalidate CloudFront cache
  run: >
    aws cloudfront create-invalidation
    --distribution-id $CLOUDFRONT_DISTRIBUTION_ID
    --paths "/*"
Those $-prefixed values come from your repository’s encrypted secrets, not the workflow file. In GitHub, go to Settings → Secrets and variables → Actions and add four (each step pulls them in through its own env: block — see the full workflow on GitHub):
AWS_ACCESS_KEY_IDandAWS_SECRET_ACCESS_KEY— the deploy user’s credentials from Step 4. The stack outputs the key ID and stores the secret in Secrets Manager.S3_BUCKET_NAME— your bucket name (for me,moltabakery.com).CLOUDFRONT_DISTRIBUTION_ID— the distribution’s ID, which you can grab from the CloudFront console.
Keeping them in secrets means nothing sensitive ever lives in the repo.
That cache-invalidation line is easy to forget and very confusing to debug without — CloudFront will happily serve yesterday’s version for hours and you’ll swear your deploy didn’t work. Now every push to main ships the site. 🚀
Wrapping up
Here’s everything we stood up, all of it defined in code:
- Route 53, CloudFront, and S3 — DNS, a global HTTPS CDN, and the bucket holding your files.
- An ACM certificate for TLS, with a single manual validation click on the first deploy.
- A locked-down deploy user so GitHub Actions ships on every push, no admin keys required.
Because it’s all CDK, it’s reusable too: the domain name lives in a single variable, so your next site is a one-line change and a fresh deploy.
Self-hosting has a reputation as a big, involved undertaking — the kind of thing you reach for Vercel or Heroku to avoid. But it’s really just a few dozen lines of CDK, one validation click, and a deploy user with two permissions. For about two dollars a month, you own the whole thing end to end.
The whole thing — CDK stack, tests, and deploy workflows — is on GitHub if you’d like to poke around or fork it for your own site: github.com/jennproos/molta.