Article summary
This semester I’m enrolled in a Visual Computing class at Oakland University. The class is centered around the theory of digital image processing, however I was craving some implementation. During our lecture on bit plane slicing, I became intrigued with its application to image compression and was curious about what sort of performance it could achieve.
Bit Planes
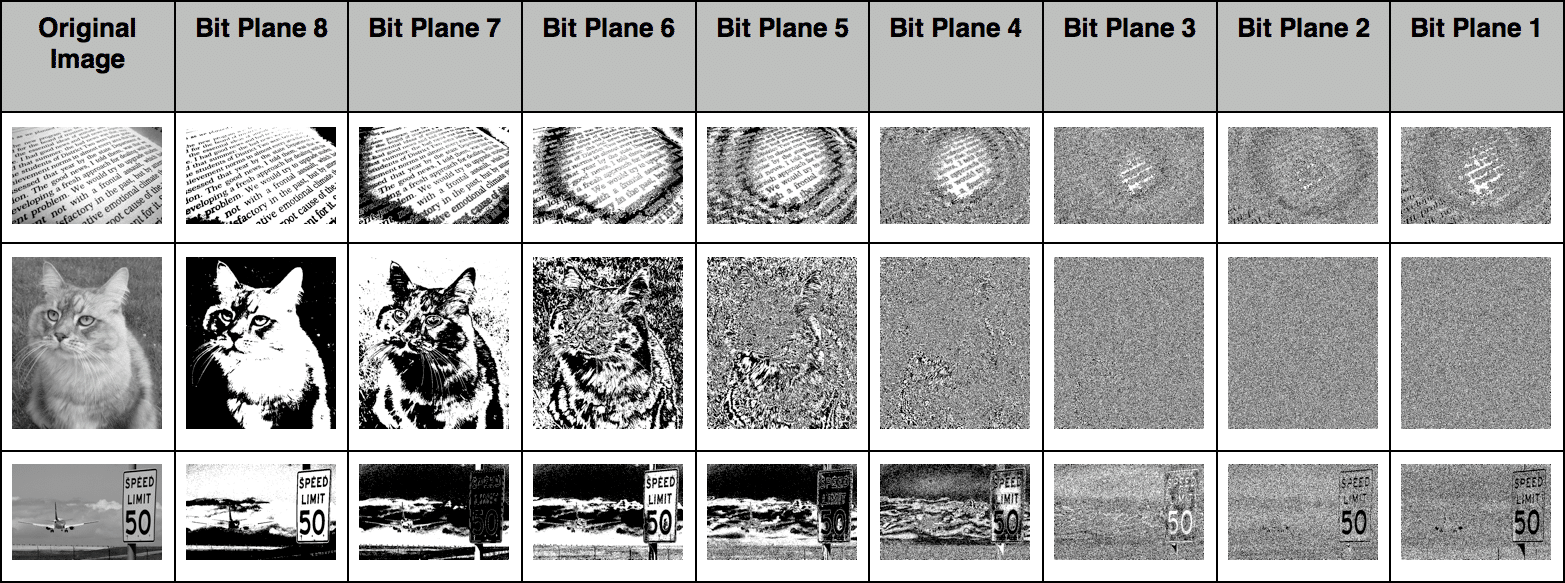
Grayscale digital images can be thought of as a matrix of pixels with intensities (values). In an 8-bit image, these values range from 0 to 255. The bit planes of an 8-bit grayscale image can be thought of as the stack of 8 binary images, containing only white or black pixels. Each pixels value is determined based upon the binary representation of its intensity. The first bit plane contains a set of pixels whose least significant bits are on, and the 8th bit plane contains the set of pixels whose most significant bits are on.
There are varying representations of this (Wikipedia lists it the opposite way), but I’m going with what’s represented in Digital Image Processing by Gonzalez and Woods. For example, a given grayscale pixel with value 129 (10010001) will be present in the 8th, 5th, and 1st bitplane.
As you can see, the bit plane consisting of the most significant bits contributes a large amount to the overall image, and the least significant bits contribute much less, with the bit plane ultimately appearing as noise. This is expected, as the most significant bits have a larger intensity value.
A Simple Lossy Compression Algorithm
One application of bit planes is with lossy media compression. Using SimpleCV, I have created a novel algorithm that creates an image mask consisting of the first 2 most-significant bit planes. Since we are removing data and replacing it with a specific value, we are likely to get continuous strings of the same color ultimately leading to smaller file size.
First, we define an object to handle the grunt work of our bit plane slicing:
from SimpleCV import *
from functools import partial

class GrayScaleBitPlane():

  #Returns a little endian (least significant bit first) binary representation as a string
  #This make's it easy to access the bit planes using only array indexing.
  def convertToLsbfBinary(self, intVal):
    noZeroB = bin(intVal)[2:]
    padded = noZeroB.zfill(8)
    return padded[::-1]


  #Return a pixel intensity for a given bit plane.
  #Since we have a gray scale image, the color channel that we use doesn't matter.
  #applyPixelFunction does not have a special call for grayscale pixels
  def transformPixel(self, bitPlane, (r,g,b)):
    littleEndianPixel = self.convertToLsbfBinary(r)

    if littleEndianPixel[bitPlane] == "0":
      return (0, 0, 0)
    return (255, 255, 255)

  #Returns a binary image of the bit plane.
  #Apply a transform function to all pixels in an image.
  #Partial function application is used to create a function for the specific bitPlane.
  def getBitPlane(self, image, bitPlane):
    return image.applyPixelFunction( partial(self.transformPixel, bitPlane) )
Then we write a small command line application to handle file IO and to perform the actual compression:
#!/usr/bin/python

import sys
from lib.GrayScaleBitPlane import *

def main(sourceFile, destFile):
  bitPlaneConverter = GrayScaleBitPlane()

  #Opens the source image
  img = Image(sourceFile)

  # slice the image into bit planes
  bitPlaneSlices = map(lambda pn: bitPlaneConverter.getBitPlane(img, pn), reversed(range(0, 8)))

  # create a compression mask using the 2 most significant bit planes
  compressionMask = bitPlaneSlices[0] + bitPlaneSlices[1]

  # save the compression mask to a file
  compressionMask.save("images/mask_out.png")

  # create a binary mask which can be applied to the image
  compressionMask = compressionMask.createBinaryMask(color1=(254,254,254), color2=(255,255,255));

  # apply the binary mask setting all the removed pixels to black
  compressed = img.applyBinaryMask(compressionMask, bg_color=(0,0,0))

  # save the compressed file
  compressed.save(destFile)


if __name__ == "__main__":
  main(sys.argv[1], sys.argv[2])
Conclusion & Results
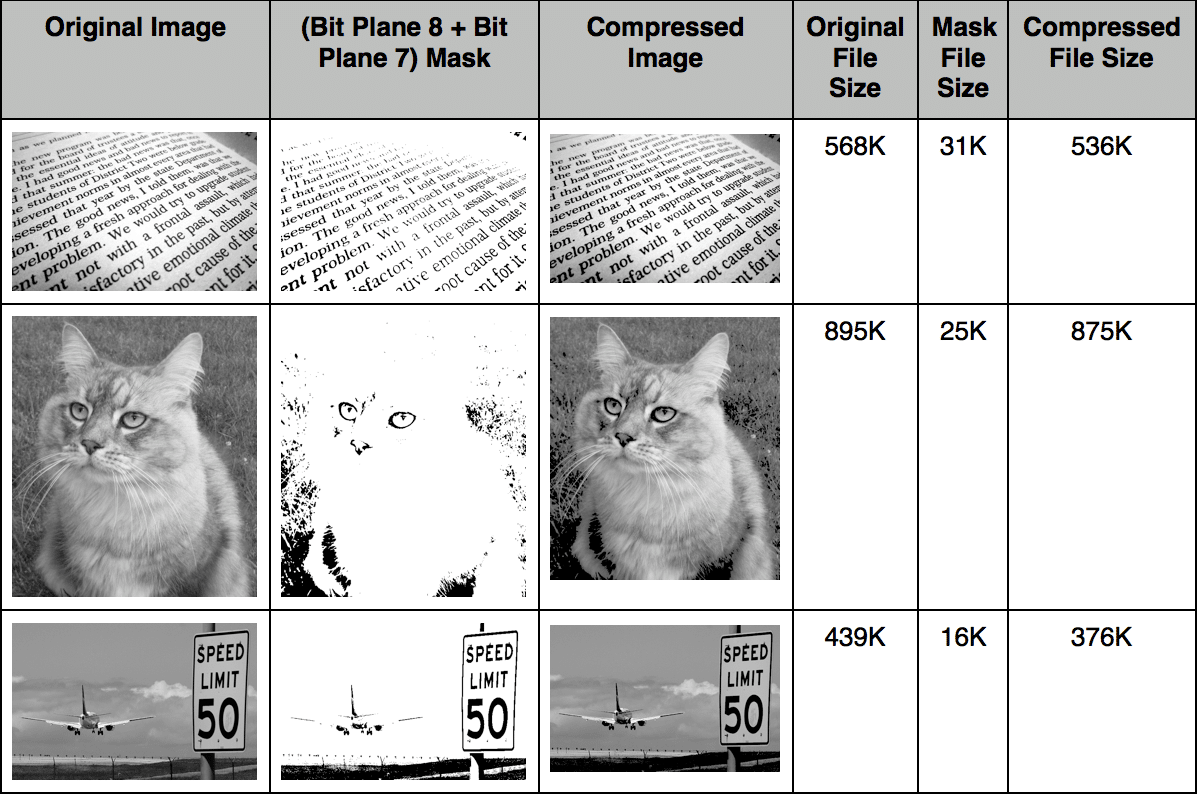
Here is a table of results using this novel image compression technique:
While not the most effective technique for compression, the images are about 30KB smaller on average. The lossyness of first image (text only) is practically unnoticeable. Under certain conditions, the mask itself could be used as the compressed image, offering a large amount of compression.
For the second image (my cat Frank the Tank), areas of loss are noticeable, specifically in the grassy areas in front of him and on his right cheek. The third image (plane and sign), requires you to look closely for the missing parts, which are most noticeable in the grassy area of the image.
“Speed Limit,” © 2011 Ron Reiring, used under a Creative Commons Attribution 2.0 Generic license: http://creativecommons.org/licenses/by/2.0/deed.en
“text 007,” © 2010 Kate Ter Haar, used under a Creative Commons Attribution 2.0 Generic license: http://creativecommons.org/licenses/by/2.0/deed.en


how compression process occurs here?
By removing the first 2 significant bits of all the colors we are reducing the number of colors being used in the image.