Recently I’ve been working on an Expo app targeted at people suffering from a chronic condition. One of the goals was to make it easy for users to sign up and log in. The prior version of the app required users to create a 15-character password, and it was a big hurdle for the users. Many of the users suffer from reduced hand dexterity, which makes it difficult to type on a phone. I had the thought: why not set up passwordless authentication?
Pros and Cons
The app does not contain any sensitive health information. It’s primarily used to educate people about their condition and allow them to set and track personal goals that will help them manage their symptoms. This is a great use case for a simple email-based authentication system that does not require passwords at all.
Without a password, it is as if the user is using a “forgot password” function every time. They enter their email (or have it saved) and then click a button that sends them an email containing a deep link back to the app containing a login token associated with that user. Many popular apps are moving to this method, which essentially turns your email into a single source of authentication.
On the plus side, users have to remember (or reuse) fewer passwords. However, using this method does mean that if a user’s email is compromised an attacker can also access any app which uses this login method. The method is not without drawbacks, and you shouldn’t use it when storing and displaying sensitive data.
Sending the Email and Storing a Token
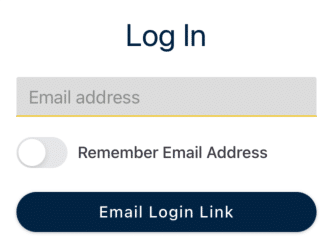
First, to be able to get the user the login link, we must take the user’s email address and send them the email containing their login token. Instead of asking for the user’s email and password when they sign up or log in we simply ask for their email address. Here is our login pane:
<View>
  <Text>
    Log In
  </Text>
  <TextInput value={email} error={invalidEmail} onChangeText={text => setEmail(text)}>
  </TextInput>
  <View>
    <Switch value={saveEmail} onChange={() => setSaveEmail(!saveEmail)}/>
    <Text>
      Remember Email Address
    </Text>
  </View>
  <Button onPress={() => logIn()} testID="login-button" disabled={emailSentVisible}>
    Email Login Link
  </Button>
</View>
This creates the login pane with a toggle to save the email address in secure storage on the device so the user does not have to retype it:
When the user clicks the “Email Login Link” button we call the logIn function:
const [email, setEmail] = React.useState("");

const sendLoginEmail = useSendLoginEmail(email);

const logIn = async () => {
  if(validateEmail(email)) {
    setInvalidEmail(false);
    if(saveEmail) {
      saveEmailToStore();
    } else {
      clearEmailFromStore();
    }
    await sendLoginEmail.refetch();
    setEmailSentVisible(true);
  } else {
    setInvalidEmail(true);
    setShowSnackbar(true);
  }
};
As you can see, this validates that the email address is properly formatted. If the user toggled the save email switch, we save it to the secure store or clear it from the store. Then we call a hook which calls our API endpoint which sends the user an email.
Our hooks are using Tanstack Query to manage the state of the request and the hook for this request is:
import { useQuery } from "@tanstack/react-query";
import { useApi } from "../api/ApiContext";

export const useSendLoginEmail = (email: string) => {
  const { sendLoginEmail } = useApi();
  return useQuery({
    queryKey: ["sendLoginEmail", email],
    queryFn: () => sendLoginEmail(email),
    staleTime: 60 * 1000,
    enabled: false,
  });
};
Finally, the API class sends a post request to our backend that generates a JWT and triggers an email to be sent with a link containing that JWT as a parameter. You can use something like sendgrid to send the email. The request also returns a JSON body with the same token to our app.
Deep Linking Back Into the App
When the user clicks the link in the email they need to be directed back to the app. In Expo, we can specify the scheme in the app.json file to allow deep links into the app. Using the scheme we can create a deep link into our app with the format scheme://screen?token=our_user_token.
Unfortunately, email clients do not like links with arbitrary schemes so we cannot just use that link in our email. What we need to do is link to a redirect page that essentially converts a normal https://... link that an email client likes into a scheme://... that opens our app. In PHP that redirect page looks like this:
<?php
$url = "scheme://screen?" . $_SERVER['QUERY_STRING'];
header("HTTP/1.1 303 See Other");
header("Location: $url");
?>
Note that we’re copying over the query string which contains our login token.
Now in our app, we need to accept the deep link and check the token against the one we got back when we called the send email endpoint. In our root navigator, we have the following functions:
const deeplink = useURL();
const { setToken } = useApi();
let signedIn = useIsSignedIn();
let refreshSignedIn = false;

const extractToken: (url: string) => string | undefined = (url: string) => {
  const params = new URLSearchParams(url.substring(url.indexOf("?")));
  const token = params.get("token");
  if (!token) {
    return undefined;
  }
  return token;
};

useEffect(() => {
  if (deeplink && !signedIn) {
    const token = extractToken(deeplink);
    if (token) {
      setToken(token);
      refreshSignedIn = true;
    }
  }
}, [deeplink]);

refreshSignedIn && (signedIn = useIsSignedIn());
This gets the deep link from the useUrl hook:
import { useEffect, useCallback, useState } from "react";
import { Linking } from "react-native";

export const useURL = () => {
  const [link, setLink] = useState();
  const handleUrlChange = useCallback(({ url }: { url: string }) => {
    setLink(url);
  }, []);

  useEffect(() => {
    (async () => {
      const initialUrl = await Linking.getInitialURL();

      if (!initialUrl) {
        return;
      }

      handleUrlChange({ url: initialUrl });
    })();

    Linking.addEventListener("url", handleUrlChange);

    return () => Linking.removeAllListeners("url");
  }, []);

  return link;
};
We take that URL and extract the token from it, pass it to the API where it is checked against the token we got back from the backend when we requested that the app send the email. If the tokens match, we log the user in.
Note that the code that checks the token is inside of a useEffect function, which is rerun when the deeplink changes. This ensures that the user can log out and log back in repeatedly. Without the useEffect function, the user cannot log out and back into the app.
Passwordless Authentication in Expo
This, briefly, is how you can log in a user to your Expo app without them ever having to type or remember a password.