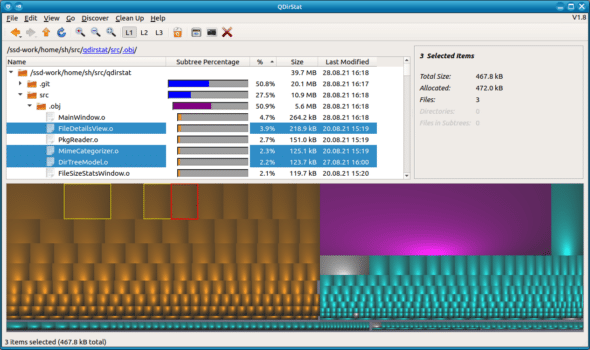
Seeing total disk usage is easy. Tracking down how the disk is being used is trickier. I can normally get pretty far off my memory, gut, and quick du -csh or tree commands. But sometimes nothing beats a good visualization. And for tracking disk usage on my NAS, I’ve turned to the LinuxServer.io QDirStat image.
This is my eleventh post documenting images I use at home. You can also read about how I run the Unifi controller, how I run Plex, how I update DuckDNS, how I run Duplicacy., how I run Heimdall, how I run Librespeed, how I run Home Assistant,how I run NetBox, how I run Scrutiny, and how I run OpenVSCode Server.
About LinuxServer.io
LinuxServer.io describes their organization as:
A group of like-minded enthusiasts from across the world who build and maintain the largest collection of Docker images on the web. At our core are the principles behind Free and Open Source Software. Our primary goal is to provide easy-to-use and streamlined Docker images with clear and concise documentation.
I’ve been using LinuxServer.io images for several years. That’s because they’re secure, thoughtful images that are clearly and concisely documented. I tend to check with LinuxServer.io first when I need a new image.
About QDirStat
QDirStat is “a graphical application to show where your disk space has gone and to help you to clean it up.” After scanning your disks, QDirStat presents some handy visuals and other metrics to help see where the data is being consumed. I’ve found it helpful with finding things I otherwise might not have.

Running via docker-compose
I run all of my containers via docker-copmose. Here are the relevant sections of my docker-compose.yml file:
networks:
  qdirstat:
    name: qdirstat

services:
  qdirstat:
    container_name: qdirstat
    image: lscr.io/linuxserver/qdirstat:1.8-ls9
    restart: unless-stopped

    env_file:
      - ./common.env
      - ./secret.env
    networks:
      - qdirstat
    ports:
      - 3000:3000
    volumes:
      - /volume1/docker/qdirstat:/config
      - /volume1/docker:/data/docker:ro
      - /volume1/Backups:/data/Backups:ro
      - /volume1/BBS:/data/BBS:ro
      - /volume1/Media:/data/Media:ro
      - /volume1/Proxmox:/data/Proxmox:ro
First, I create an explicitly-named network for QDirStat to use. This helps ensure services are isolated and avoids the automatic names docker-compose generates. The names aren’t bad, but I like the explicit names better.
Then, the first stanza of the services key specifies the basic container configuration: a name, image to use, and restart policy.
Next, the env_file section brings in environment variables used commonly across my containers. This includes the PUID and PGID variables for setting permissions.
In terms of port mappings: there is only one here. In this case, I map the internal port 3000 to the external port 3000. Often times I need to map the external port to something else since 3000 is a fairly common port used by apps, and I could have a conflict. In this case, I’m running QDirStat directly on my NAS, since that is where the storage is. My NAS only runs three images; thankfully none of the others want port 3000.
My mapped volumes here are probably the most interesting part of the configuration.
/volume1/docker/qdirstat is where I would like QDirStat’s own data files to be saved — hence mapping to the usual LinuxServer.io /config directoy.
The docker, Backups, BBS, Media, and Proxmox subdirectories of /volume1 are all the data directories I want QDirStat to scan. I mark these directories as read-only, since QDirStat is only scanning to compute disk usage.
QDirStat – a Handy Disk Space Visualization Tool
QDirStat is another one of the simpler LinuxServer.io images I’ve configured. The most important thing is to get the volume mappings correct so that the container can see the filesystem(s) you need to examine. And I very much appreciate the visual representation of the filesystem that QDirStat provides.
Thanks to the QDirStat and LinuxServer.io teams for making this tool readily available.

