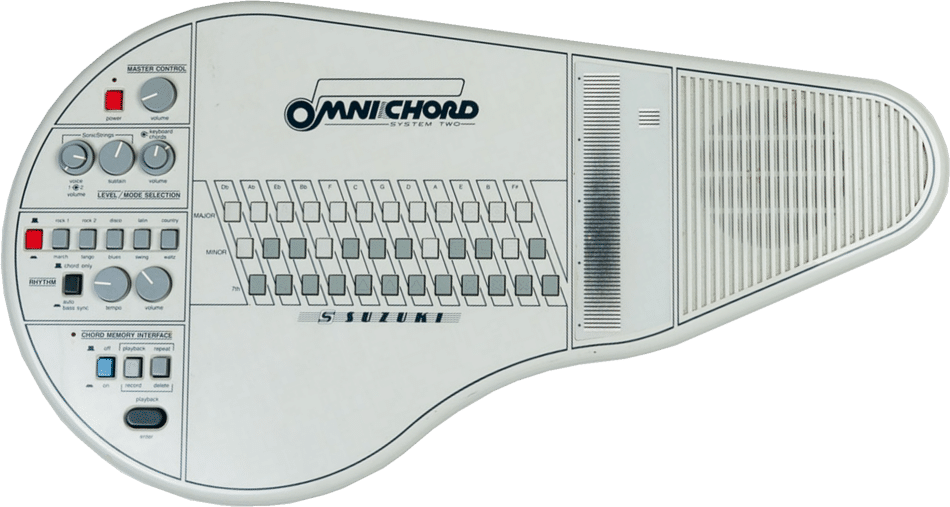
The OM-84 Omnichord, released in 1984
Outside of my 9-to-5 job as a software engineer, I play keys in a six-person cover band. A few months back, our drummer came into rehearsal exclaiming, “Georgia, you won’t believe what I found on Facebook Marketplace!” He reached into his backpack and pulled out an Omnichord.
What the heck is an Omnicord?
The Omnichord is an electronic instrument created by Suzuki back in the 1980s. The instrument has several buttons, each one mapped to a specific chord that plays when pressed (major, minor, etc.). Pressing combinations of buttons can play other chords (major sevenths, minor sevenths, etc.). On the right, there is a strum plate that arpeggiates the selected chord when strummed. The strumplate can also be tapped to play individual pitches in the chord.
While the original instrument was discontinued, a new Omnicord modal, the OM-108, is available for purchase… for $999.99… yikes. The one our drummer had found on Facebook Marketplace was an older model that he bought for $250, which was a total steal. Most used models go for around $600.
Not wanting to completely drain my bank account on an impulse purchase, I realized that this was the perfect opportunity to combine two passions in life: coding and music.
NOTE: This post contains a lot of code snippets, but the public GitHub repository can also be viewed here: https://github.com/georgia-martinez/omnichord.
Choosing the Tech Stack
From the get-go, I knew I wanted it to be an iPad app. With the number of buttons needed, my tiny iPhone 12 mini wasn’t gonna cut it. The main two contenders here were Swift and React Native. I’ve only used Swift very briefly, but because of my inexperience with it, I was hesitant to choose it since I wanted a prototype done quickly. I had never used React Native either, but the codebase I work in for my current client project uses React, so I figured it would be an easy transition.
Generating sounds
Another big decision I had to make was how to generate the sounds. Many other programmers have also recreated the Omnichord. Some repos I found sampled real Omnichords for the sounds, which was a cool approach. I could have done this, given my friend had an Omnichord, but I decided to generate the sounds myself. This approach would ultimately take less time, and I’ve also generated sounds programmatically through a few other side projects I’ve worked on in the past. After some research on audio libraries, I decided to use the React Native Audio API.
To recreate the Omnichord sound, I used three oscillators stacked on top of each other: a triangle wave and two sine waves. Simply put, an oscillator is what generates the sounds. Triangle and sine waves are types of waveforms that have distinct sounds. Stacking them on top of each other can create new sounds. To make the sound feel thicker, I detuned some of the oscillators. Because they’re not quite in sync, it creates a subtle wobble in the sound, and this makes it sound more interesting. To give the sound a vintage, electronic character, everything is put through a lowpass filter that cuts out the high frequencies.
const detunes = [0, -8, 8];
const types = ["triangle", "sine", "sine"];

detunes.forEach((detune, i) => {
const oscillator = context.createOscillator();
oscillator.type = types[i];
oscillator.frequency.value = frequency;
oscillator.detune.value = detune;
oscillator.connect(voiceGain);
oscillator.start();
oscillatorsForVoice.push(oscillator);
});
A single chord is made up of three or more notes. The Omnichord has a very on-and-off quality to the chords. When a chord button is pressed, the chord immediately plays. When the chord button is released, the chord immediately stops playing. The strumplate, on the other hand, has a fuller shape. To replicate this, the strumplate sounds use an envelope. Envelopes are used to shape a sound’s volume or timbre over time, defining its dynamic contour from start to finish. For the strumplate, I used an ADSR (Attack, Decay, Sustain, Release) envelope. The note fades in over 10ms, sustains, then fades out exponentially.
Modeling Chords
Once I had sounds being synthesized, I had to figure out how to model the chords in code. First, I created an enum with all of the chord types I wanted to support:
export enum CHORD_TYPE {
  MAJOR = "MAJOR",
  MINOR = "MINOR",
  DIMINISHED = "DIMINISHED",
  DOMINANT_7 = "DOMINANT 7",
  MAJOR_7 = "MAJOR 7",
  MINOR_7 = "MINOR 7",
}
Then, I created a map that mapped each chord type to the intervals that make up the chord:
export const CHORD_INTERVALS: Record<CHORD_TYPE, number[]> = {
 [CHORD_TYPE.MAJOR]: [0, 4, 7],
 [CHORD_TYPE.MINOR]: [0, 3, 7],
 [CHORD_TYPE.DIMINISHED]: [0, 3, 6],
 [CHORD_TYPE.DOMINANT_7]: [0, 4, 7, 10],
 [CHORD_TYPE.MAJOR_7]: [0, 4, 7, 11],
 [CHORD_TYPE.MINOR_7]: [0, 3, 7, 10],
} as const;
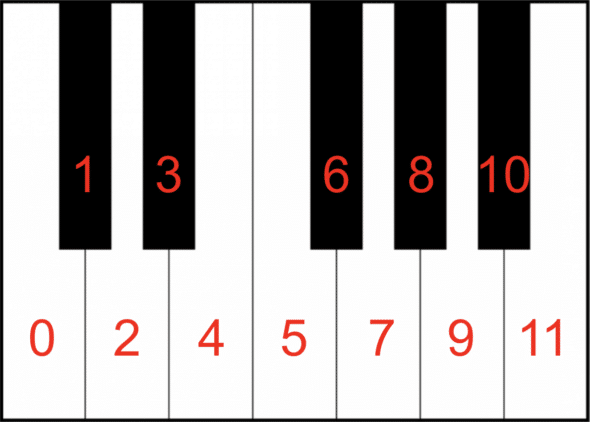
The numbers represent intervals from the root of the chord. For example, a major chord is made up of the root (0), a major third (4 halfsteps from the root), and a perfect fifth (7 halfsteps from the root). C major is made up of the notes C, E, and G. This can be visualized on the piano keyboard below, which I have numbered:
With these defined intervals, all chords can be calculated from any root note.
export const CHROMATIC: CHORD_LETTER[] = [
 CHORD_LETTER.C,  // 0
 CHORD_LETTER.Cs, // 1
 CHORD_LETTER.D,  // 2
 CHORD_LETTER.Ds, // 3
 CHORD_LETTER.E,  // 4
 CHORD_LETTER.F,  // 5
 CHORD_LETTER.Fs, // 6
 CHORD_LETTER.G,  // 7
 CHORD_LETTER.Gs, // 8
 CHORD_LETTER.A,  // 9
 CHORD_LETTER.As, // 10
 CHORD_LETTER.B,  // 11
] as const;
Using the above chord letter array, we can see that the indices needed for a C major chord are 0, 4, and 7, as shown in the interval map. This list loops around. For example, to get a G major chord, we start at index 8. Adding 4 gets us B at index 12. Adding 7 from index 8 loops us back around to index 2, which gives us D. So a major chord is G, B, and D.
All of these chord letters were mapped to their known frequencies in another map shown below. I hardcoded the frequencies from C2 to B7. You can see below that a C2 is 65.41hz, a C3 is 130.81hz etc. Note that these frequencies can also be determined programmatically (the next octave of a note is essentially double the value), but I was admittedly feeling a bit lazy here.
export const NOTES: Record<CHORD_LETTER, Record<number, number>> = {
 [CHORD_LETTER.C]:   { 2: 65.41,   3: 130.81,  4: 261.63, etc…},
 [CHORD_LETTER.D]:   { 2: 73.42,   3: 146.83,  4: 293.66, etc…},
  etc…
} as const;
To build a chord, the buildChord function just needs the root and the type of chord. From there, it uses the known intervals of the chord type to determine which notes to use. I also added some additional logic to handle the octave of a note, as you’ll see in getNote. I wanted all the chords to be in root position, meaning the root is the lowest note. The octave parameter ensures that all the notes built on top of the root are higher than the note that came before it.
export function buildChord(
 root: CHORD_LETTER,
 type: keyof typeof CHORD_INTERVALS,
 rootOctave = 4
): Note[] {
 const rootIndex = CHROMATIC.indexOf(root);
 return CHORD_INTERVALS[type].map(interval =>
   getNote(rootIndex, rootOctave, interval)
 );
}


function getNote(rootIndex: number, octave: number, interval: number): Note {
 const newIndex = rootIndex + interval;

 return {
   name: CHROMATIC[newIndex % CHROMATIC.length],
   octave: octave + Math.floor(newIndex / CHROMATIC.length),
 };
}
Arpeggiation
With the chord logic working, I needed to tackle how to implement the strumplate. The strumplate on my Omnichord recreation is made up of twelve segments. I chose twelve segments since all of the supported chords were either three notes or four notes, meaning that the arpeggio would evenly fit within the twelve segments. For a C major chord, the strumplate has the following twelve notes:
C4, E4, G4, C5, E5, G5, C6, E6, G6
With the chord logic from above, I was able to determine the notes for any of the supported chords. As you can see from the example above, the arpeggiation consists of the notes of a chord ascending. From this, I was able to create a generateArpeggio function where the inputs are the main notes in a chord (e.g., C4, E4, and G4 for a C major arpeggio):
const generateArpeggio = (notes: Note[]) => {
 const result: Note[] = [];

 const repetitions = 12 / notes.length;
 const startingOctave = 3;

 for (let i = 0; i < repetitions; i++) { const octaveShift = i; const shifted = notes.map(n => ({
     name: n.name,
     octave: startingOctave + (n.octave - notes[0].octave) + octaveShift,
   }));

   result.push(...shifted);
 }

 return result;
};
This function returns the note names in an arpeggio. From there, I just had to look up the note names in my map to get the frequencies and send this to my synthesizer logic for the oscillators to play.
As a side note for Omnichord enthusiasts, I know that the real Omnichord strumplate doesn’t actually arpeggiate completely ascending like this. But for the simplicity of a prototype, I made it an ascending arpeggio.
Building the UI with React Native
Now that I had all of the sound stuff done, it was time to map the sounds to UI. To handle all of the button presses, swipes, etc. I used the react native gesture handler. The chord buttons were straightforward since they just need to play a sound when a button is pressed and stop the sound when the button is released. To limit the number of bottoms, the original Omnichord has some chords mapped to combinations of buttons.
For example, to play a C major seventh chord, you press the C major button and the C seventh button. Pressing the seventh button on its own plays a C dominant seventh chord. I originally tried using React Native’s built-in Pressable component, but scrapped it once I realized it didn’t support multitouch. With Gesture.native(), I could have multiple chord buttons being pressed at the same time. To get the strumplate working, which needed to handle individual plates being tapped and swiping gestures, I used Gesture.Pan().
Omnichord App Demo
The video below is a demo of the progress I have so far on my Omnichord recreation!
There is still a lot more stuff to add if I ever decide to revisit this project. Adding some volume controls would be a great addition. The original Omnichord also has different voices, drumbeats, and a lot of other features omitted from my initial mockup. With that said, I had a lot of fun working on this project! If you want to delve deeper into the code, check out the GitHub repository here: https://github.com/georgia-martinez/omnichord.