Article summary
Over the last few months, I have had the opportunity to work with Xamarin, a platform for writing native mobile apps (iOS, Android, Windows) in a single, cross-platform implementation. Based on the Mono framework, Xamarin allows for maximum code reuse between mobile platforms, while preserving any native APIs. Even very platform-specific APIs, such as iOS Background Fetch are no match for Xamarin!
This two-part series will provide an overview of some iOS background features are accessible in Xamarin. In this post, I will offer a brief tutorial for implementing basic iOS Background Fetch with Xamarin. In my next post, I will explain how to utilize iOS’s Background Transfer Service along with Background Fetch in order to implement large downloads/uploads in the background.
What’s Background Fetch?
First introduced in iOS 7, Background Fetch allows apps to periodically fetch data and update the UI while the app is in the background. This is a really useful feature to help keep your app’s content and UI current, so users only see the latest data when they open your app.
When your app is registered for Background Fetch, iOS will periodically wake it up and call a delegate hook. From that point, your app has 30 seconds to fetch new data, process the content, and update its UI. After 30 seconds, iOS will suspend your app.
It is also important to note that iOS has total control over when it decides to wake up your app. The exact timing is based on many factors, such as common user patterns and how often your app actually fetches new content. For example, if a person typically uses your app at 9:00 a.m., iOS will recognize this pattern and likely give your app a chance to fetch data sometime before that hour. Also, if your app only receives new data 5 percent of the time, iOS will start reducing the frequency of your fetches. That said, it is important to understand that you cannot rely on any typical or ideal timing scenarios.
So, let’s begin.
Implementing Background Fetch with Xamarin
1. Enable Background Fetch.
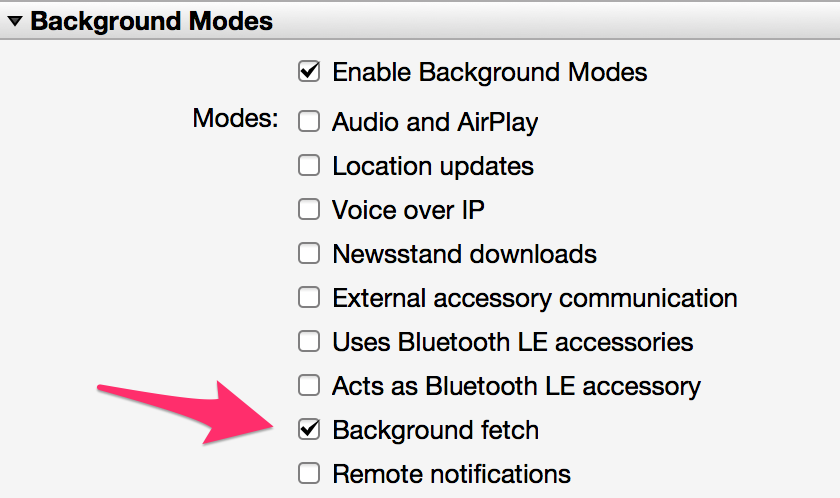
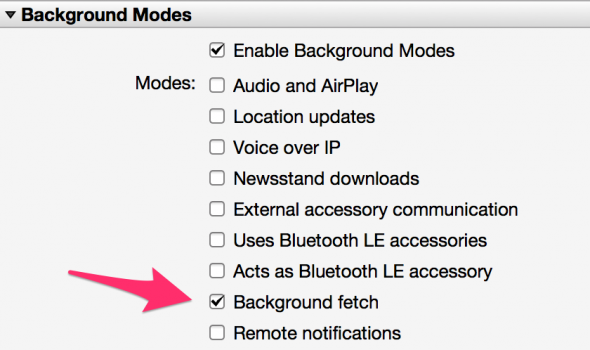
The first step is to enable the Background Fetch entitlement in your Info.plist file. It’s basically the same as you’d do with a native iOS app, except you probably won’t be editing the file in Xcode. There are two easy ways to update this file:
- Use Xamarin Studio’s plist editor:
- Just add the following key to the file:
<key>UIBackgroundModes</key>
<array>
  <string>fetch</string>
</array>
Either way, this tells iOS you plan to use Background Fetch.
2. Specify how frequently you’d like to fetch.
Once you have enabled the Background Fetch entitlement, you need to set the desired fetch interval with the SetMinimumBackgroundFetchInterval method. You have some choices here.
- The default interval is
BackgroundFetchIntervalNever, which basically means that Background Fetch is disabled by default. - You can use
BackgroundFetchIntervalMinimumif you want to let iOS determine when your app is woken up. - You can specify a desired interval, which means that iOS will wait at least the desired amount of time before waking up your app.
The most common place to put the call to SetMinimumBackgroundFetchInterval is in your FinishedLaunching delegate method, such as below:
using Foundation;
using UIKit;

public override bool FinishedLaunching(UIApplication app, NSDictionary options)
{
  UIApplication.SharedApplication.SetMinimumBackgroundFetchInterval(UIApplication.BackgroundFetchIntervalMinimum);

  // More startup code here
}
3. Implement the fetch handler.
The final step is to implement the PerformFetch delegate method in your AppDelegate declaration. This is the method iOS will invoke to help your app update its content and UI. In this method, you should download any required content, determine if any new content or network errors exist, and call the provided Action<UIBackgroundFetchResult> completionHandler (the completion handler is an Action delegate that is provided as an argument in PerformFetch). This method must finish in 30 seconds, or iOS will likely terminate your app.
Below is a sample implementation of PerformFetch which downloads an image and saves it to the personal directory of the app:
using Foundation;
using UIKit;
using System.IO;
using System.Net.Http;
using System.Threading.Tasks;

public partial class AppDelegate
{
  public override bool FinishedLaunching(UIApplication app, NSDictionary options)
  {
    UIApplication.SharedApplication.SetMinimumBackgroundFetchInterval(UIApplication.BackgroundFetchIntervalMinimum);

    // More startup code here
  }

  public override async void PerformFetch (UIApplication app, Action completionHandler)
  {
    // Download an image and save to disk
    var result = await FetchImage("https://www.xamarin.com/content/images/pages/branding/assets/xamagon.png");

    // Call the completion handler with the proper result
    completionHandler(result);
  }

  public async Task FetchImage (string url)
  {
    using (var httpClient = new HttpClient())
    {
      try {
        var outputFile = Path.Combine(Environment.GetFolderPath(Environment.SpecialFolder.Personal), "xamarin.png");
        var result = await httpClient.GetAsync(request);
        var contentStream = await result.Content.ReadAsStreamAsync(),

        if (contentStream.Length == 0) {
          return UIBackgroundFetchResult.NoData;
        }

        var stream = new FileStream(outputFile, FileMode.Create, FileAccess.Write))

        await contentStream.CopyToAsync(stream);

        return UIBackgroundFetchResult.NewData;
      } catch (Exception e) {
        return UIBackgroundFetchResult.Failed;
      }
    }
  }
}
So there you have it—a basic iOS app that will periodically wake up your app, fetch an image, and save it to disk. The next post in this series will explain how to use the Background Transfer Service to kick off a large download/upload (i.e., a download that might take more than 30 seconds) and update the content once it’s complete.