Article summary
I was at a local user group recently where the topic of the meeting was one of the hot new cross-platform mobile development options out there (doesn’t really matter which one). There was the usual UIkit bashing, which was expected since the topic was to propose an alternative programming model.
I’m not here to defend UIkit, because I agree that it can use some improvement. However, the speaker did say one thing about Auto Layout that I have heard before and that rubbed me the wrong way.
I’ve heard people say things like, “You need a mathematics PhD to understand Auto Layout,” or, “You need to be a rocket scientist to understand Auto Layout.” I’m not going to get into a debate on how hard rocket science actually is—you can see reddit for the answer. Instead, in this blog post, I will show you how easy the calculation for Auto Layout is. In fact, the linear equation is so simple that an elementary child could do the math.
So why do people think Auto Layout is hard? Well, I don’t think Xcode’s interface builder helps the situation. Xcode has improved since Auto Layout was introduced, but it can still be hard to see how the Auto Layout equation relates to what you see in interface builder. Let’s see if I can demystify Auto Layout a little.
The Equation
Let’s say you have two buttons and you want to know how far apart to place them. How could we express the relationship between the right edge of the Cancel button and the left edge of the Accept button? If I were to describe this to another person, I would probably say something like, “The Accept button is eight points to the right of the Cancel button.”

A more precise statement would be, “The left edge of the Accept button is eight points greater than the right edge of the Cancel button.” The equation for this would be:
Accept.left = Cancel.right + 8 where 8 is a constant
What if I wanted to express the width of the Accept button in relation to the width of the Cancel button? Let’s say it’s twice as wide. Then the equation would be the following:
Accept.width = Cancel.width * 2 where 2 is a multiplier
The Auto Layout equation combines these two into one to express any kind of relational constraint.
Item1.attribute = Item2.attribute * multiplier + constant
To express the position of the Accept button in relation to the Cancel button, we don’t need the multiplier, so its value is one. The equation would be the following:
Accept.left = Cancel.right * 1 + 8
To express the width of the Accept button, we don’t need the constant, so that becomes zero.
Accept.width = Cancel.width * 2 + 0
That’s it! The mystical equation that you need a math PhD to figure out ¯\_(ツ)_/¯. As with any equation, you can reverse it. You can express the relationship between the distance of these two buttons with Item 1 and Item 2 reversed as follows:
Cancel.right = Accept.left * 1 + (-8)
I think this is where some of the confusion starts with Auto Layout because Xcode’s interface builder doesn’t always show the equation in the order you are expecting. It is not logical to think of the distance between the two buttons as a negative number.
If you want to know more about the equation, Apple has a great page explaining the Anatomy of a Constraint.
Next, I’ll show you how interface builder uses this equation to build a constraint.
Interface Builder
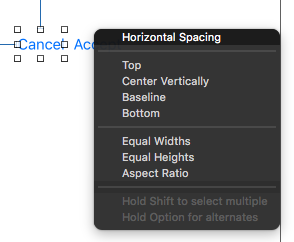
Let’s create the same horizontal constraint between our two buttons. I am not going to go through all the different ways you can create a constraint in interface builder because there are several different ways. My favorite way is to press the control key and drag a constraint from the first item to the second.
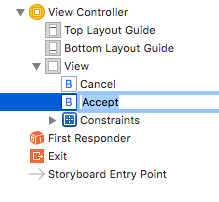
After I drag UI elements into my view controller, I give them a meaningful name in the document tree. This is very helpful in understanding which control is which when looking at the attributes of a constraint. Xcode will use the the name of the control in the attribute inspector so it is easier to identify your controls.
Now let’s look at the attributes of the horizontal constraint and try to find the elements of the equation in interface builder.
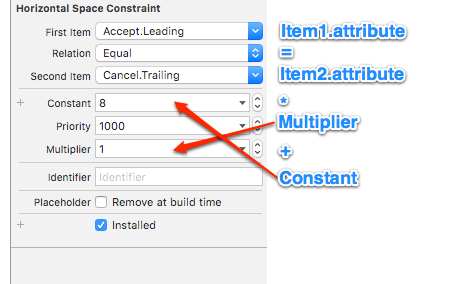
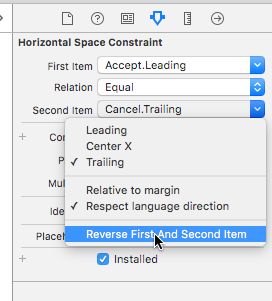
When you add constraints in Xcode, the order of the equation may not be what you are expecting so the numbers will be reversed. Here you can see that my constant is a negative number and the first and second items are reversed. I believe this trips people up in understanding what is going on.
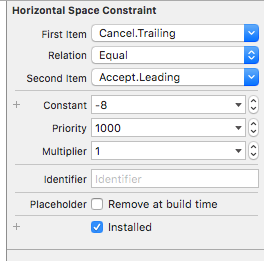
You can fix this situation by reversing the first and second item. I often do this so that it is clear in my head (even though, from a mathematical standpoint, it is the same). After you reverse it, the negative constant becomes positive again, and the items appear in the order you expect.
Hopefully, this is helpful to someone new to Auto Layout. We don’t need to hire mathematicians to lay out our controls. The math is pretty easy, although Xcode doesn’t help the situation sometimes.

