
Amazon’s S3 service comes with some pretty handy server-side encryption features. In fact, the S3 web app provides a single control to automatically encrypt all new objects in a bucket with SSE-S3 or SSE-KMS. Unfortunately, these controls only affect new objects. If your bucket already contains 10,000 unencrypted objects, then turning on automatic encryption does not make your bucket secure. Those 10,000 objects will remain unencrypted!
Fortunately, AWS provides a few ways to retroactively encrypt objects, including one way to encrypt a large bucket safely and easily. It’s a relatively new feature called S3 Batch Operations, and it lets you create a long-running job that will perform an operation on many objects and keep track of the results. This is an improvement over the old way, which was to use the command line operation aws s3 copy.
This guide will explain how to turn on default encryption for your bucket and use a Batch Operation to encrypt all of your existing objects. After going through these steps, your bucket will be fully encrypted.
1. Turn on Default Encryption
This first part is really easy. In the AWS S3 console, navigate into your bucket and find the “Properties” tab.

Then find the panel named “Default Encryption” and open it up. You will see three options: “None,” “AES-256,” and “AWS-KMS.” This guide will use AES-256. (You can use AWS-KMS, but it will require that you have AWS KMS set up.)
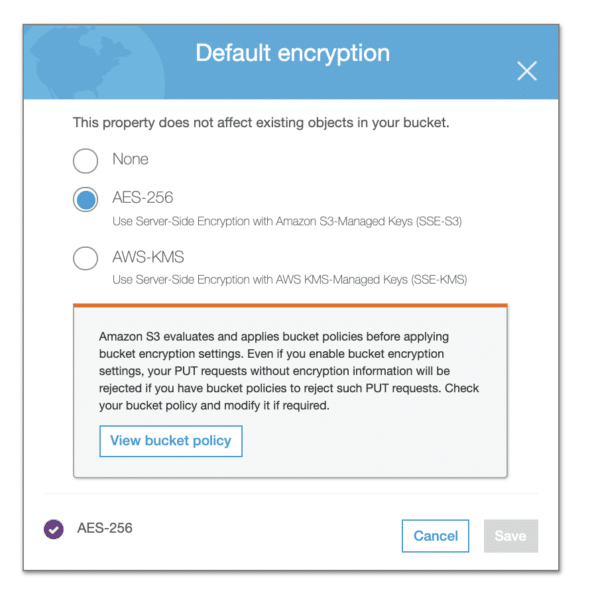
Notice the warning: “Your PUT requests without encryption information will be rejected if you have bucket policies to reject such PUT requests.” Double-check your bucket policies to make sure this will not cause any issues, then select “AES-256” and click “Save.” Any objects that are added to the bucket will now be encrypted.
2. Create an Inventory
To begin encrypting your pre-existing objects, create an “S3 inventory.” This inventory can serve many purposes; we’ll be using it as a manifest for the Batch Operation.
Go to the “Management” tab for your bucket, then go to the “Inventory” section. Click the “add new” button near the bottom of the page, which will take you to a form. Make the following changes to it:
- Enter an “Inventory name” – anything will do.
- For the “Destination bucket,” use the bucket that you’ll be encrypting.
- Change the “Object versions” value from “Current version only” to “Include all versions” so previous versions of objects will also be encrypted by the Batch Operation.
- Change “Encryption” to “AES-256.”
Click “save.” You should see an alert noting that the inventory has been created. You may also see an alert that a destination bucket policy was created. Lastly, you’ll notice that the inventory may take up to 48 hours to create. You may proceed to Step 3 before the inventory is created (but not to Step 4).
3. Create the Necessary IAM Role
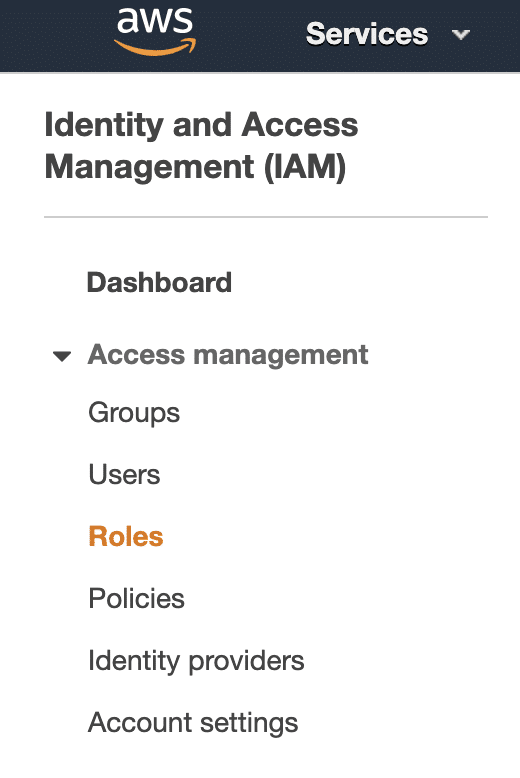
When you create a Batch Operation in the next step, you’ll need to provide an IAM role that can perform PUT copy operations in your bucket. To do this, go to the AWS IAM console and navigate to “Roles” in the sidebar.
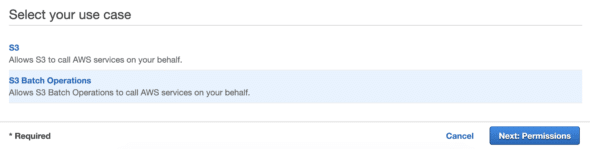
Click “Create Role,” which will bring you to the workflow for creating a new IAM Role. On the first page, make sure the “trusted entity” is set to “AWS service.” For “Choose a use case,” select “S3” from the main list. This will bring up a new list at the bottom of the page. Select “S3 Batch Operations” and then click “Next: Permissions.”
On the following page, click “Create policy,” which will open a form in a new window. Choose the “JSON” tab and enter the following policy:
{
   "Version":"2012-10-17",
   "Statement":[
      {
         "Action":[
            "s3:PutObject",
            "s3:PutObjectAcl",
            "s3:PutObjectTagging",
            "s3:PutObjectLegalHold",
            "s3:PutObjectRetention",
            "s3:GetBucketObjectLockConfiguration"
         ],
         "Effect":"Allow",
         "Resource":"arn:aws:s3:::YOUR-BUCKET/*"
      },
      {
         "Action":[
            "s3:GetObject",
            "s3:GetObjectAcl",
            "s3:GetObjectTagging"
         ],
         "Effect":"Allow",
         "Resource":"arn:aws:s3:::{{SourceBucket}}/*"
      },
      {
         "Effect":"Allow",
         "Action":[
            "s3:GetObject",
            "s3:GetObjectVersion",
            "s3:GetBucketLocation"
         ],
         "Resource":[
            "arn:aws:s3:::YOUR-BUCKET/INVENTORY-NAME/*"
         ]
      },
      {
         "Effect":"Allow",
         "Action":[
            "s3:PutObject",
            "s3:GetBucketLocation"
         ],
         "Resource":[
            "arn:aws:s3:::YOUR-BUCKET/*"
         ]
      }
   ]
}
Replace “YOUR-BUCKET” with the name of your bucket and “INVENTORY-NAME” with the name of the inventory you created in Step 2. Click “Review Policy” to continue.
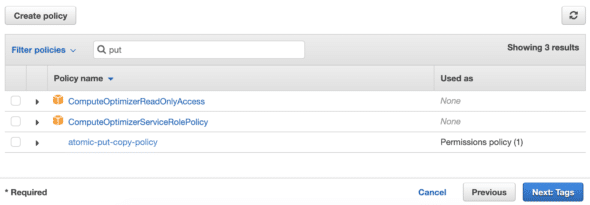
On the next page, give your policy a name, then click “Create policy.” Now go back to the Role workflow and click the refresh button just above the Policy table to load your new policy. Search for it by name, select it, and click “Next: Tags.”
Add tags if you wish, then click “Next: Review.” Finally, give your Role an appropriate name and click “Create role.”
4. Create a Batch Operation
Once your IAM Role is created and your first Inventory is complete, it’s time to get down to business. Navigate to your inventory in the S3 console, select it, and find the “Create job from manifest” button:

Configuring the job is a four-page process.
- On the first page, select the same “Region” as the bucket you’re encrypting. The “Manifest” section should already be set up, so you can click “Next.”
- On the second page, choose the “Copy” operation to bring up more options. You can configure these options however you like, except for the following:
- For the “Copy destination” section, enter your bucket path without a prefix: “s3://bucket-name.”
- In the “Server-Side Encryption” section, check the box and select “Amazon S3 key (SSE-S3)” as the encryption type (unless you chose SSE-KMS in Step 1).
- On the third page, choose your preferred options for the “Additional options” and “Completion report” sections. In the “Permissions” section, select “Choose from existing IAM roles,” click the “Choose IAM role” box, and find the IAM Role that you created in Step 3.
- On the fourth page, confirm that everything looks correct, then click “Create job” at the bottom of the page. You should land on a page that lists Batch Operations and see a notification that the job was created.
5. Run the Batch Operation
The job you created will not run automatically! Find and click your job in the list, which will take you to a page with information about the job’s overview, status, manifest, etc. There will be several options in the top-right corner, including “Run job.” Click that button, which will take you to yet another confirmation page. Read the notice at the top about pricing for Batch Operations and jobs so that you can anticipate any charges. Finally, scroll to the bottom and click “Run job” again.
On the Job Details page, the Status section should now indicate that the status is “Ready.” Batch Operation jobs do not begin immediately, and they can take a while to complete if your bucket is large. But eventually, the status should change to “Completed.”
At this point, you can navigate to any object in your bucket and see that it’s encrypted in the “Properties” tab. If there are any problems at all during the Batch Operation job, the status will be “Failed,” and the status section will include a field called “Reasons for Failure” – but hopefully that won’t happen!
I hope this walkthrough helps you add total server-side encryption to your S3 bucket.