My current project is very large, and we’ve been working on a process for decomposing features so that everything we design delivers value. This method also integrates tightly into Atomic’s agile software development practices, allowing both designers and developers to work on the same set of features simultaneously within continuous delivery cycles.
Project Background
During the project kick-off, we agreed to start by redesigning an existing website into a responsive mobile web app. We also needed to create a visual design system, incorporating a new brand direction that the client was introducing.
Our audience for this app was very large, and the demographic didn’t require a super modern aesthetic. Still, we did some brand exploration work to identify how the brand image and identity revealed itself in the existing and new visual design assets.
You want to learn as much as possible if there is an existing product and user base (analytics or research must be studied). With our UCD practices at Atomic, we want to base decisions on things we know (i.e. what the users/market are telling us, what the business needs are). Below I’ve outlined some basic steps to get you started.
1. Formulate a Process for Practicing Design
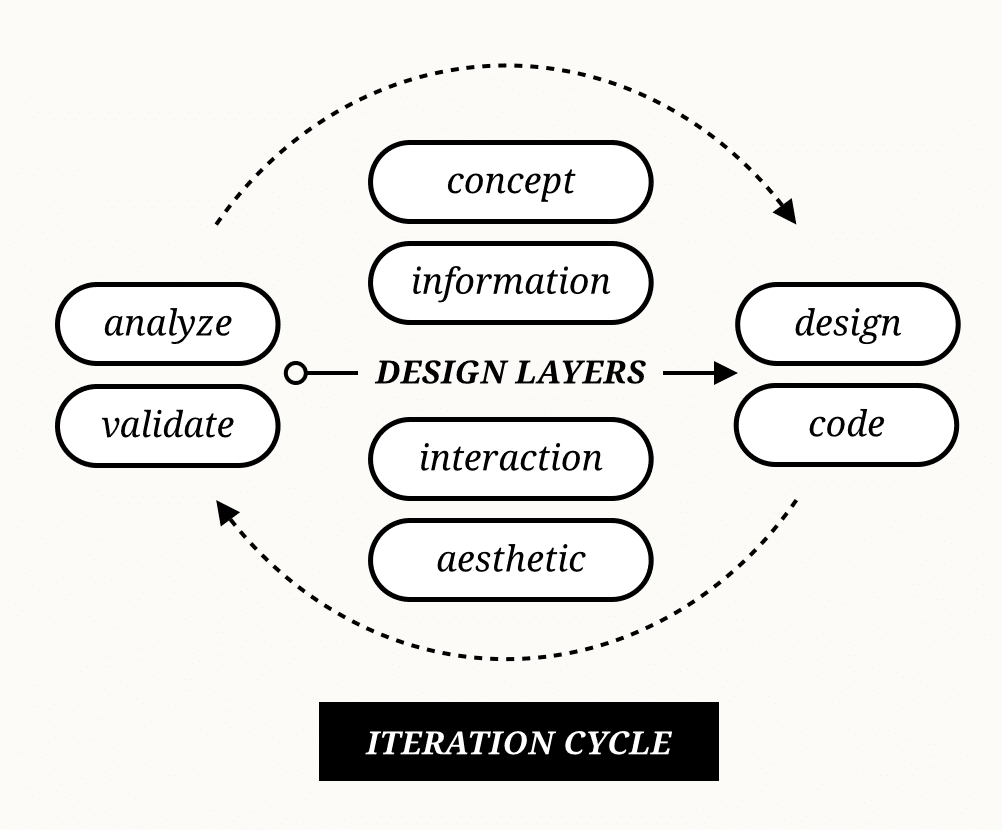 This graphic represents a high-level conceptualization of a project iteration cycle. Keep in mind that in agile design, nothing happens linearly (and there are many benefits to that). Therefore, it is important to incorporate some disciplined design practices to validate the team continues to deliver the right work.
Designing within iteration cycles offers more feedback loops that allow a team to learn how the working design fits the needs of their client and users. The team will shift as needed, with the goal of consistently producing artifacts that get users and clients interacting and contributing toward the design, early and often. This approach will build confidence along the way that your team is producing something viable.
Over the years, I have developed an interest in design process and strategy (particularly with software or digital products). I enjoy involvement at the early stages of a project because I know how important it is to have your voice in the foundation of what the team is building. If something goes wrong at the beginning, it brings a sense of ownership and accountability toward the success or failure of a fundamental decision.
2. Group Requirements into Sub-projects
 It isn’t uncommon at Atomic that we get approached with a rather complex list of requirements that can stretch across multiple platforms or devices. Figuring out where to start can be a task in and of itself.
When decomposing a large software project it’s best to start by grouping requirements into buckets of similar context or technology. Prioritize these buckets into sub-projects with the client based on what presents the most value to the business and user. If you don’t do this, you maintain a horizon line that is too distant and allows for too much slack, resulting in a blurred vision of exactly what you need to deliver and when. Introducing more constraints like sub-projects and milestones will provide more immediate goals for identifying what is best to deliver, when and in what form or fidelity. A sense of urgency and slight pressure should always be present so that value on the project is continuously delivered and measured.
After synthesizing requirements at a high-level, we allocated a percentage of our overall budget to each individual sub-project. We tracked against this figure as an upper bound, making careful decisions about how we should best spend time and stack resources as the weeks progressed. Partitioning the project like this allowed us to stay focused on delivering full scope on budget. As we moved further along in the project, we decided with the client where trade offs would occur and which features were substantial enough to merit an extension of time or budget.
One key to creating a successful design is developing a shared understanding of the scope and budget allocations very early in the project. Below are a few other insights I learned when kicking off a new project.
- Gauge how optimistic your team is about achieving project goals within the overall budget, given varying degrees of potential complexity.
- Prioritize with the understanding you may not accomplish everything. Set this expectation with the client early on so they understand where you have buffered in room for trade off when deciding which features to extend the budget for.
- Build a framework to allow client transparency in a way that makes it possible to make strategic project changes on a weekly basis.
- Don’t underestimate the need for good spreadsheets and tracking tools.
3. Decompose Requirements into Activities & Features
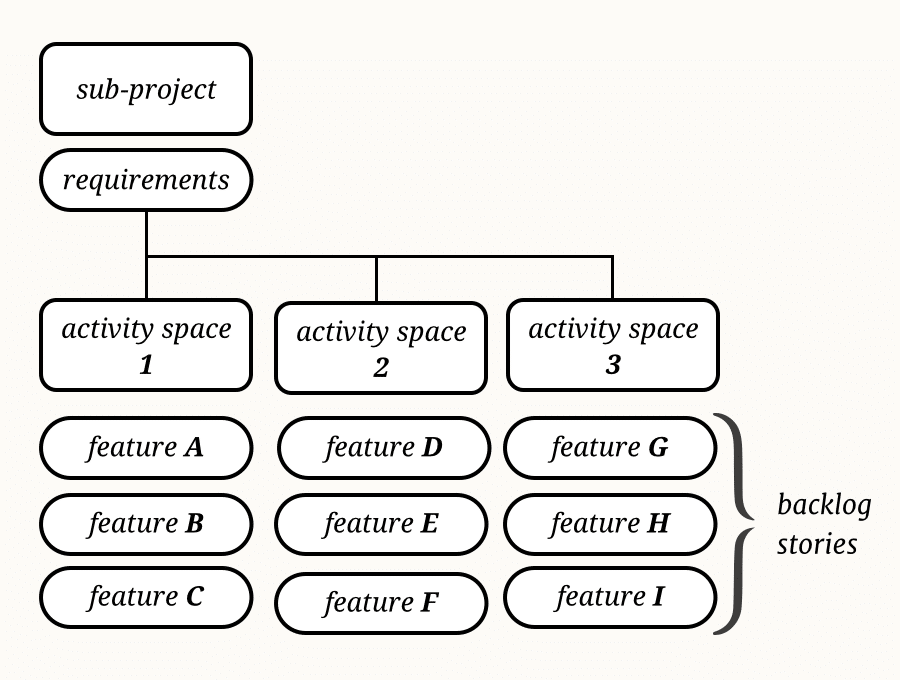 Requirements can come in many forms (i.e. business goals, user needs, technical constraints, etc.) When translating those requirements into design tasks, it can be difficult to know how granular to get. Start by grouping requirements into activity spaces based on shared workflow or context. Aim for 3-4 large activity spaces that you can decompose into features, UI elements and interactions.
There are many good methods to building a project backlog. If you know what your design process looks like or how resources will be stacked, you can break the backlog stories down further (e.g. we created separate tasks for creating mockups targeting desktop/tablet/phone device widths). It is valuable to have more refined estimates at an earlier stage in the project to build more confidence in your delivery timeline. But if you don’t know much about a particular feature, keep the estimate high-level. You will always revisit and break it down with the client before producing the work.
Even at their most granular level, a form element or break in an on-boarding process speaks to a brand in a way the user will remember as a significant experience associated with your product.
Your activity spaces should comprise the majority of key features that represent the areas the user will interact most with your product. It’s important to agree on these with the client, as they will become the foundation for your project backlog. As you are assigning estimates, you might find yourself allocating more time toward features that demand more design attention, critical thinking, or are just more closely associated to the brand or key user workflows. These features often contribute to areas that differentiate your product or contribute to a more enjoyable user experience.
Agree with the team on broader point estimates, so there is alignment when tasks are assigned. I tracked the budget burn visually in a spreadsheet to map out these activity spaces as project phases over a timeline. Measuring resource capacity against point value remaining, I could communicate a realistic outcome, which we could adjust moving forward. We worked with the client on a weekly basis (holding larger design reviews bi-weekly), maintaining consensus on where we should spend more time before moving onto the next feature.
4. Decompose Features into Workflows & Tasks
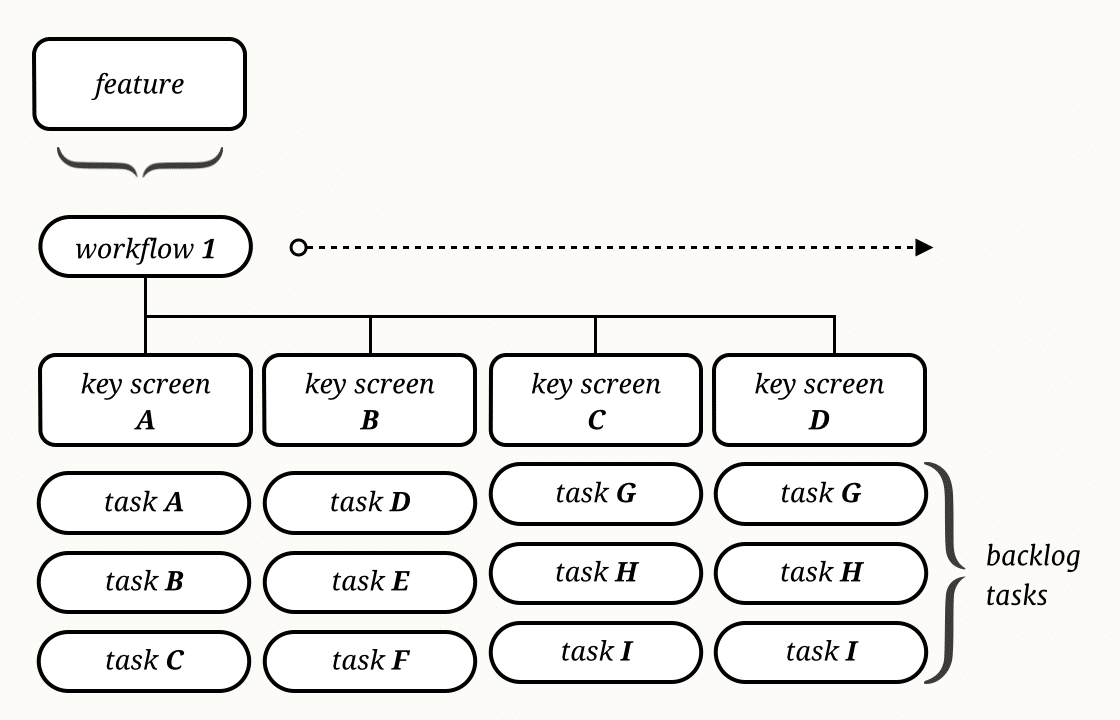 After discovering your users’ needs and identifying your client’s goals and vision, you can now break these insights down into something tangible (and executable). For a given feature, map the primary workflows that support a particular user journey. The entire team should build empathy for the user to understand why and how they are interacting with the product, as well as what their needs are. Predicting the user’s behavior will go lengths to help all team members create memorable product experiences.
After mapping out the key workflows, you will begin to identify screens that support each core feature of the app. The more work you produce, additional items will surface and provide continuous insight on interactions that need to be considered. This will continue to build confidence in the team that you are tackling the right design challenges.
Getting to know what features are important for which users, and the context in which those users interact with your product, results in valuable insight to drive decision-making in the design process.
If your web app is responsive, some additional time should be allocated to scaling down those features so that they feel natural on a touch or desktop device. For example, your navigation in the desktop browser will work best designed one way, but will be drastically different when designed to feel native on a phone.
Brainstorm (ideally with the client) ways in which it might be best to approach designing those elements, and where to spend additional time iterating. Understand your target audience and which devices and key features they primarily use. You might find yourself creating two versions of the same workflow (e.g. signing up, accessing navigation or a browsing a content library). Those device-specific elements are all part of a larger UI library that will continue to be refined and grow into the visual design system for your app.
5. Build the New Design Iteratively & Incrementally
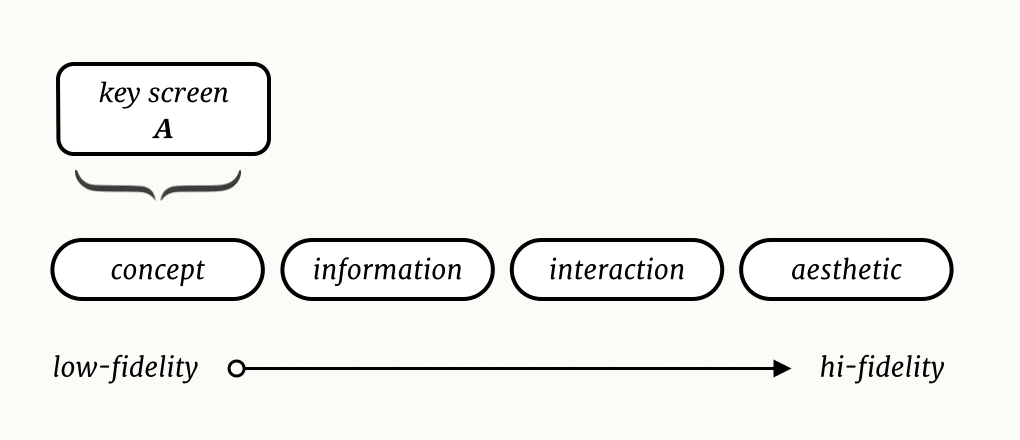 With each new design iteration comes a new layer of fidelity, with the new work validating the assumptions made in the previous iteration. This approach isolates areas of tangible design practice, allowing designers to focus on core elements like type, color and shape and how they contribute to the overall desirability and effectiveness of the app. Visit this post to see examples of how to apply this process when deconstructing an existing site or app.
The first sub-project we considered a ‘renovation’ project, where our constraints were to redesign the app within the existing feature set. Our second sub-project was the ‘innovation’ layer of new features we incorporated into this newly designed foundation. This helped scope project tasks to address our goals and to identify constraints to a particular layer of design or feature implementation. Isolating the issue with something existing rather than inventing something new, might be a better way to approach introducing a new design to your audience.
I always want to feel like I’m moving forward in a project, continuously learning about how best to approach delivering new value with design.
I believe this process helped provide discipline when applying aesthetics to form, requiring us to solve the hard problems at the time most needed, at a level of fidelity that felt most appropriate for the conversation. Certain software complexities don’t often reveal themselves until you encounter them at some point in the design process. A design process is not solid in agile, it needs to grow and adapt to the specific needs of the client, team or project.
When approaching visual design, make careful decisions about how each style choice supports the information design, workflows and key interactions within your app. Leverage existing patterns first if the elements share the same intent or utility. This is the point of merger and finesse between aesthetics and functionality. Style decisions should support information hierarchy and content strategy. If the two are not supportive of each other it will lead to a very disjointed user experience.
In Closing
As designers we must always be practitioners, and we must always be learning (no matter our specialties or backgrounds). I try to empower this ‘teach and learn’ approach with my project team and make sure I get enough diversity to keep us innovating on our individual craft and design practices at Atomic. We usually do this by building working prototypes early. We want to test out ideas in the native environment quickly to get an opportunity to improve the product with continuous user feedback.
The process used here is an amalgamation of many practices I’ve learned and tried in recent years. I find that a good design process is tailored to the client and prescribed based on many project constraints, including time, budget, resource availability or technical complexity.
While we can observe and identify pain points in the user journey, there is a sort of art in determining how to best turn an idea into a solid execution plan, all while producing quality work that supports a great product design.
If you’d like to learn more about agile design practices, a good place to start would be with Alan Cooper’s book, About Face 3: The Essentials of Interaction Design. If you are interested in hands-on learning, take a look at the training offered at Cooper.