Article summary
Recurring push notifications in React Native can be a useful tool to send messages to users on a regular schedule. Below is a step-by-step guide to adding this functionality to a React Native app.
Note: this tutorial follows steps for react-native >= 0.60. For older versions of React Native, please refer to the individual libraries’ repositories.
Setup & Installation
We’ll be using a combination of two libraries (react-native-push-notification and react-native-background-fetch) to create regularly scheduled events.
First, add both libraries to the project:
yarn add react-native-push-notification
yarn add react-native-background-fetch
Then we have some library- and OS-specific setup to do.
react-native-push-notification
iOS Development
For iOS, this library uses PushNotificationIOS, a push notification API:
yarn add @react-native-community/push-notification-ios
cd ios && pod install
At this point, the Podfile should be updated with the new libraries we’ve added. Now we need to enable support for notifications in our AppDelegate.m. At the top of the file, add the following line:
#import <RNCPushNotificationIOS.h>
Then add:
// Required to register for notifications
- (void)application:(UIApplication *)application didRegisterUserNotificationSettings:(UIUserNotificationSettings *)notificationSettings
{
  [RNCPushNotificationIOS didRegisterUserNotificationSettings:notificationSettings];
}
// Required for the register event.
- (void)application:(UIApplication *)application didRegisterForRemoteNotificationsWithDeviceToken:(NSData *)deviceToken
{
  [RNCPushNotificationIOS didRegisterForRemoteNotificationsWithDeviceToken:deviceToken];
}
// Required for the notification event. You must call the completion handler after handling the remote notification.
- (void)application:(UIApplication *)application didReceiveRemoteNotification:(NSDictionary *)userInfo
fetchCompletionHandler:(void (^)(UIBackgroundFetchResult))completionHandler
{
  [RNCPushNotificationIOS didReceiveRemoteNotification:userInfo fetchCompletionHandler:completionHandler];
}
// Required for the registrationError event.
- (void)application:(UIApplication *)application didFailToRegisterForRemoteNotificationsWithError:(NSError *)error
{
  [RNCPushNotificationIOS didFailToRegisterForRemoteNotificationsWithError:error];
}
// Required for the localNotification event.
- (void)application:(UIApplication *)application didReceiveLocalNotification:(UILocalNotification *)notification
{
  [RNCPushNotificationIOS didReceiveLocalNotification:notification];
}
Android Development
For Android, add the following lines to the settings.gradle file:
include ':react-native-push-notification'
project(':react-native-push-notification').projectDir = file('../node_modules/react-native-push-notification/android')
Next, hop over to the AndroidManifest.xml. We’ll be adding permissions for showing push notifications to users here. Within the manifest tag, add the following:
<uses-permission android:name="android.permission.WAKE_LOCK" />
  <permission
    android:name="${applicationId}.permission.C2D_MESSAGE"
    android:protectionLevel="signature" />
  <uses-permission android:name="${applicationId}.permission.C2D_MESSAGE" />
  <uses-permission android:name="android.permission.VIBRATE" />
  <uses-permission android:name="android.permission.RECEIVE_BOOT_COMPLETED"/>
In the application tag, add:
<meta-data  android:name="com.dieam.reactnativepushnotification.notification_color"
                android:resource="@android:color/white"/>

<receiver
  android:name="com.google.android.gms.gcm.GcmReceiver"
  android:exported="true"
  android:permission="com.google.android.c2dm.permission.SEND" >
   <intent-filter>
     <action android:name="com.google.android.c2dm.intent.RECEIVE" />
     <category android:name="${applicationId}" />
   </intent-filter>
</receiver>

<receiver android:name="com.dieam.reactnativepushnotification.modules.RNPushNotificationPublisher" />
<receiver android:name="com.dieam.reactnativepushnotification.modules.RNPushNotificationBootEventReceiver">
   <intent-filter>
     <action android:name="android.intent.action.BOOT_COMPLETED" />
   </intent-filter>
</receiver>
<service android:name="com.dieam.reactnativepushnotification.modules.RNPushNotificationRegistrationService"/>

<service
  android:name="com.dieam.reactnativepushnotification.modules.RNPushNotificationListenerServiceGcm"
  android:exported="false" >
    <intent-filter>
     <action android:name="com.google.android.c2dm.intent.RECEIVE" />
    </intent-filter>
</service>

<meta-data android:name="com.dieam.reactnativepushnotification.notification_channel_name" android:value="YOUR NOTIFICATION CHANNEL NAME"/>
<meta-data android:name="com.dieam.reactnativepushnotification.notification_channel_description" android:value="YOUR NOTIFICATION CHANNEL DESCRIPTION"/>
Note: Make sure to add a colors.xml with the color white if it doesn’t exist.
react-native-background-fetch
This library requires some extra setup for iOS but none for Android.
iOS Development
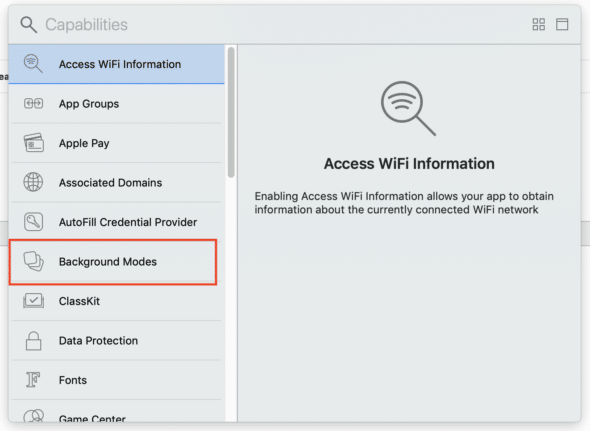
Open Xcode and navigate to the root of our project. On the Signings & Capabilities tab, select the option to add a new capability and choose the Background Modes capability. This will add a new item to the Signings & Capabilities list.

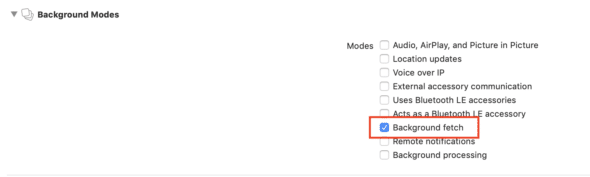
Finally, within this item, check the box next to Background fetch.
Next, add an AppDelegate extension to the project. This file will go in the same folder that the AppDelegate.m lives. Right-click on that folder and select Add Files to Project.
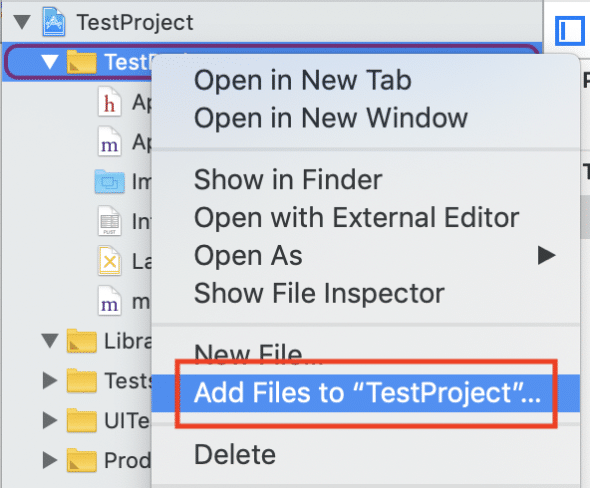
The file we’re adding is located at node_modules/react-native-background-fetch/ios/RNBackgroundFetch/RNBackgroundFetch+AppDelegate.m
Once this file is part of our project, we’re ready to implement the scheduled push notifications.
Code Implementation
With the setup and installation done, we can get to the important (and easier) part: writing the code.
First, we need to configure the background fetch. In some of the app boot-up code, add the following configuration:
BackgroundFetch.configure(
 {
  minimumFetchInterval: 15 // minutes
 },
 () => {
  console.log("Received background fetch event");
  BackgroundFetch.finish(BackgroundFetch.FETCH_RESULT_NEW_DATA);
 },
 (error) => {
  console.log("Background fetch failed to start with error: " + error);
 }
);
The first parameter is our configuration. While the code above only provides one option, the background fetch library has more documentation on configuration available. The minimum value for the minimumFetchInterval is 15, meaning background fetches cannot happen at a higher frequency than every fifteen minutes.
The second parameter in the configure method is the callback. This is for the code for what we want to happen when a background fetch occurs. The last line in the callback is required to signal the completion of the background fetch task. If it is not included, the operating system can terminate the app for running in the background too long.
Finally, we can include an error callback in case something goes wrong in our background fetch code.
After adding the background fetch configuration, we can now add the code to actually trigger a push notification. Inside the callback for the background fetch, we’ll add the following code before the BackgroundFetch.finish:
PushNotification.configure({
 onNotification: (notification) => {
  console.log("Push notification received");
 }
});
This sets up a callback for when a push notification is received by a user. It is a required configuration for push notifications. Other configurations can be found in the push notification library documentation.
In the background fetch callback, after this configuration, we’ll add the trigger to send a push notification:
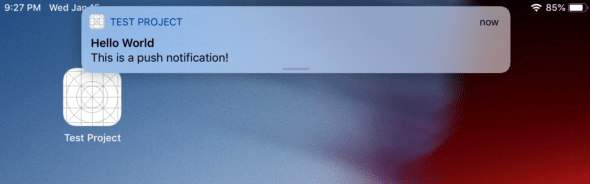
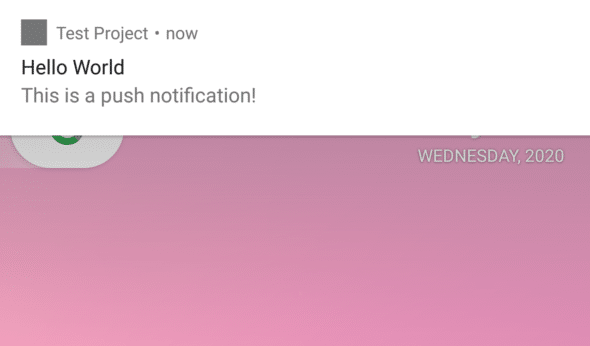
PushNotification.localNotification({
 title: "Hello World",
 message: "This is a push notification!"
});
Now we’re ready to try it out.
Testing on Simulators and Devices
To manually trigger our push notifications on a simulator or an emulator, we’ll need to follow different procedures for each OS.
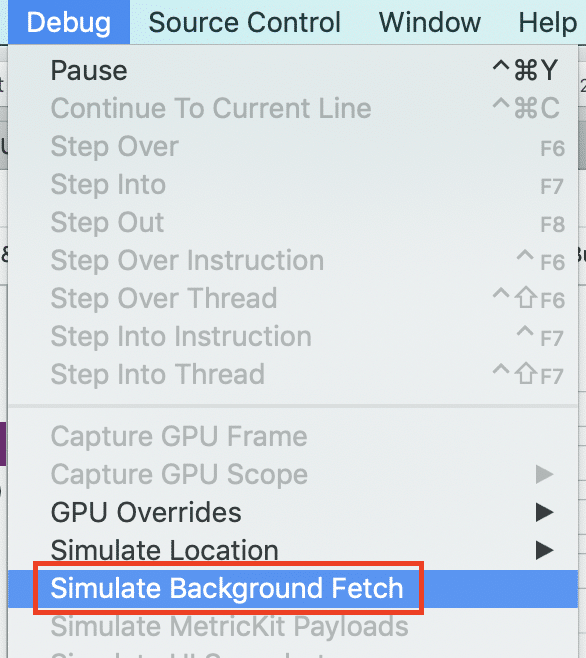
For iOS, we can simulate a background fetch from Xcode on a simulator. With a simulator running, navigate to the Debug menu in Xcode and select Simulate Background Fetch. If everything is set up correctly, a push notification should appear on the simulator.
For Android, use one of the following commands:
# For Android SDK 21+
adb shell cmd jobscheduler run -f your.application.id 999
# For Android SDK < 21
adb shell am broadcast -a your.application.id.event.BACKGROUND_FETCH
And with that, we have recurring push notifications!
Thanks for this tutorial, it helped me !
Unfortunately react-native-background-fetch is not precise, and not regular on iOS. Moreover it doesn’t work when the app is killed…
I prefer using PushNotification.localNotificationSchedule() from react-native-push-notification with the repeatType parameter.
The only valid value for repeatType on iOS is “day”, and I haven’t even been able to get repeating daily local notifications to work, as there is a 64-notification limit in iOS. So one has to find a way to schedule new local notifications, and AFAIK a timer or background fetch are the only two mechanisms available.
Thanks for the tutorial.
Will this work when the app is killed?
Hi Valentin,
Does PushNotification.localNotificationSchedule() work when the app is killed? How about React Native Firebase Notification? Thanks!