
Recently, I was assigned the task of adding a hand-drawing component to a React Native application. While searching for the ideal library, I came across React Native Skia — a high-performance 2D graphics library that utilizes the same rendering engine that powers Flutter. Upon further investigation, I discovered several blog posts that appeared to be exactly what I needed.
Although they were well-written and helpful, these blog posts were either outdated or relied on additional unnecessary libraries. That made the process more complex than simply copying and pasting code into my project. I decided to create a tutorial that offers a clear and up-to-date approach, using only React Native Skia as the third-party dependency.
Acknowledgment
Before getting started, I’d like to quickly acknowledge the blog posts that helped me accomplish this task:
- https://blog.notesnook.com/drawing-app-with-react-native-skia/
- https://medium.com/react-native-rocket/building-a-hand-drawing-app-with-react-native-skia-and-gesture-handler-9797f5f7b9b4
A Non-Interactive Example
Before building an interactive hand-drawing component, let’s create a non-interactive example to familiarize ourselves with the library. This process will give us a better understanding of the building blocks that we’ll use to build this component: <Path /> and <Canvas />.
Our first example will be a simple component that draws a star.
import { Canvas, Path, Skia } from "@shopify/react-native-skia";
import React from "react";
import { StyleSheet } from "react-native";

// copied from https://shopify.github.io/react-native-skia/docs/shapes/path#using-path-object
const path = Skia.Path.Make();
path.moveTo(128, 0);
path.lineTo(168, 80);
path.lineTo(256, 93);
path.lineTo(192, 155);
path.lineTo(207, 244);
path.lineTo(128, 202);
path.lineTo(49, 244);
path.lineTo(64, 155);
path.lineTo(0, 93);
path.lineTo(88, 80);
path.lineTo(128, 0);
path.close();

export const SketchCanvasWithoutInteraction = () => {
  return (
    <Canvas style={style.container}>
      <Path path={path} color={"black"} style={"stroke"} strokeWidth={2} />
    </Canvas>
  );
};

const style = StyleSheet.create({
  container: {
    flex: 1,
    width: "100%",
  }
});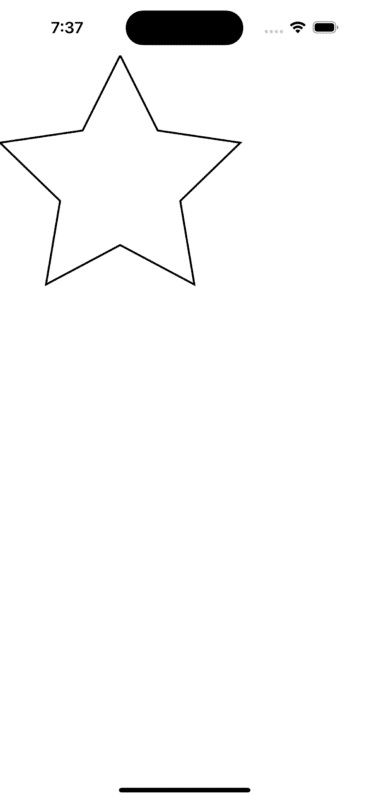
After completing the non-interactive example, you should see a star shape that was rendered using React Native Skia’s <Canvas /> and <Path /> components.
The <Canvas /> component serves as the root for your drawing. If you are familiar with the HTML canvas element, it behaves similarly. It behaves like a regular React Native view. However, behind the scenes, it uses its own renderer to display its components.
The <Path /> component can be used to create various shapes, including lines, curves, and arcs. Paths are extremely useful because they can form complex shapes by combining multiple straight or curved lines. In this instance, we used it to draw the lines of the star.
The library provides other shapes, such as rectangles and circles, but since we will only being using Paths, I left those out for now.
Adding Interactivity
Now that we’ve familiarized ourselves with React Native Skia’s <Canvas /> and <Path /> components, let’s introduce some interactivity!
import {
  Canvas,
  Path,
  SkPath,
  Skia,
  TouchInfo,
  useTouchHandler,
} from "@shopify/react-native-skia";
import React, { useCallback, useState } from "react";
import { StyleSheet } from "react-native";

export const SketchCanvasWithInteraction = () => {
  const [paths, setPaths] = useState<SkPath[]>([]);

  const onDrawingStart = useCallback((touchInfo: TouchInfo) => {
    setPaths((old) => {
      const { x, y } = touchInfo;
      const newPath = Skia.Path.Make();
      newPath.moveTo(x, y);
      return [...old, newPath];
    });
  }, []);

  const onDrawingActive = useCallback((touchInfo: TouchInfo) => {
    setPaths((currentPaths) => {
      const { x, y } = touchInfo;
      const currentPath = currentPaths[currentPaths.length - 1];
      const lastPoint = currentPath.getLastPt();
      const xMid = (lastPoint.x + x) / 2;
      const yMid = (lastPoint.y + y) / 2;

      currentPath.quadTo(lastPoint.x, lastPoint.y, xMid, yMid);
      return [...currentPaths.slice(0, currentPaths.length - 1), currentPath];
    });
  }, []);

  const touchHandler = useTouchHandler(
    {
      onActive: onDrawingActive,
      onStart: onDrawingStart,
    },
    [onDrawingActive, onDrawingStart]
  );

  return (
    <Canvas style={style.container} onTouch={touchHandler}>
      {paths.map((path, index) => (
        <Path
          key={index}
          path={path}
          color={"black"}
          style={"stroke"}
          strokeWidth={2}
        />
      ))}
    </Canvas>
  );
};

const style = StyleSheet.create({
  container: {
    flex: 1,
    width: "100%",
  },
});
Breaking Down the Steps
If you use the above component, you should now be able to draw on your screen! Let’s break down what we added:
First, we create an array using useState to hold all the lines that the user adds.
React Native Skia provides an easy way for the component to detect when a user is interacting with it. The useTouchHandler takes an object that has three callbacks on it: onStart, onActive, and onEnd. In this example we are only using onStart and onActive since there is no need to use onEnd here.
onStartis called when the user first presses on the component. In our case, we create a new path that starts at the XY coordinates that the user started pressing at and add it to thepathsstate. If the user lifts there finger and puts it down again, theonStartmethod is called again, adding another path to the state.- The
onActivecallback is called after theonActivefunction has been called when the user starts moving there finger. Here we are able to add lines to the last path in our component using thequadTomethod on the path object.
Next, we pass the return value of the useTouchHandler to the prop onTouch on the <Canvas /> element.
Inside of the <Canvas /> element, we loop over the paths in our state array and render them using the <Path /> component. We are utilizing the following props:
path– The path the user drew.color– The color of the line being drawn.style– The paint style we are using, “fill” or “stroke.” We are using “stroke” in this example to prevent the space between lines from being filled in.strokeWidth– The thickness of the line that was drawn.
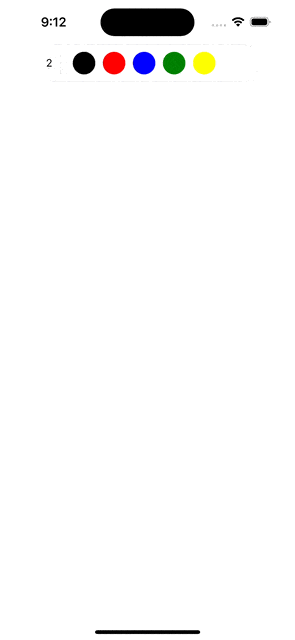
Customizing the Brush
Users can now draw using this component! But they can only draw black lines of uniform width. Let’s allow users to get more creative by drawing different color lines of varying widths!
import {
  Canvas,
  Path,
  SkPath,
  Skia,
  TouchInfo,
  useTouchHandler,
} from "@shopify/react-native-skia";
import React, { useCallback, useState } from "react";
import { Pressable, StyleSheet, Text, View } from "react-native";

type PathWithColorAndWidth = {
  path: SkPath;
  color: Color;
  strokeWidth: number;
};

export const SketchCanvasWithInteractionAndCustomization = () => {
  const [paths, setPaths] = useState<PathWithColorAndWidth[]>([]);
  const [color, setColor] = useState<Color>(Colors[0]);

  const [strokeWidth, setStrokeWidth] = useState(strokes[0]);

  const onDrawingStart = useCallback(
    (touchInfo: TouchInfo) => {
      setPaths((currentPaths) => {
        const { x, y } = touchInfo;
        const newPath = Skia.Path.Make();
        newPath.moveTo(x, y);
        return [
          ...currentPaths,
          {
            path: newPath,
            color,
            strokeWidth,
          },
        ];
      });
    },
    [color, strokeWidth]
  );

  const onDrawingActive = useCallback((touchInfo: TouchInfo) => {
    setPaths((currentPaths) => {
      const { x, y } = touchInfo;
      const currentPath = currentPaths[currentPaths.length - 1];
      const lastPoint = currentPath.path.getLastPt();
      const xMid = (lastPoint.x + x) / 2;
      const yMid = (lastPoint.y + y) / 2;

      currentPath.path.quadTo(lastPoint.x, lastPoint.y, xMid, yMid);
      return [...currentPaths.slice(0, currentPaths.length - 1), currentPath];
    });
  }, []);

  const touchHandler = useTouchHandler(
    {
      onActive: onDrawingActive,
      onStart: onDrawingStart,
    },
    [onDrawingActive, onDrawingStart]
  );

  return (
    <View style={style.container}>
      <Toolbar
        color={color}
        strokeWidth={strokeWidth}
        setColor={setColor}
        setStrokeWidth={setStrokeWidth}
      />
      <Canvas style={style.container} onTouch={touchHandler}>
        {paths.map((path, index) => (
          <Path
            key={index}
            path={path.path}
            color={path.color}
            style={"stroke"}
            strokeWidth={path.strokeWidth}
          />
        ))}
      </Canvas>
    </View>
  );
};

const Colors = ["black", "red", "blue", "green", "yellow", "white"] as const;

type Color = (typeof Colors)[number];

type ToolbarProps = {
  color: Color;
  strokeWidth: number;
  setColor: (color: Color) => void;
  setStrokeWidth: (strokeWidth: number) => void;
};

const strokes = [2, 4, 6, 8, 10, 12, 14, 16, 18, 20];

const Toolbar = ({
  color,
  strokeWidth,
  setColor,
  setStrokeWidth,
}: ToolbarProps) => {
  const [showStrokes, setShowStrokes] = useState(false);

  const handleStrokeWidthChange = (stroke: number) => {
    setStrokeWidth(stroke);
    setShowStrokes(false);
  };

  const handleChangeColor = (color: Color) => {
    setColor(color);
  };

  return (
    <>
      {showStrokes && (
        <View style={[style.toolbar, style.strokeToolbar]}>
          {strokes.map((stroke) => (
            <Pressable
              onPress={() => handleStrokeWidthChange(stroke)}
              key={stroke}
            >
              <Text style={style.strokeOption}>{stroke}</Text>
            </Pressable>
          ))}
        </View>
      )}
      <View style={[style.toolbar]}>
        <Pressable
          style={style.currentStroke}
          onPress={() => setShowStrokes(!showStrokes)}
        >
          <Text>{strokeWidth}</Text>
        </Pressable>
        <View style={style.separator} />
        {Colors.map((item) => (
          <ColorButton
            isSelected={item === color}
            key={item}
            color={item}
            onPress={() => handleChangeColor(item)}
          />
        ))}
      </View>
    </>
  );
};

type ColorButtonProps = {
  color: Color;
  isSelected: boolean;
  onPress: () => void;
};

const ColorButton = ({ color, onPress, isSelected }: ColorButtonProps) => {
  return (
    <Pressable
      onPress={onPress}
      style={[
        style.colorButton,
        { backgroundColor: color },
        isSelected && {
          borderWidth: 2,
          borderColor: "black",
        },
      ]}
    />
  );
};

const style = StyleSheet.create({
  container: {
    flex: 1,
    width: "100%",
  },
  strokeOption: {
    fontSize: 18,
    backgroundColor: "#f7f7f7",
  },
  toolbar: {
    backgroundColor: "#ffffff",
    height: 50,
    width: 300,
    borderRadius: 100,
    borderColor: "#f0f0f0",
    borderWidth: 1,
    flexDirection: "row",
    paddingHorizontal: 12,
    justifyContent: "center",
    alignItems: "center",
    alignSelf: "center",
  },
  separator: {
    height: 30,
    borderWidth: 1,
    borderColor: "#f0f0f0",
    marginHorizontal: 10,
  },
  currentStroke: {
    backgroundColor: "#f7f7f7",
    borderRadius: 5,
  },
  strokeToolbar: {
    position: "absolute",
    top: 70,
    justifyContent: "space-between",
    zIndex: 100,
  },
  colorButton: {
    width: 30,
    height: 30,
    borderRadius: 100,
    marginHorizontal: 5,
  },
});
Using React Native Skia
If you run this example you should be able to switch between colors and line width! Here’s what we did to achieve this:
- Added a component that allows us to select colors and stroke widths from a predefined list.
- Added state to track the currently selected color and stroke width.
- Store the color and stroke width selected when a line was created with the line.
- Use the stroke width and color properties on the
<Path />component.
Congratulations! You can now create a hand-drawable component using React Native Skia. Feel free to use any of the code referenced in this article. You can see the complete code written in this tutorial here.
i got this error while trying to paste the code and after installed skia library for react native
Cannot read property ‘canvas’ of undefiened
Sorry it’s said Skia and not canvas