Welcome to our series on Design Thinking methods and activities. You’ll find a full list of posts in this series at the end of the page.

Start Your Day is one of the most beloved and consistently used exercises at Atomic. I’m also a touch biased because I love this activity and, to date, so has every team I’ve worked with.
Start Your Day
| Primary Goal | To understand when and how a user engages with your product/experience on a daily, weekly, monthly, and yearly basis. |
| When To Use | Any time a new initiative is started. This includes revisiting this activity any time a new user goal is added. |
| Time Required | On average, 1-2 hours. Add 30-45 mins for each extra persona you’ll run the activity for. |
| Number of Participants | 1 facilitator and 3-4 story-mappers |
| Who Should Participate? | The core team, typically consisting of the product owner, project manager, design lead, technical/development lead, and (bonus points!) if you run the activity with an end user or user advocate. |
| Supplies | Large chunk of wall space or Post-it tabletop pads (at least 4 sheets), Sharpies for each participant, different colored Post-its. |
The beauty of this exercise is that it challenges your team to think about how a product might fit into the life of a user and how that relationship may change over time. For example, if you’re creating a fitness tracking app how does the application greet the user on a daily basis and how is content adjusted/added/removed they have achieved their fitness goals?
Depending on the size of your product and how many different personas are engaging with it this exercise can be completed in 30 minutes or 4 hours. Let your personas help determine how deep to take the exercise.
1. Prep for the Activity
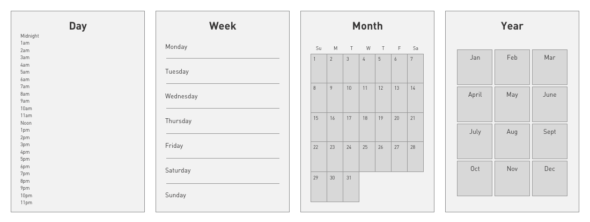
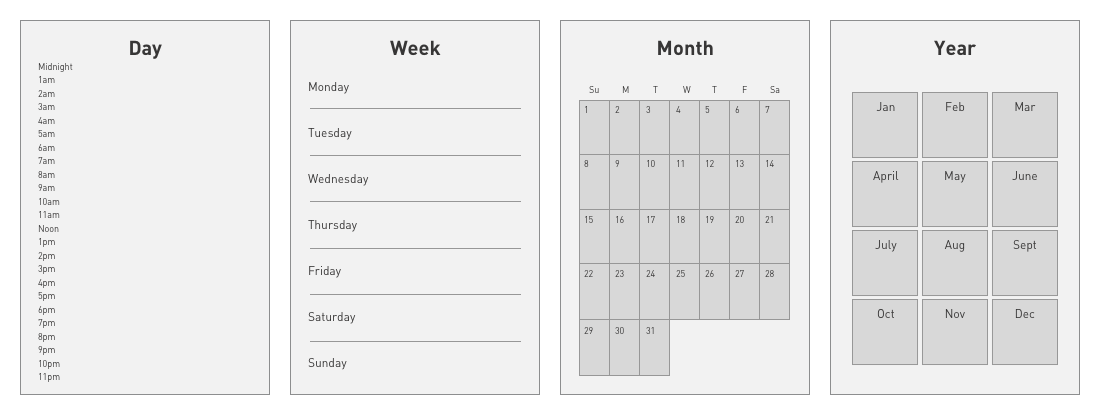
To begin, grab four large Post-It sheets and clear off a large section of wall. Each of your sheets will be dedicated to one of the following–day, week, month, and year. Title each sheet as such and then fill in the proper chart information for each sheet as such:

Now you have a choice to make—you can assign each member of your team who will be participating in the activity a Post-It color for ease in keeping track of everyone’s ideas OR you can assign Post-It colors to each persona type. Typically, I’ll assign colors to team members and make create columns on the sheets for each persona type, but do work works best for you.
2. Explain the Activity
It’s best to start by explaining the exercise from start to finish so that everyone can understand how it works, what the goals of the exercise are, and what the output of the exercise will be.
The goal of the exercise is to understand how and when users will be engaging with your product. To do that the team will map each event on the proper chart. They’ll fill in one chart at a time and will have ten minutes per chart to ideate and post events. Afterwards team members will discuss one-by-one the items that they posted.
Encourage them to think about events that are appropriate to the product such as registering for a product, recurring events, and/or one-time events (like a birthday or special sale). Also, consider what happens when something goes wrong or when a goal as been accomplished.
Only one event per Post-It should be written and affixed to the appropriate area of the chart. For example, if the application sends the user a “Good Morning” notification at 8:00am on a daily basis then post that note on the Daily chart on the 8:00am line.
3. Mapping Events
Begin with the “Daily” chart and give team members ten minutes to post events. During this time I like to play ambient music in the backyard to keep everyone focused and to ease some of the awkward quietness of the room. This is a great playlist to jam quietly in the background:
Once everyone has filled in the first chart take another 5-10 minutes to go one-by-one and explain each of the posts made. This will also give you a chance to shore up any duplicates and talk through any questions.
Once your Daily chart is complete move onto Weekly and so on and so forth.
This exercise can fill up your charts very quickly so be sure to have extra wall space or large Post-It sheets prepared incase you need overflow space.
5. Follow-Up
After you’ve completed this activity you can synthesize the information into a Story Map or backlog (our backlog tool of choice is Pivotal Tracker) or into a Google Drawing document.
That’s it for this lesson. Check back soon for new ones, and leave me a comment below if you’ve facilitated or participated in Start Your Day.
References
Reference for this exercise: Innovation Games: Creating Breakthrough Products Through Creative Play by Luke Hohmann (2006)
Atomic’s Design Thinking Toolkit
- What Is Design Thinking?
- Your Design Thinking Supply List
- Activity 1 – The Love/Breakup Letter
- Activity 2 – Story Mapping
- Activity 3 – P.O.E.M.S.
- Activity 4 – Start Your Day
- Activity 5 – Remember the Future
- Activity 6 – Card Sorting
- Activity 7 – Competitors/Complementors Map
- Activity 8 – Difficulty & Importance Matrix
- Activity 9 – Rose, Bud, Thorn
- Activity 10 – Affinity Mapping
- Activity 11 – Speed Boat
- Activity 12 – Visualize The Vote
- Activity 13 – Hopes & Fears
- Activity 14 – I Like, I Wish, What If
- Activity 15 – How to Make Toast
- Activity 16 – How Might We…?
- Activity 17 – Alter Egos
- Activity 18 – What’s On Your Radar?
- Activity 19 – The Perfect Morning
- Activity 20 – 2×3
- Activity 21 – How Can I Help…?
- Activity 22 – Cover Story
- Activity 23 – Crazy 8s
- Activity 24 – Abstraction Ladder
- Activity 25 – Empathy Map
- Activity 26 – Worse Possible Idea
- Activity 27 – Pre-Project Survey
- Activity 28 – The Powers of Ten
- Activity 29 – SCAMPER
- Activity 30 – Design Studio
- Activity 31 – Forced Connections
This is an updated version of a post originally published in October 2017.

