Welcome to our series on Design Thinking methods and activities. You’ll find a full list of posts in this series at the end of the page.
Our next lesson tackles the most basic activity: Making an Affinity Map/Diagram.
| Primary Goal | To group matching ideas or concepts |
| When To Use | To quickly make sense of and identify themes of large amounts of information |
| Time Required | On average, 30-60 minutes (add or remove time depending on the amount of items in your list) |
| Number of Participants | 1 facilitator and 2-7+ participants or 1 person |
| Who Should Participate? | For anyone as a solo activity or the entire project team |
| Supplies | Large whiteboard or Post-it Tabletop Pad, Post-it notes, Sharpies, whiteboard markers |
Of all the activities reviewed so far, Affinity Mapping is probably the most simple and adaptable. Affinity Mapping (or Clustering, as it’s sometimes called) is merely a fancy name for grouping or putting like ideas together—an “apples go with oranges and carrots go with cucumbers” kind of thing.
It can help you to reveal common themes, goals, pain points, patterns, or concepts. This can be particularly helpful when you want to get ideas onto paper or whiteboard quickly with little framework needed.
We often make an Affinity Diagram/Map at the end of other activities. At Atomic, we typically use it after activities like Rose, Bud, Thorn. The other activities provide more rigorous structure, and Affinity Mapping wraps the information into a manageable bow. I think of it as a blunt tool because of its very fast and loose structure and quick synthesis.
I’m going to break this activity down into two sections: mapping on its own, and as a supplemental activity.
So let’s begin!
Affinity Mapping as Solo Activity
1. Prepare
For this activity, you’ll need only the basics—enough Post-it notes and Sharpie markers for each participant, whiteboard markers, and a large open whiteboard. It’s important to have a large writable surface where you can attach the Post-its because you’ll be writing group names around the clusters.
2. Brainstorm!
After you’ve passed out the writing materials, it’s time to jump to it. Make sure everyone understands the topic, and brainstorm ideas on Post-it notes for 10 minutes.
This is a heads-down activity. Read the room and move on to the next step if people pop up their heads and put down Sharpies before the 10 minutes are up. Conversely, if they are still furiously writing away as the timer is about to buzz, give them an extra minute or two.
This is about quantity, not quality. Participants should write down one idea per Post-it. Any and every idea, question, or concern is valid here. The point of a brainstorm is that all ideas are on the table.
And this is what makes Affinity Mapping so easy to use. It takes into account anything and everything. Other activities can sometimes be too specific in the ideas or concepts they are trying to explore. Affinity Mapping allows us to take everything into account, which is why I referred to it as a blunt tool. We’re not going for accuracy or quality here. We want all thoughts out of heads and visible for all to see.
3. Diagram/Map
Once the 10 minutes are up, have each participant read through each Post-it and stick it to the whiteboard. At this time, everyone can ask questions and clarify ideas.
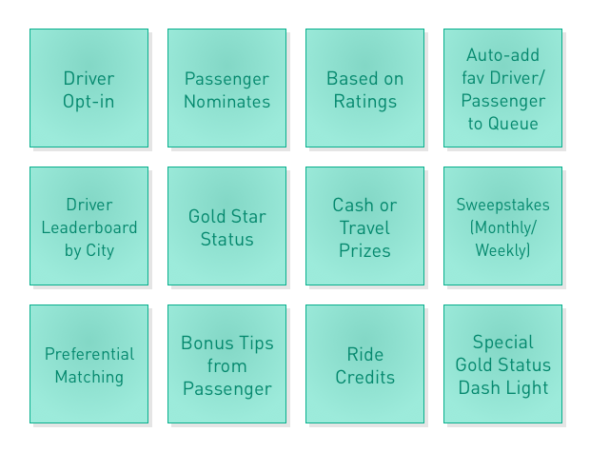
For our client example, I’ve used Lyft, the ride sharing app. The topic will be the Favorite Drivers program, which would reward top drivers financially. Here, all the Post-its have been placed on the whiteboard.
4. Group
Once all of the Post-its have been tracked, you as the facilitator will begin to group them together. You can relieve the group for 10 minutes as you work, or grab a partner or two and group together.
The point of this step is that like ideas should be grouped together. Once you’ve created a group, draw a circle around it and give it a name.
As you group, you may find that some groups have become too large. If a group grows beyond 6 Post-its, break it down into smaller groups. For example, if a group’s theme emerges as “Fruit” and contains 15 items, break it into smaller groups like “Citrus,” “Stone Fruit,” and “Tropical.”
Also, keep in mind that the groups you create initially may need to be adjusted later on. Don’t be afraid to constantly break and re-group Post-its. Half the fun of the activity is seeing different themes and groups emerge.
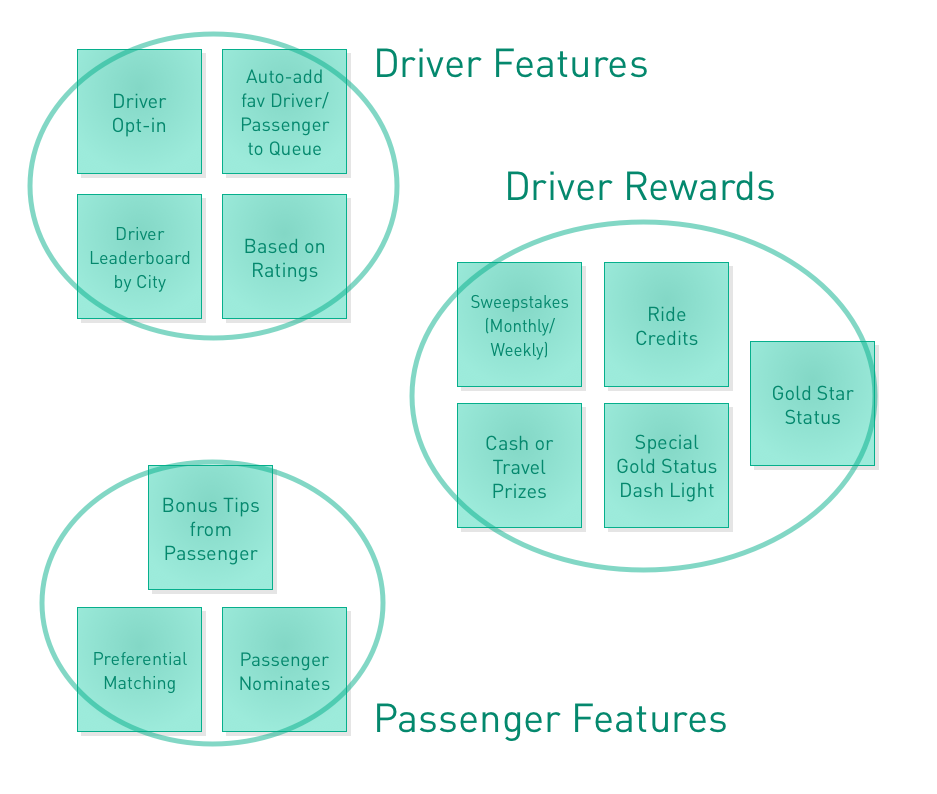
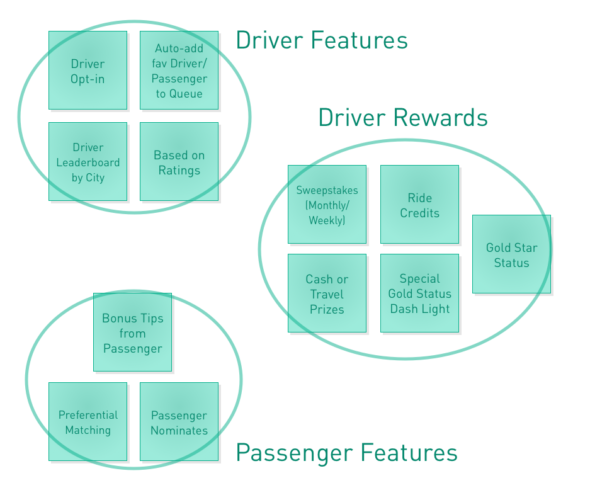
Here’s how the Favorite Driver program was grouped:
Affinity Mapping as Supplemental Activity
1. Prep & run activity
We often use Affinity Mapping as a tool at the end of another activity like Rose, Bud, Thorn or P.O.E.M.S. It’s especially helpful when you’re trying to make sense of user feedback or any other activity that produces a lot of material.
Run your first activity as you always would. It may be that the activity wasn’t completed on Post-its. If that’s the case, it’s helpful to organize the output by placing each idea onto a Post-it as a means of better synthesizing the activity.
2. Group
Now take the Post-its from that activity and group them into like segments, the same as you did in Step 4 above.
3. Wrap-up
Once you have organized each group, synthesize them into a spreadsheet or document that you can share with your client. It could be that you prioritize which groups are most important to tackle first or use them as a way to create a plan of action.
Atomic’s Design Thinking Toolkit
- What Is Design Thinking?
- Your Design Thinking Supply List
- Activity 1 – The Love/Breakup Letter
- Activity 2 – Story Mapping
- Activity 3 – P.O.E.M.S.
- Activity 4 – Start Your Day
- Activity 5 – Remember the Future
- Activity 6 – Card Sorting
- Activity 7 – Competitors/Complementors Map
- Activity 8 – Difficulty & Importance Matrix
- Activity 9 – Rose, Bud, Thorn
- Activity 10 – Affinity Mapping
- Activity 11 – Speed Boat
- Activity 12 – Visualize The Vote
- Activity 13 – Hopes & Fears
- Activity 14 – I Like, I Wish, What If
- Activity 15 – How to Make Toast
- Activity 16 – How Might We…?
- Activity 17 – Alter Egos
- Activity 18 – What’s On Your Radar?
- Activity 19 – The Perfect Morning
- Activity 20 – 2×3
- Activity 21 – How Can I Help…?
- Activity 22 – Cover Story
- Activity 23 – Crazy 8s
- Activity 24 – Abstraction Ladder
- Activity 25 – Empathy Map
- Activity 26 – Worse Possible Idea
- Activity 27 – Pre-Project Survey
- Activity 28 – The Powers of Ten
- Activity 29 – SCAMPER
- Activity 30 – Design Studio
- Activity 31 – Forced Connections
This is an updated version of a post originally published in May 2018.